My sisters asked me to make a small box to bury some of my Mom's ashes next to my Dad's burial site. I decided to make a "box" out of aluminum since I had a block of aluminum sitting in my metal box that was approximately 2" X 2 1/2" X 3" in size.
I did not square the block, but instead just finished all sides on the South Bend lathe using the four-jaw chuck and aluminum soft-jaws. I then cut the block on a line about 1/2" below one end with the band saw. Unfortunately, the block was not sitting square or was not held tightly enough in the vise and the cut wandered off line. I then faced both parts until square on the lathe losing most material from the bottom.
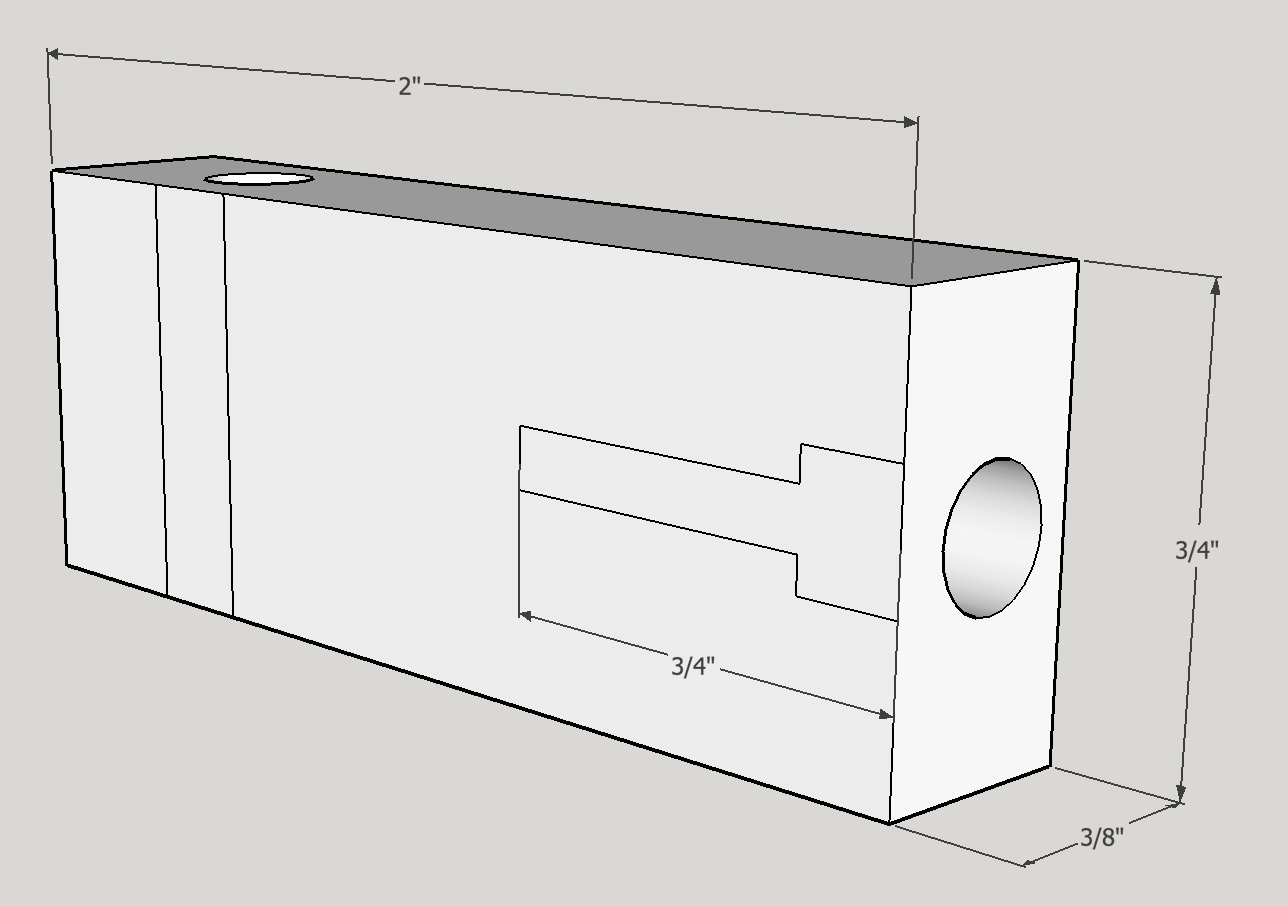
In order to bore the holes in the top and bottom I needed to center the blocks in the four-jaw chuck. Consequently, I needed a fixture to hold the dial indicator in the cross slide. I found a piece of 3/8" aluminum that was about 2" long. This was cut in half leaving a piece that was about 3/4" in width. I squared this up using the angle plate on the mill with a two insert cutter. I then drilled two holes. One was drilled at one end through the 3/4" width and the other was drilled in from the opposite end. The first was threaded and the second was first clearance drilled and then threaded. Both were threaded 10-32. This fit nicely in the lantern tool post with the original washer under it. The indicator is not on center, but for this work it sufficed.
The dial indicator came with a separate back plate with a tab/hole for attaching. Unfortunately, the dial indicator so fitted no longer fits in the case it came in!?! Not the best planning on the part of the Chinese manufacturer.
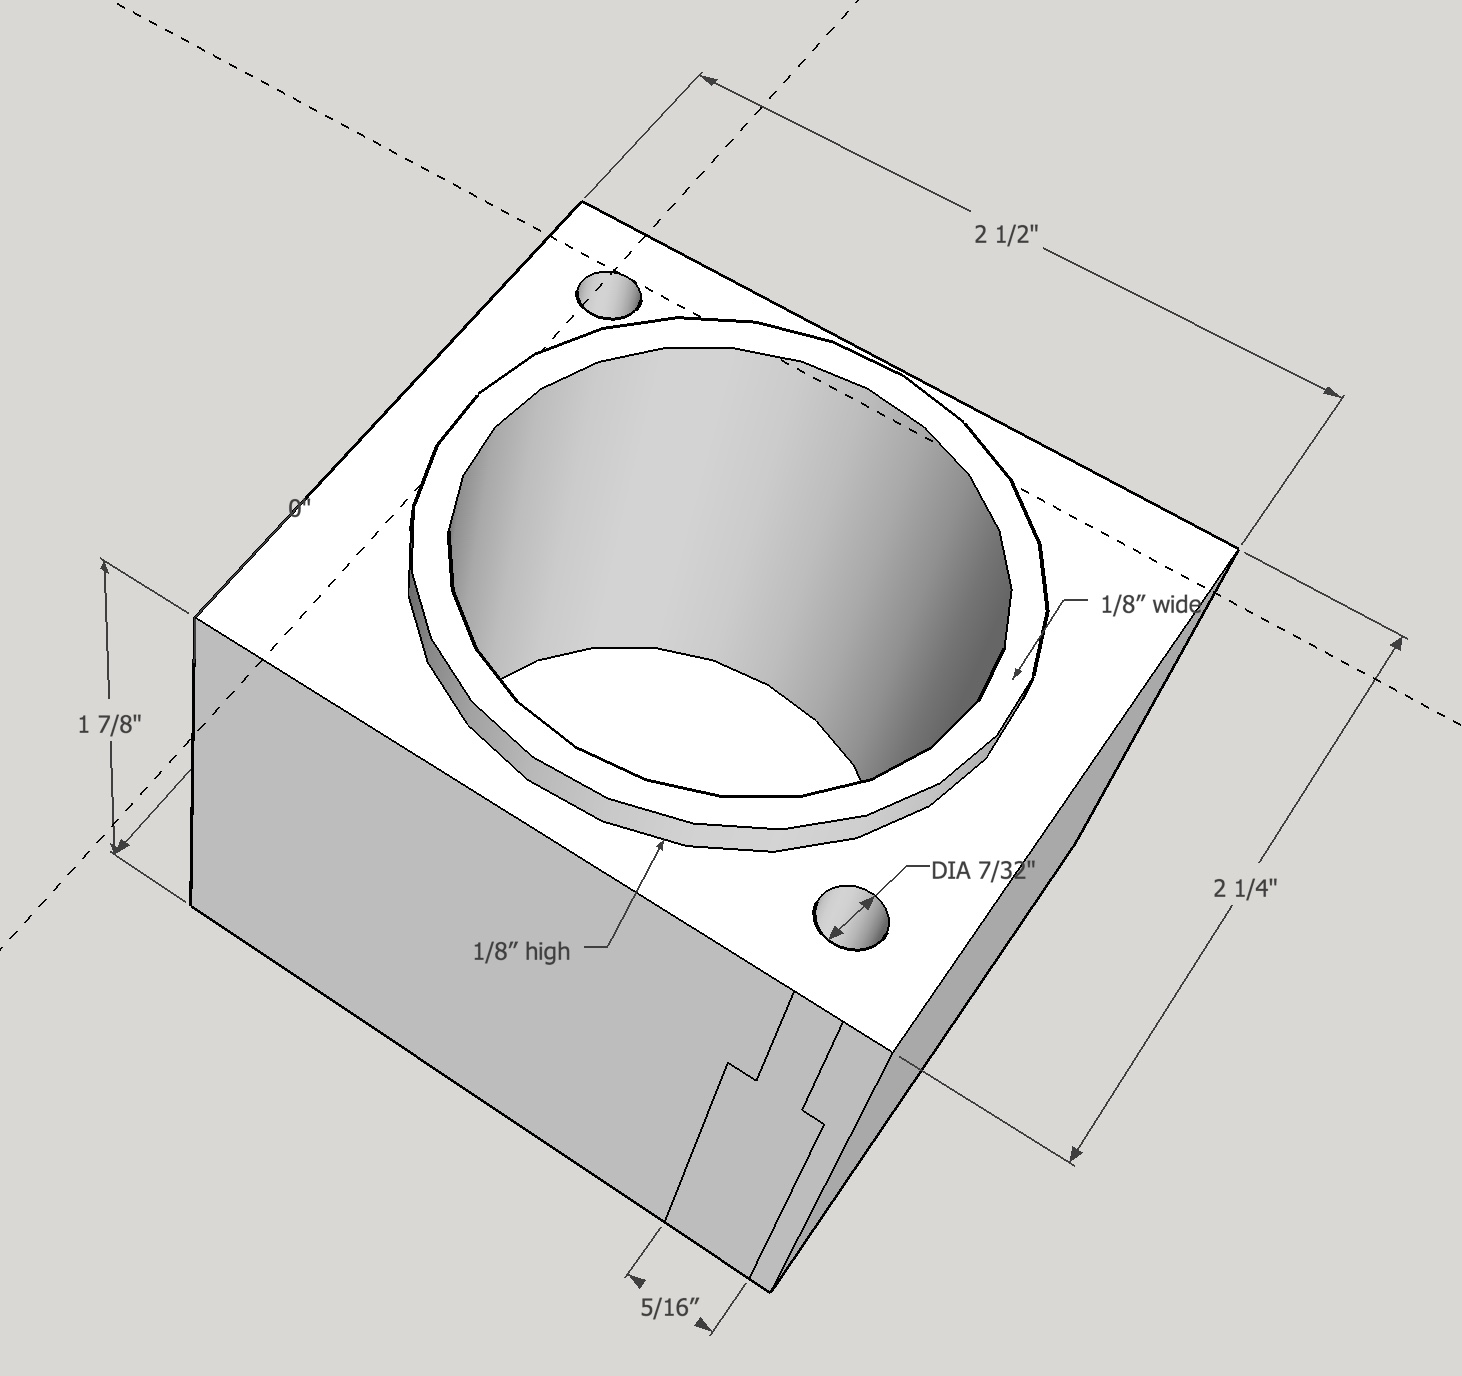
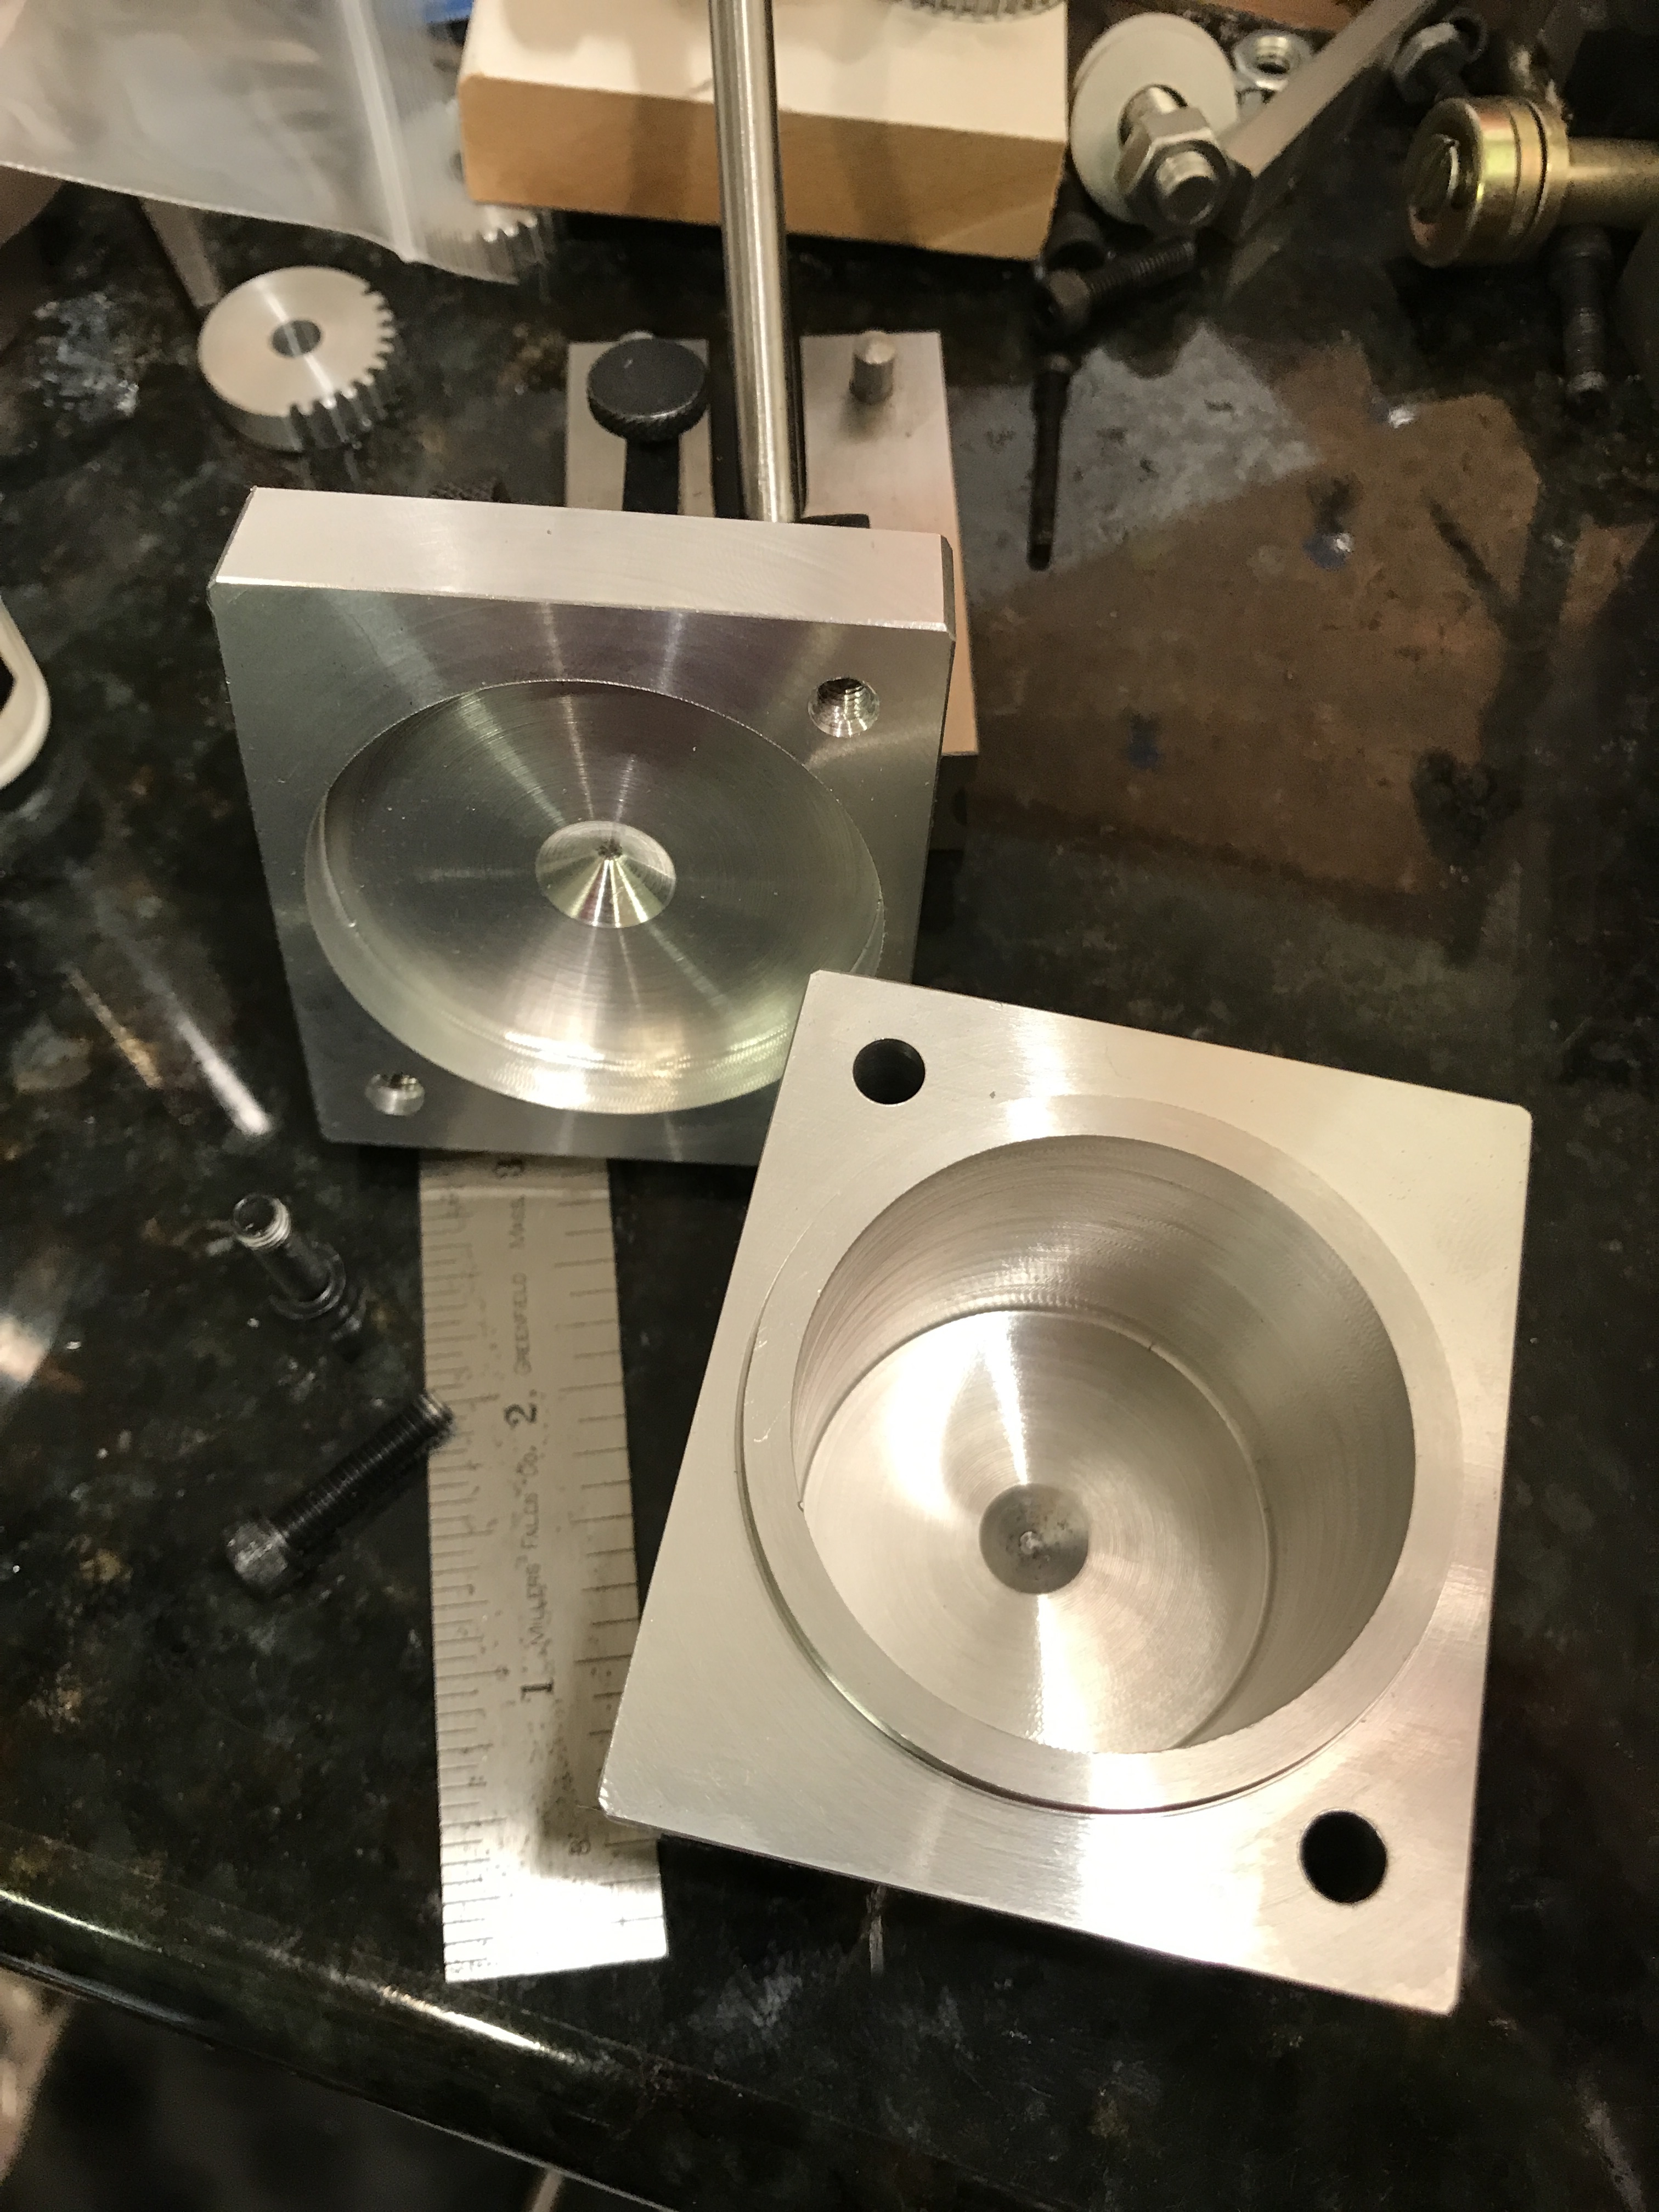
After centering the bottom block in the four-jaw chuck with soft jaws installed it was center drilled and then drilled up to 1/2" to a depth of 2"; about ~1/4" from the bottom. I had recently purchased a new boring bar for the South Bend and this was the perfect opportunity to try it out. I needed some way of holding it with the lantern tool post. The bar has a flat top side and is 0.375" in diameter. So I carefully measured the height of the cutting tip above the bottom of the bar by setting it across a vee block of known height. It was slightly (0.007") shy of 3/16". I took a 1 1/2" length of 2" steel round bar and cleaned it up in the lathe. I drilled it to 7/8" to fit the lantern tool post.
A number of the large drill bits recently purchased and used in this progressive drilling were quite dull and need to be sharpened.
I then carefully located the end and the sides on the mill and drilled a hole 1.082" from one end. This should put the tip on the center height (1.075"). The hole was drilled to 3/8" and was a nice sliding fit with the bar. Placing the washer on the tool post, sliding the boring bar in, and tightening the screw led to a satisfying if slow boring operation. I removed about 0.015" per pass with a reasonable feed rate. The last pass was only 0.005" with a slower feed rate leaving a nice finish. The bottom may need some kind of sanding.
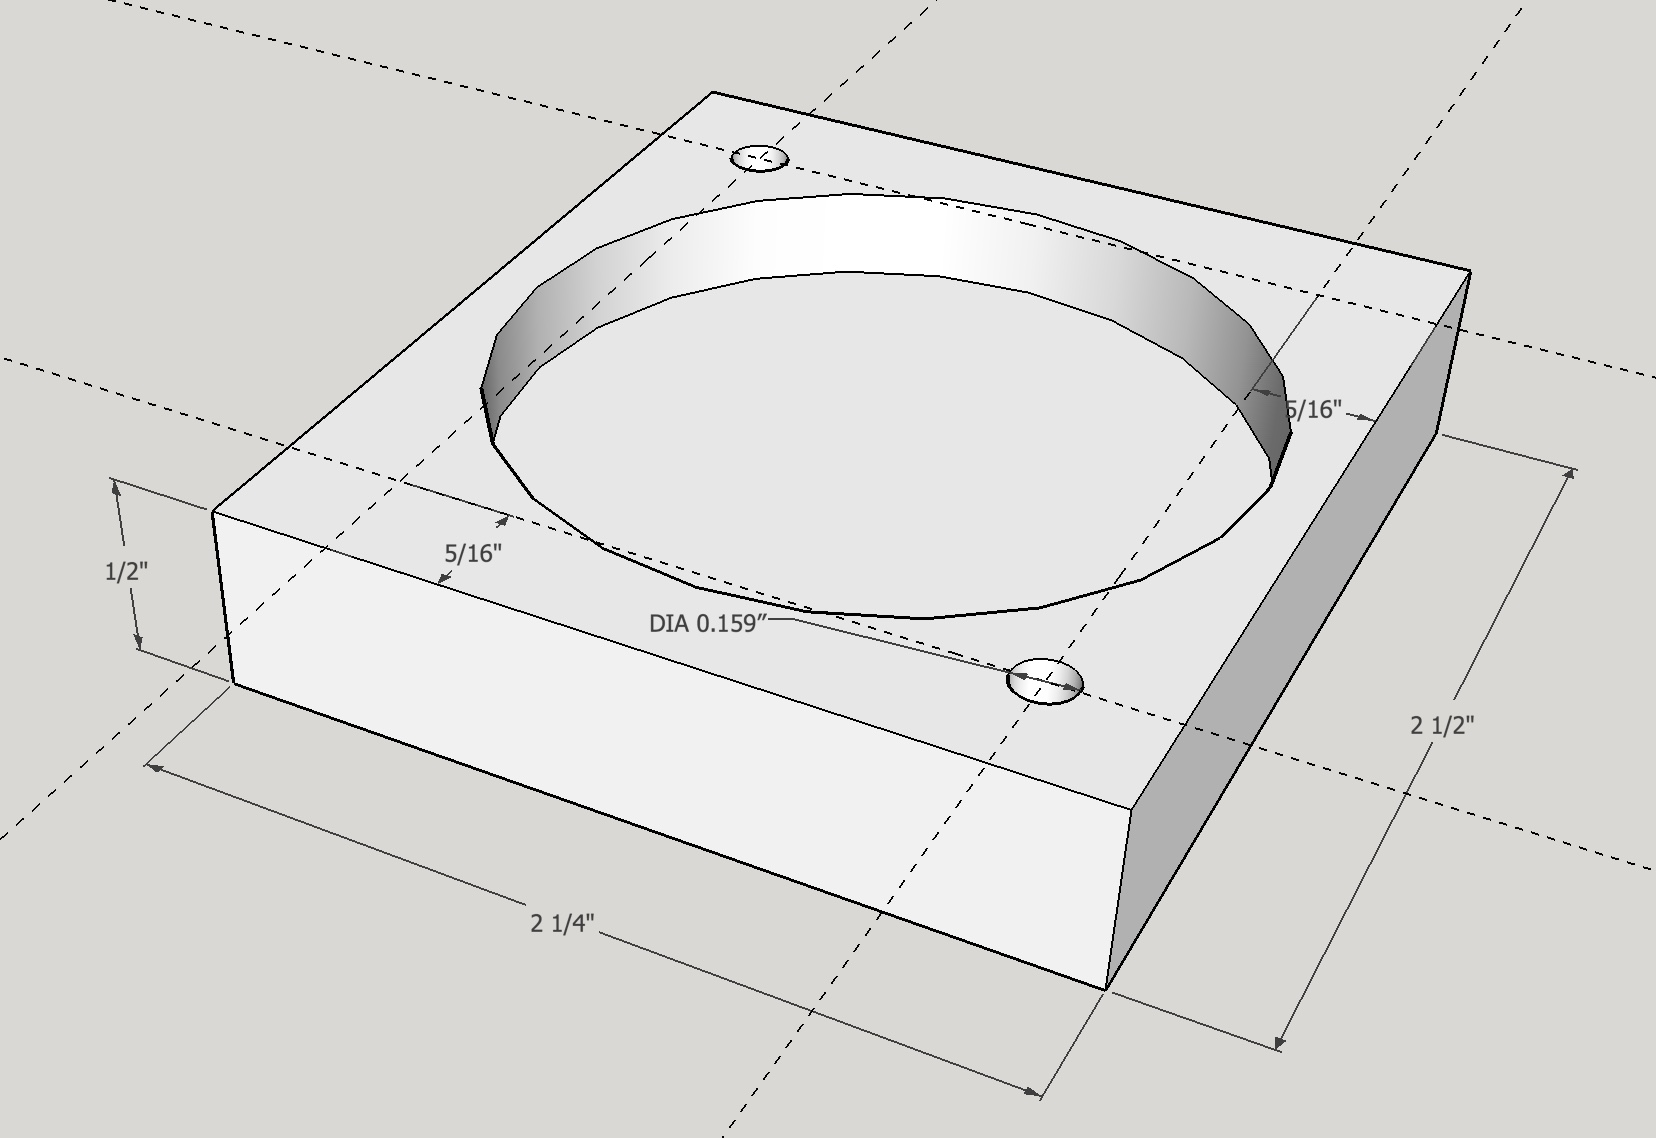
A 1/8" lip was then cut in the bottom by removing material in a facing fashion from the square block. After bring the lip to the correct dimensions about 0.005" was removed from the side of the lip to clean it up. The bottom is complete, unless I decide to "seal" the lid with some screws from the bottom side of the box.
Damn!!! Broke off the tip of the spotting drill bit in the aluminum top when beginning to drill and bore. Will attempt to make a tiny hole saw to cut out the broken tip. The tip is 0.060" wide so will make the hole saw 1/16" ID and 1/8" OD from drill rod. The hole saw won't work as I have no way to cut the teeth, so went to the Dremel with a grinding tool equipped and was able to grind off the drill bit.
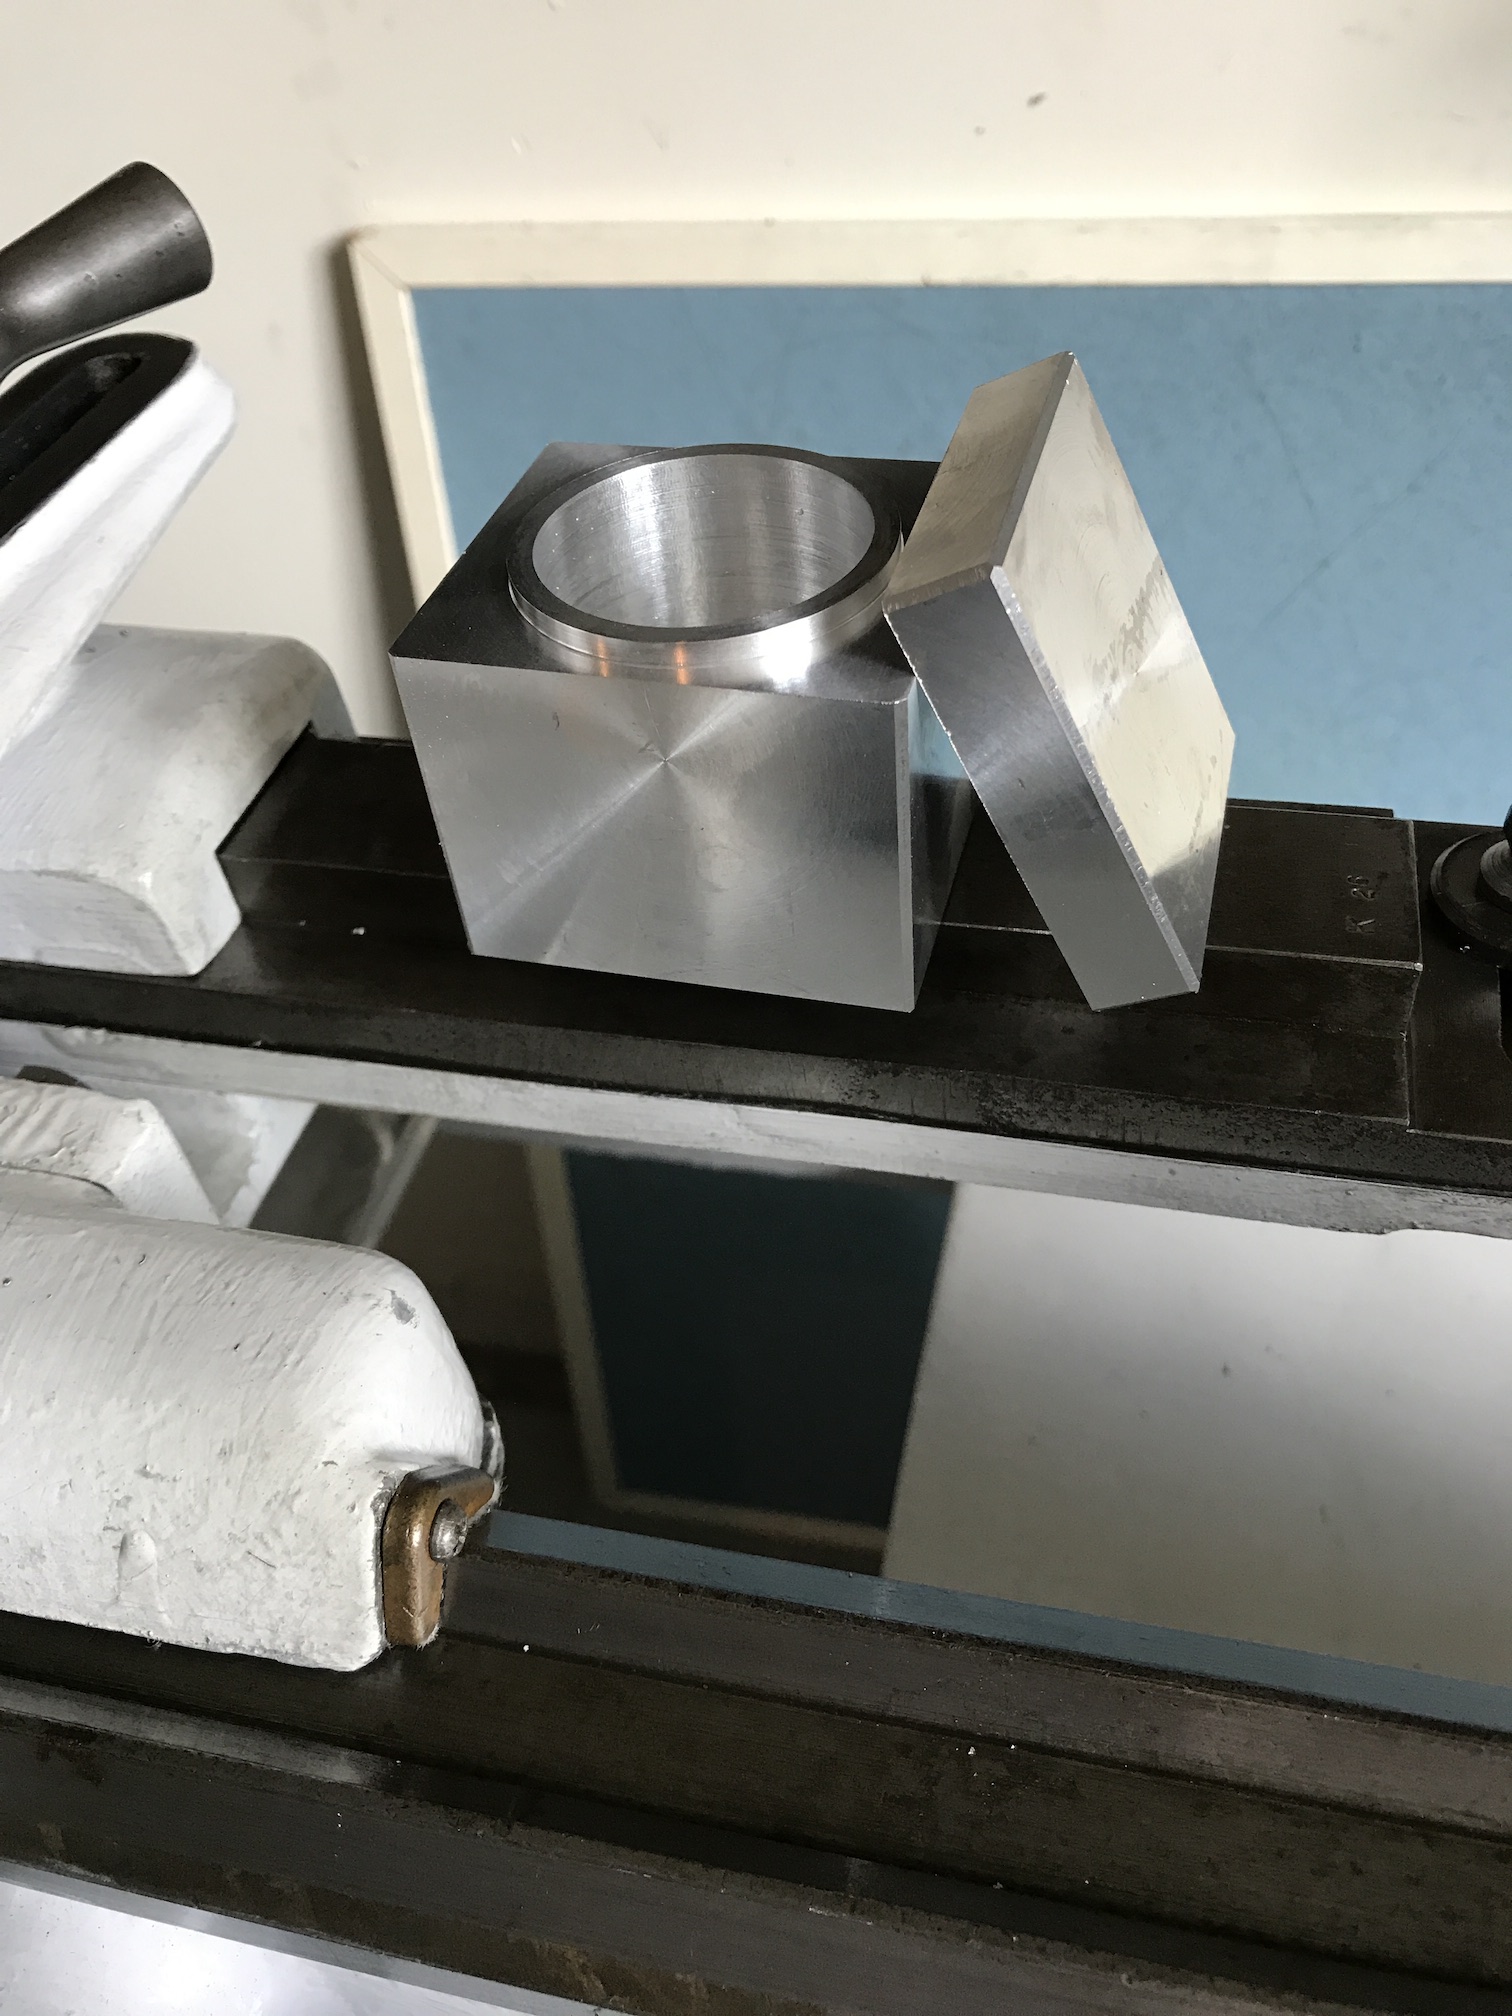
After grinding off the drill bit drilled with a 1/2" drill to a depth of about 1/4". Then opened the hole with the boring tool to approximately the right OD. Then carefully completed the opening to fit the lip of the bottom of the box. It is a nice fit with very little play.
Decided to "close" the box with two screws. The box and lid were clamped upside down against an angle plate with one strap clamp. The back and side were found and the table was moved 5/16" in both directions to position the spindle in position for drilling. After spotting with a center drill a #21 drill bit was used to drill a hole 2.25" deep. This was followed with a 7/32" through drill bit to a depth of 2" (or to the bottom of the lid). Finally, a 5/16" clearance drill was used to provide clearance for the screw head to a depth of 1 3/8". The hole in the top of the box was then tapped 10-32. Using a 1" screw the fit was good providing a nice tight clamp. The drilling and tapping was then repeated on the opposite corner with a screw in place in the first hole. After cleaning out the chips both screws fit nicely holding the top in alignment with the bottom of the box.
I have decided how to best decorate the reliquary. The top will feature an engraved four-leaf clover. The four sides will each have one of the four words, "Love, Inquire, Care, Passion" inscribed in a scroll border (yet to be defined). The bottom will have "Deloris Ann McDonald 1931 - 2017" engraved on it. A little practice work on a scrap of aluminum demonstrated the feasibility of both the clover and the text with the font "Calileo" from LetterheadFonts.com.
According to Rhea via Jeopardy the four leaves on a four leaf clover represent faith, hope, love, and luck. I don't see faith or hope as big in my image of Dorie.

Engraved the four leaf clover on the top first. Then all four sides and the top face of the top were sanded with 400, 600, 1000, 1500 grit sandpaper. A polishing wheel was installed in the old drill press and charged with green polish. Just a small amount was sufficient or black streaks would appear after the engraved letters. A light touch led to a nice gloss.
Sketched out the words and borders to be used on the sides of the reliquary on graph paper. Compared the sizes of the sketched letters with the space on the reliquary. The letters drawn 7/16" high (upper case) seemed to fit the bst. Lower case letters were drawn 19/64" high or about 2/3 of the UC height. With the lid on the words should look slightly above center, so set the bottom of the words at 1 1/8" from the bottom. Used a wax (?) pencil to coat one side of the box bottom. Then copied the words from the graph paper to the reliquary. One side was done at a time. Also added a border for the upper right and the lower left of the word. Constant reference to the Calileo font online was necessary to get the letters to have some semblance of accuracy. The letters were then engraved by hand with a 120° graver. This process was repeated for "Love", "Care", "Inquire", and "Passion".
The bottom's bottom was left to engrave last. Since there was so much text to engrave the font needed to be even smaller. Decided that three lines of text 5/16" high (UC) with a 1/10" separation seemed reasonable. "Deloris Ann" was on the first line, followed by "McDonald" on the second, and "1931-2017" on the third. Again, the letters were sketched out on graph paper and then copied to the wax covered aluminum. After engraving all of the letters I realized that I had inadvertently changed 1930 to 1931!!
Mike Dubber stressed double checking spelling when engraving letters. Clearly this includes checking dates!
The mistake was corrected by drilling out a 0.375" hole with a series of drills followed by a 3/8" reamer. A plug was made on the lathe from a 1/2" round bar of aluminum. It was faced, reduced to 0.377", the end chamfered, and parted off at 0.321". (The bottom of the reliquary was 0.321" thick.) The reliquary bottom was held in aluminum jaws in the large vise. A parallel was used against the plug which was started in the hole with the chamfered end as the soft jaw was not very flat. Tremendous force was needed to drive the plug only part way into the hole. I was unable to drive it all the way in. Clearly, hewing to Machinery's Handbook recommendation of 0.0005 to 0.001" would have been valuable. This left a proud plug in the bottom.
This plug was carefully sanded off on the drill press with a very coarse grained paper. This did a reasonable job using a "fence" tom minimize contact of the body with the abrasive. A few slips did result in some scratching of the surface. Sanding was completed to the level of the bottom with 120 grit paper by hand. Not all scratches could be removed. The plug could still be recognized, but not bad looking all in all. Finally, the "1" was engraved as well as the hyphen, which had been partially drilled out. A few of the letters and numbers needed some touching up with the graver. The bottom was then sanded and polished as above.
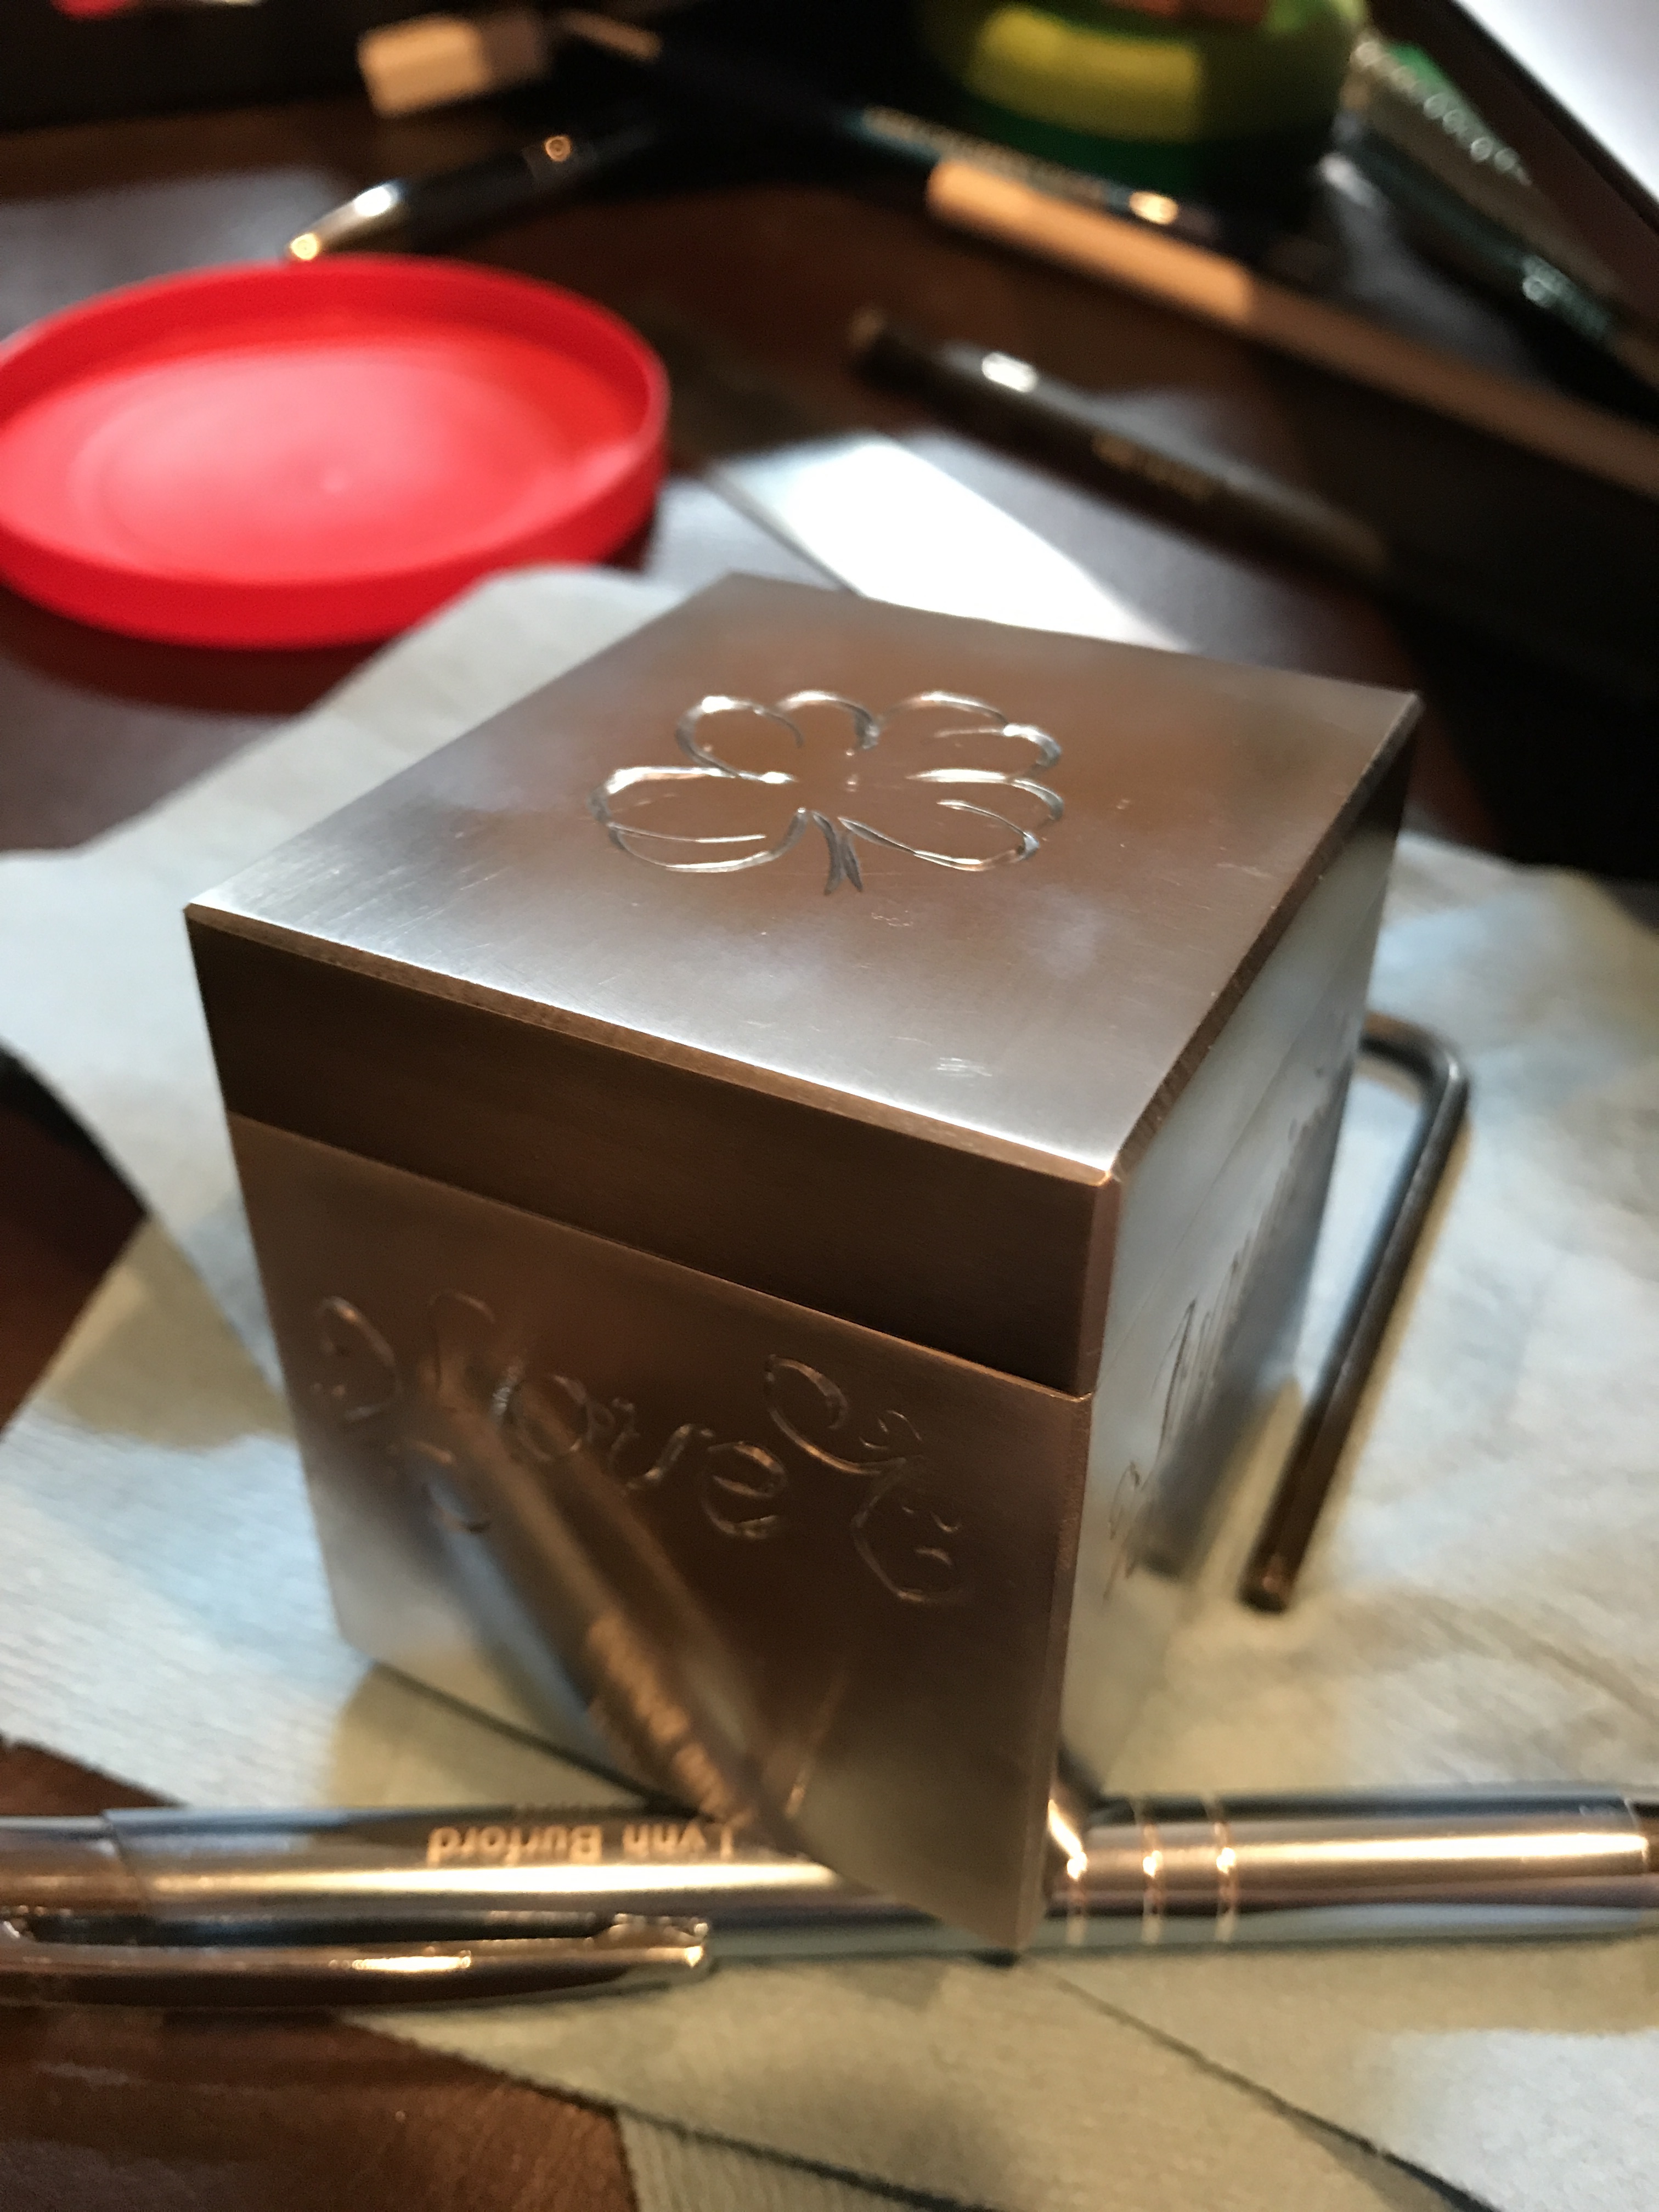
I notified my sisters that the reliquary was complete and sent them the picture above. They will provide a date for filling and eventual burial next to my father's grave.