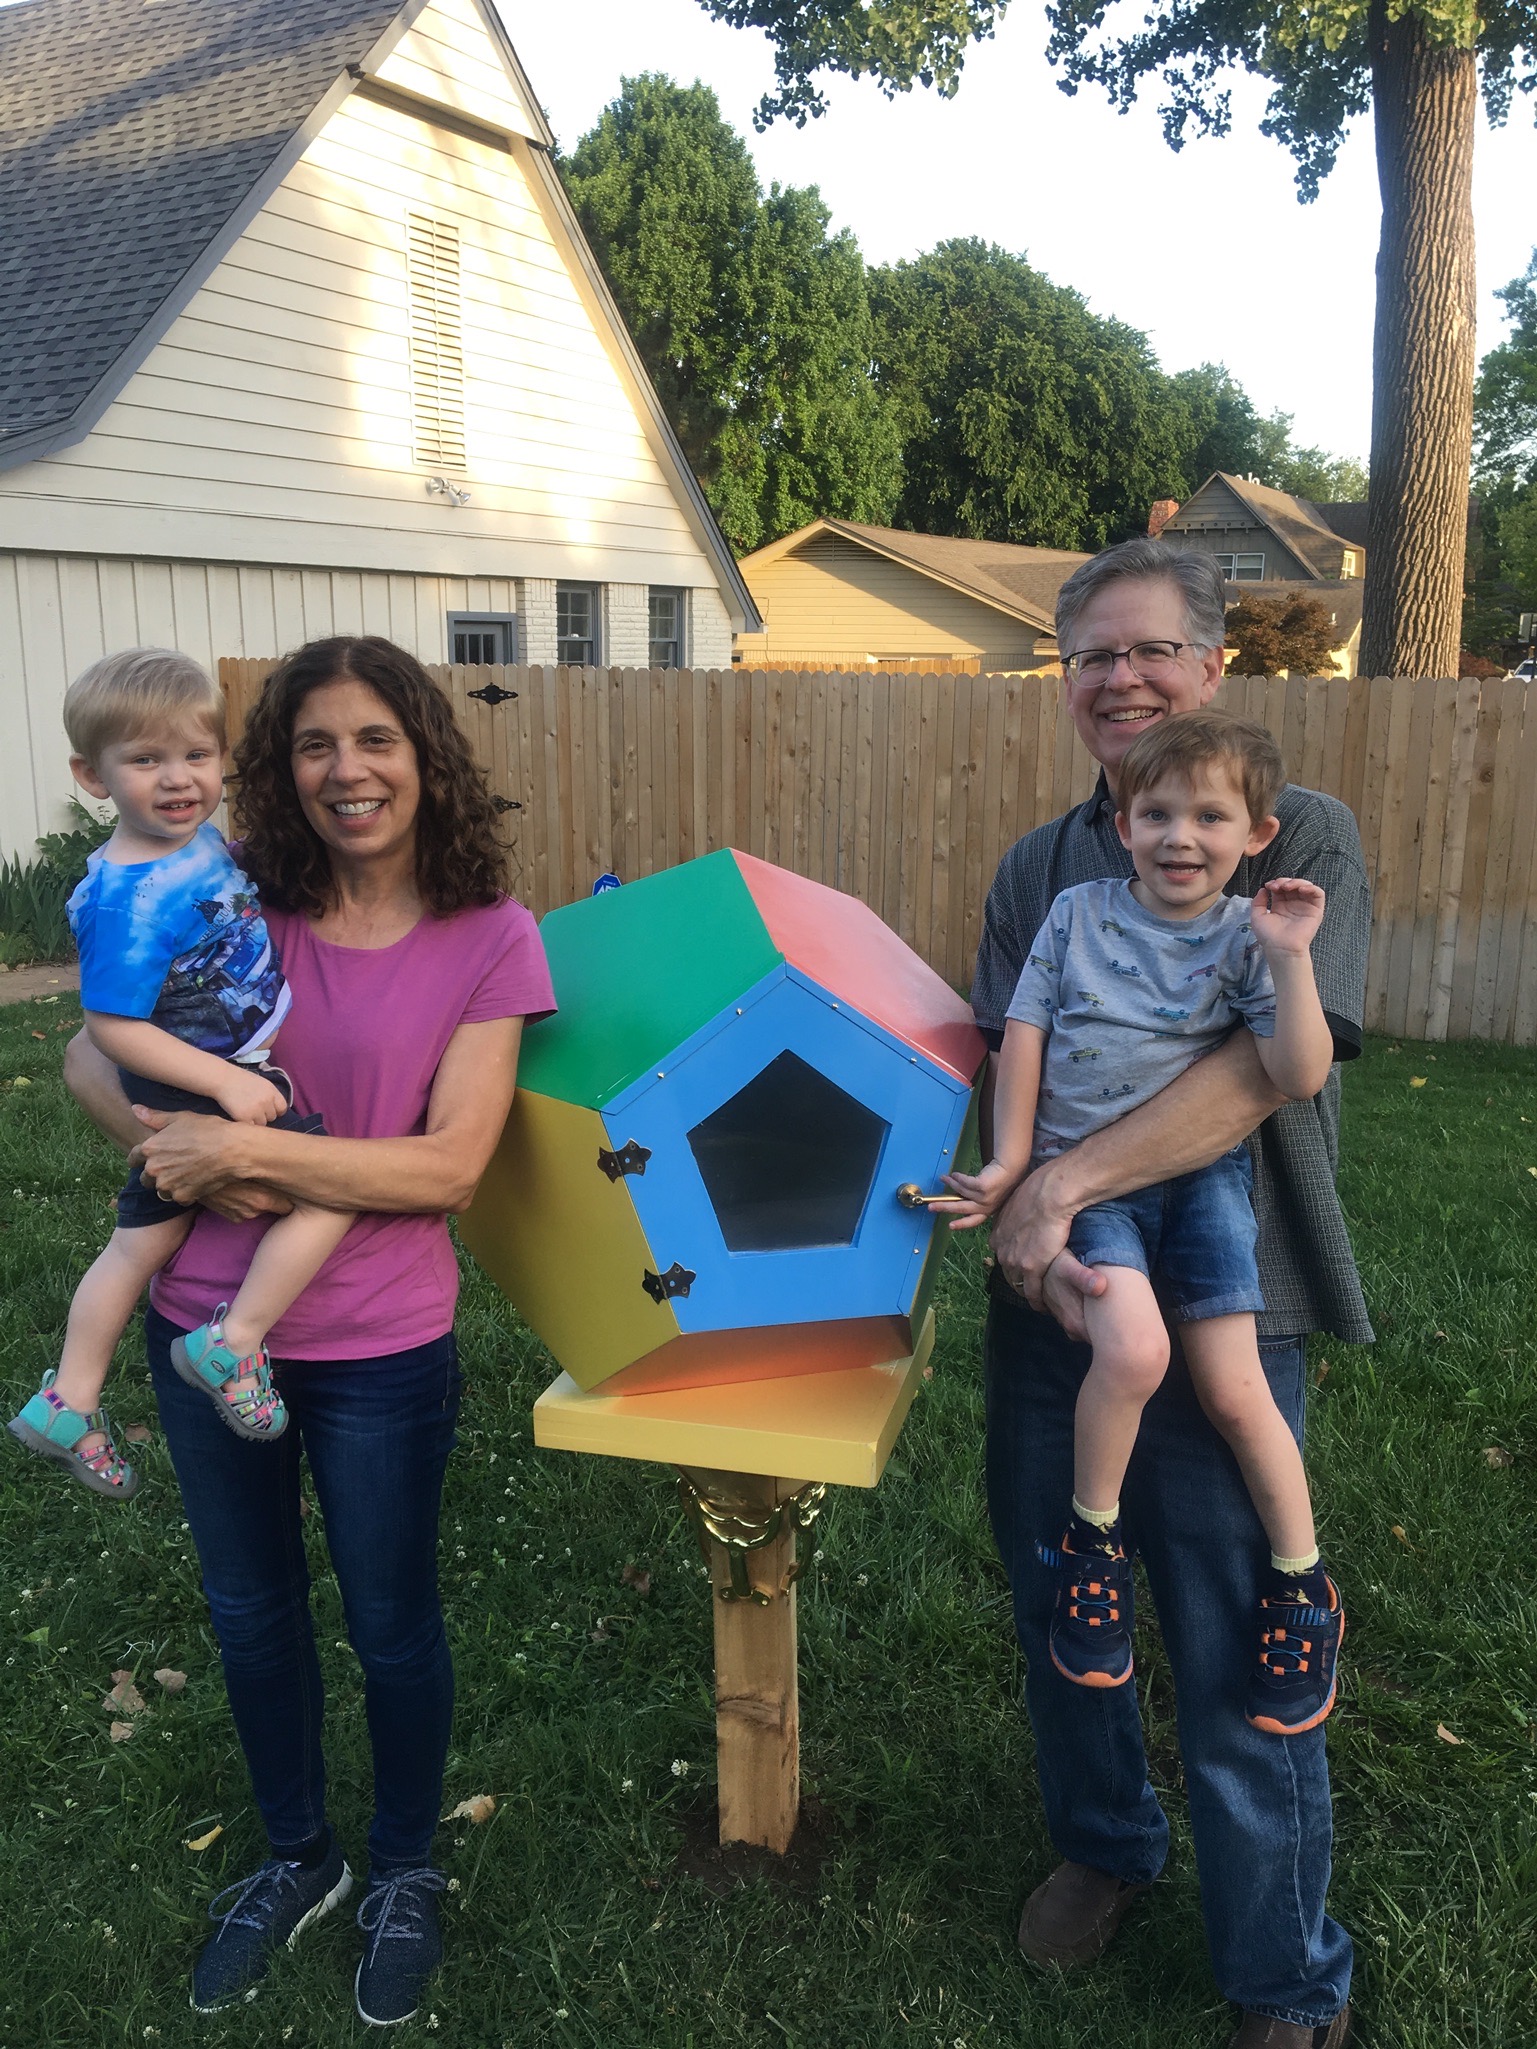
Michelle asked that I make a Little Free Library for their new yard. After looking around for some time and exploring multiple alternatives, I decided to make a dodecahedron for the library and decorate it with a math theme.

The dodecahedron will sit with a point on top and on bottom. This allows for a better position for the door. This will pose somewhat of a problem for attaching the library to the post. A cradle that fits the point will need to be made. The point is a vertex where three pentagons join. Making a cradle to fit this should be relatively straightforward.
Decorations for the dodecahedron will consist of various mathematically interesting pictures. The dodecahedron will be painted in four colors: the four color theorem. One side will feature the other four Platonic solids. There will be multiple visual proofs: 1/2 + 1/4 + 1/8 + ... = 1, 1 + 2 + 3 + ... + n = n(n+1), 1 + 3 + 5 + ... + 2n-1 = n2, 1/4 + 2/8 + 3/16 + 4/32 + ... = 1, 2nd proof that 1/2 + 1/4 + 1/8 + ... = 1. A number of visual proofs of the Pythagorean theorem are possibilities. A rotating proof of the Pythagorean theorem will also be attempted. It should be signed and dated on a bottom face. Euler's formula for the relationship of the number of edges, vertices, and faces, E + F - V = 2, should be included.
A dodecahedron is made of twelve regular pentagons. Some key mathematical parameters follow:
The wikipedia article on pentagons shows the most efficient tiling of the plane with pentagons, columns of pentagons shifted slightly relatively to one another. Consequently, 6 pentagons of side length 1' can be cut from a 4' X 4' sheet. Menards will ship a 4 X 8 sheet of Baltic Birch plywood to the store for about $60.
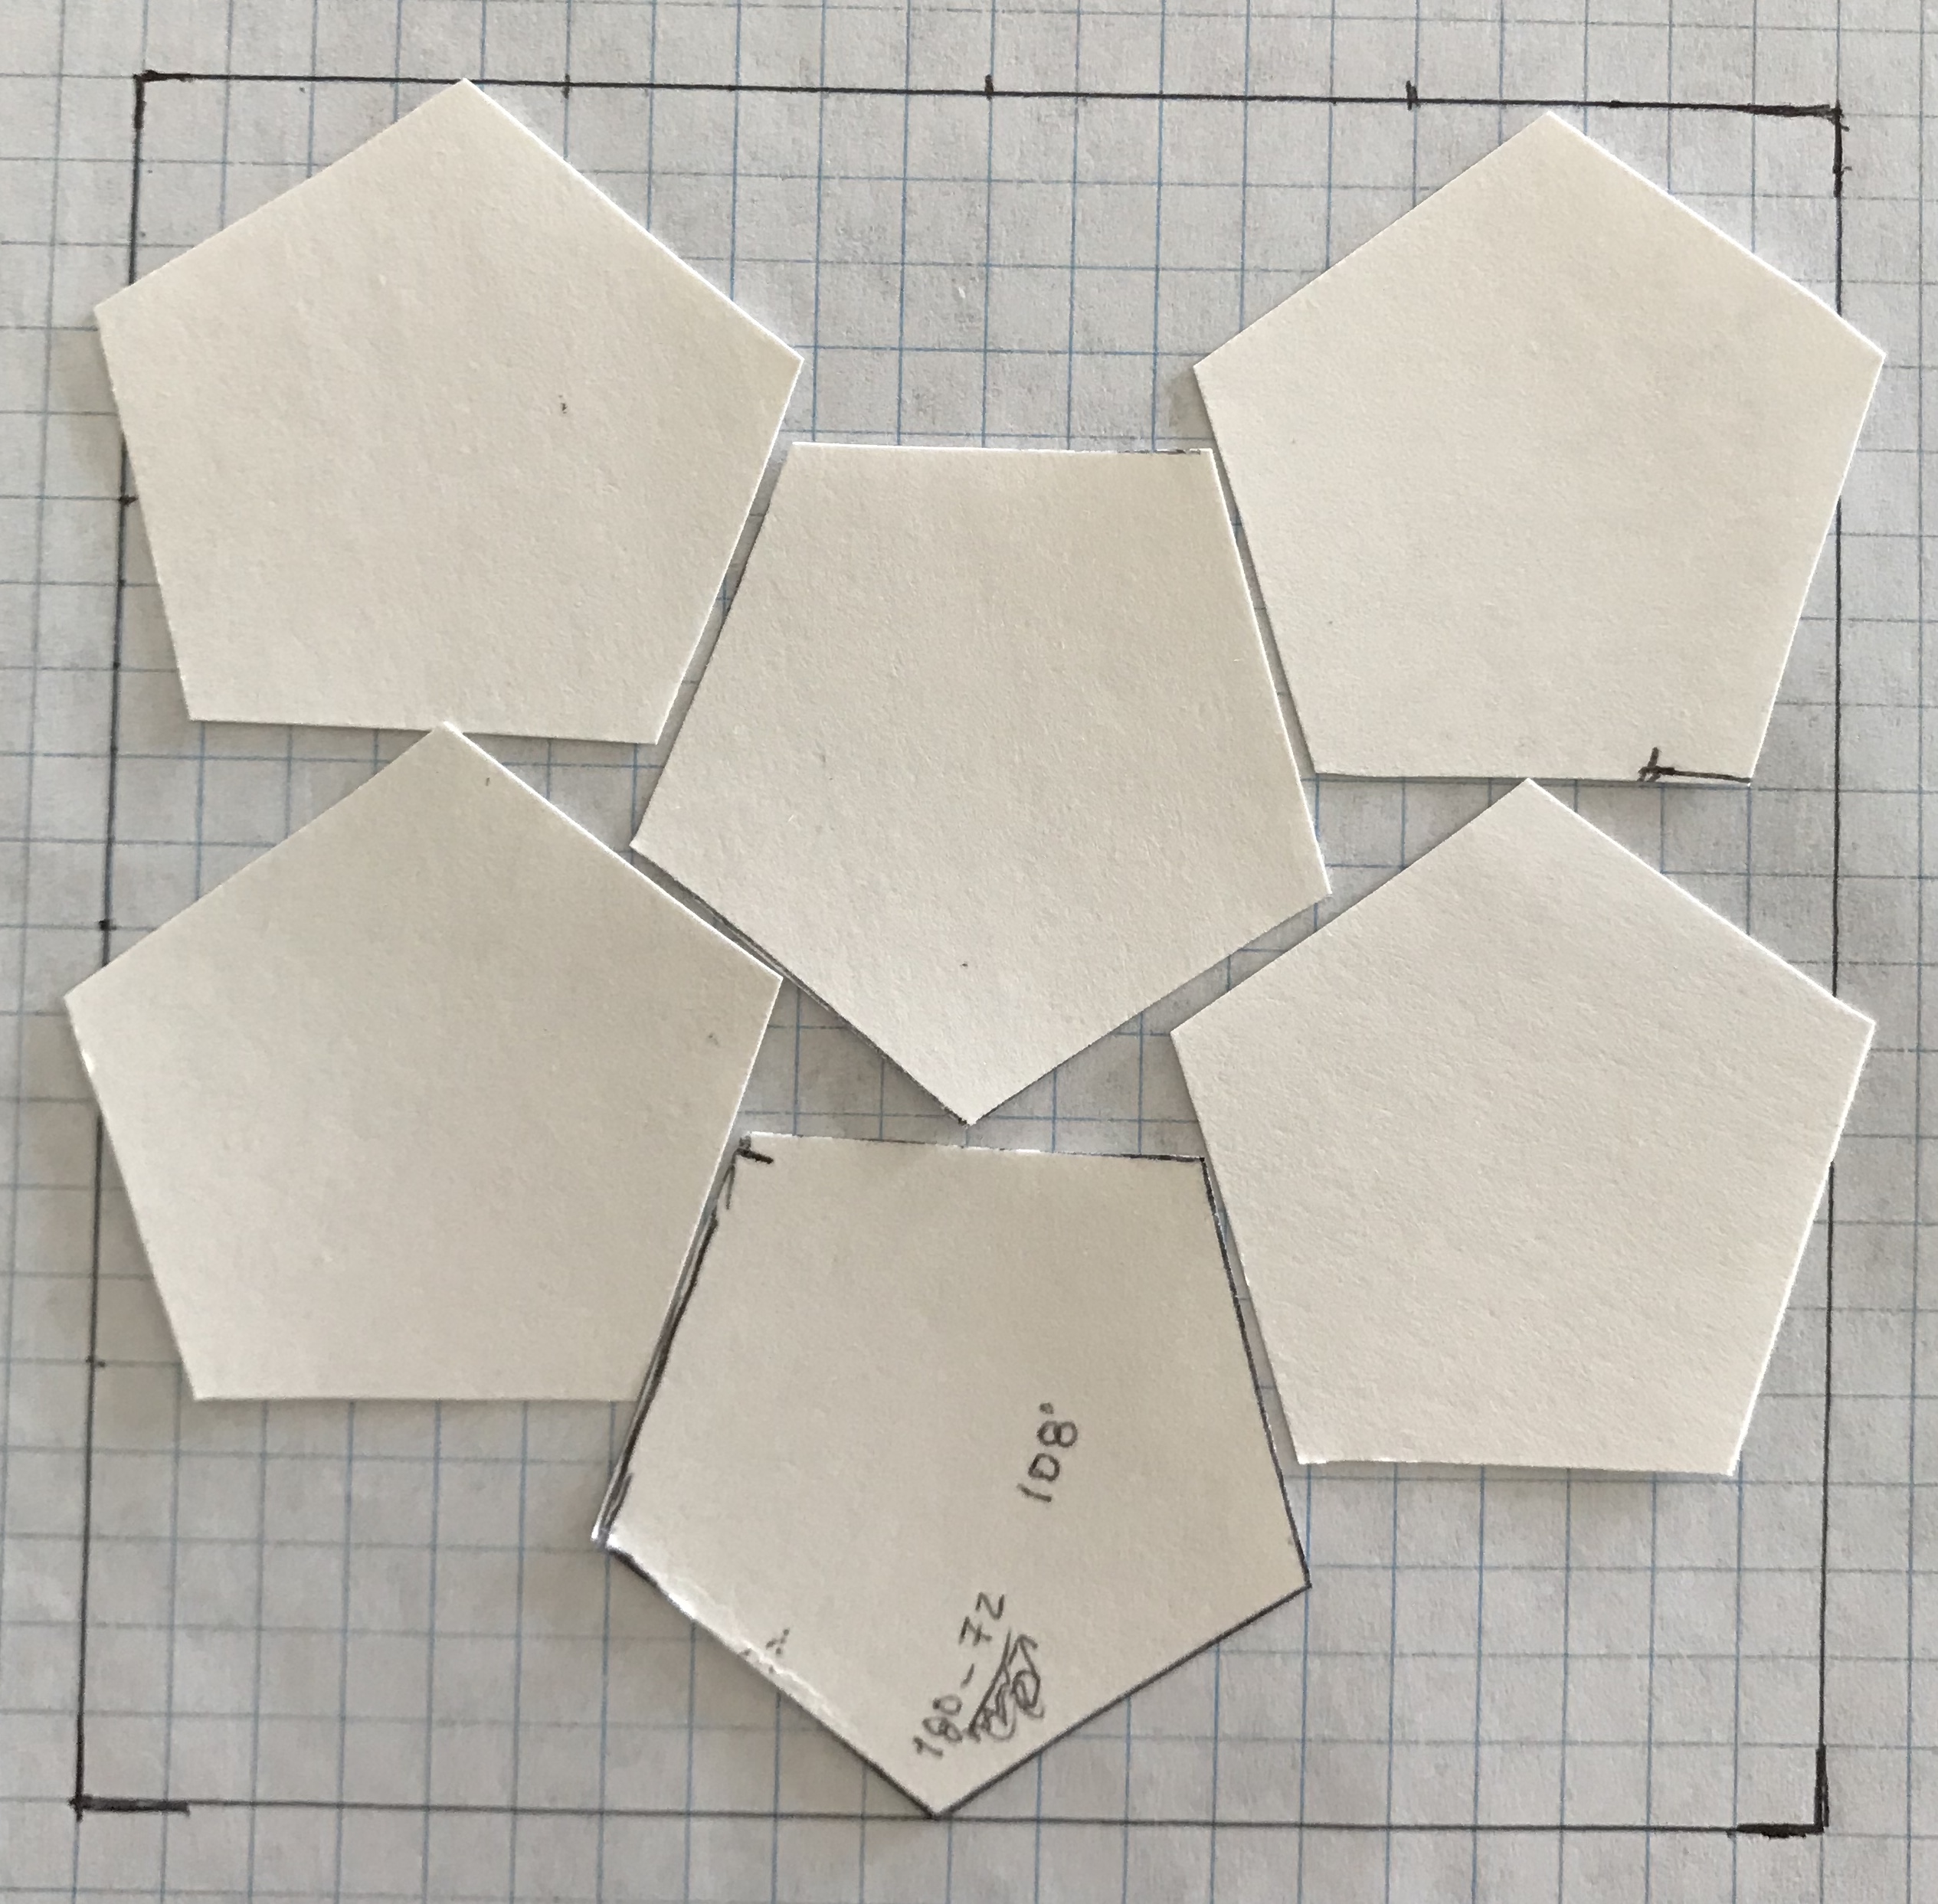
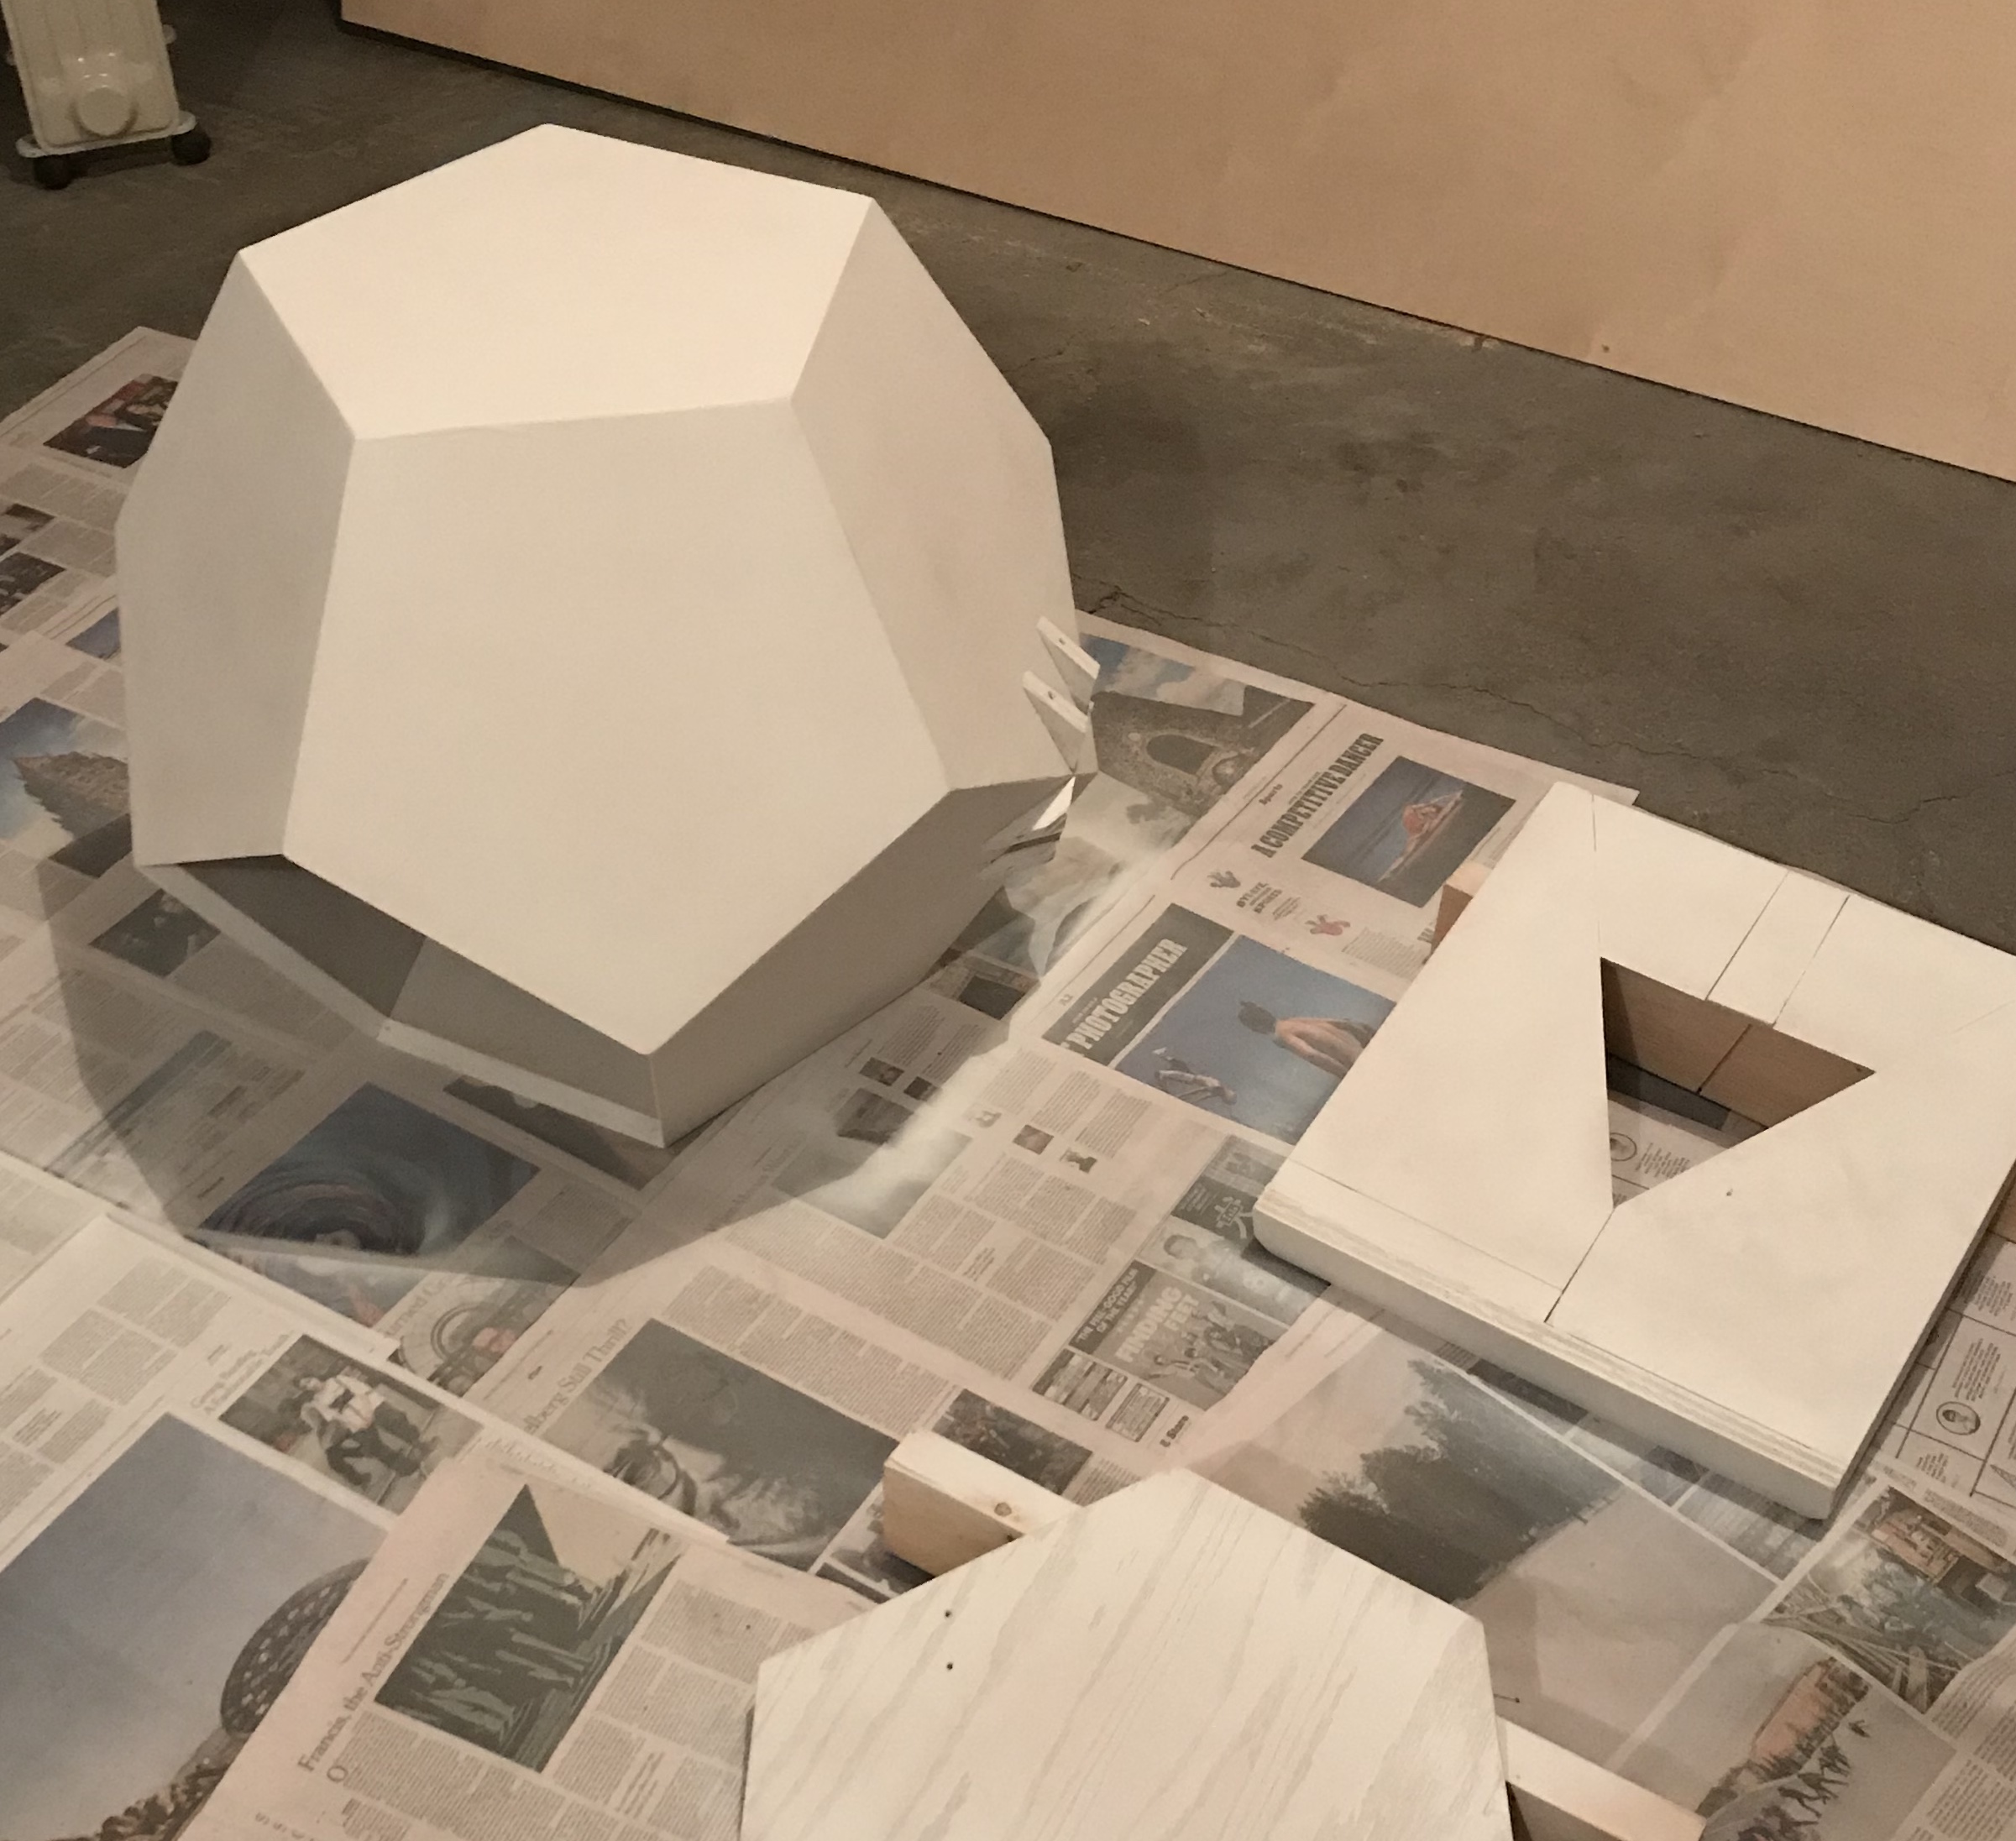
In order to be sure that this most efficient tiling will fit in a 4' X 4' square a set of six pentagons were made out of card stock with 1" long sides. These were fit into a 4" X 4" square on graph paper. The pentagons did not fit, the three pentagons across the width were about 2.4" too large. In addition it would be very difficult to cut these pentagons out even if the sides were shortened to 11". The picture below shows this tiling on the 4' square.
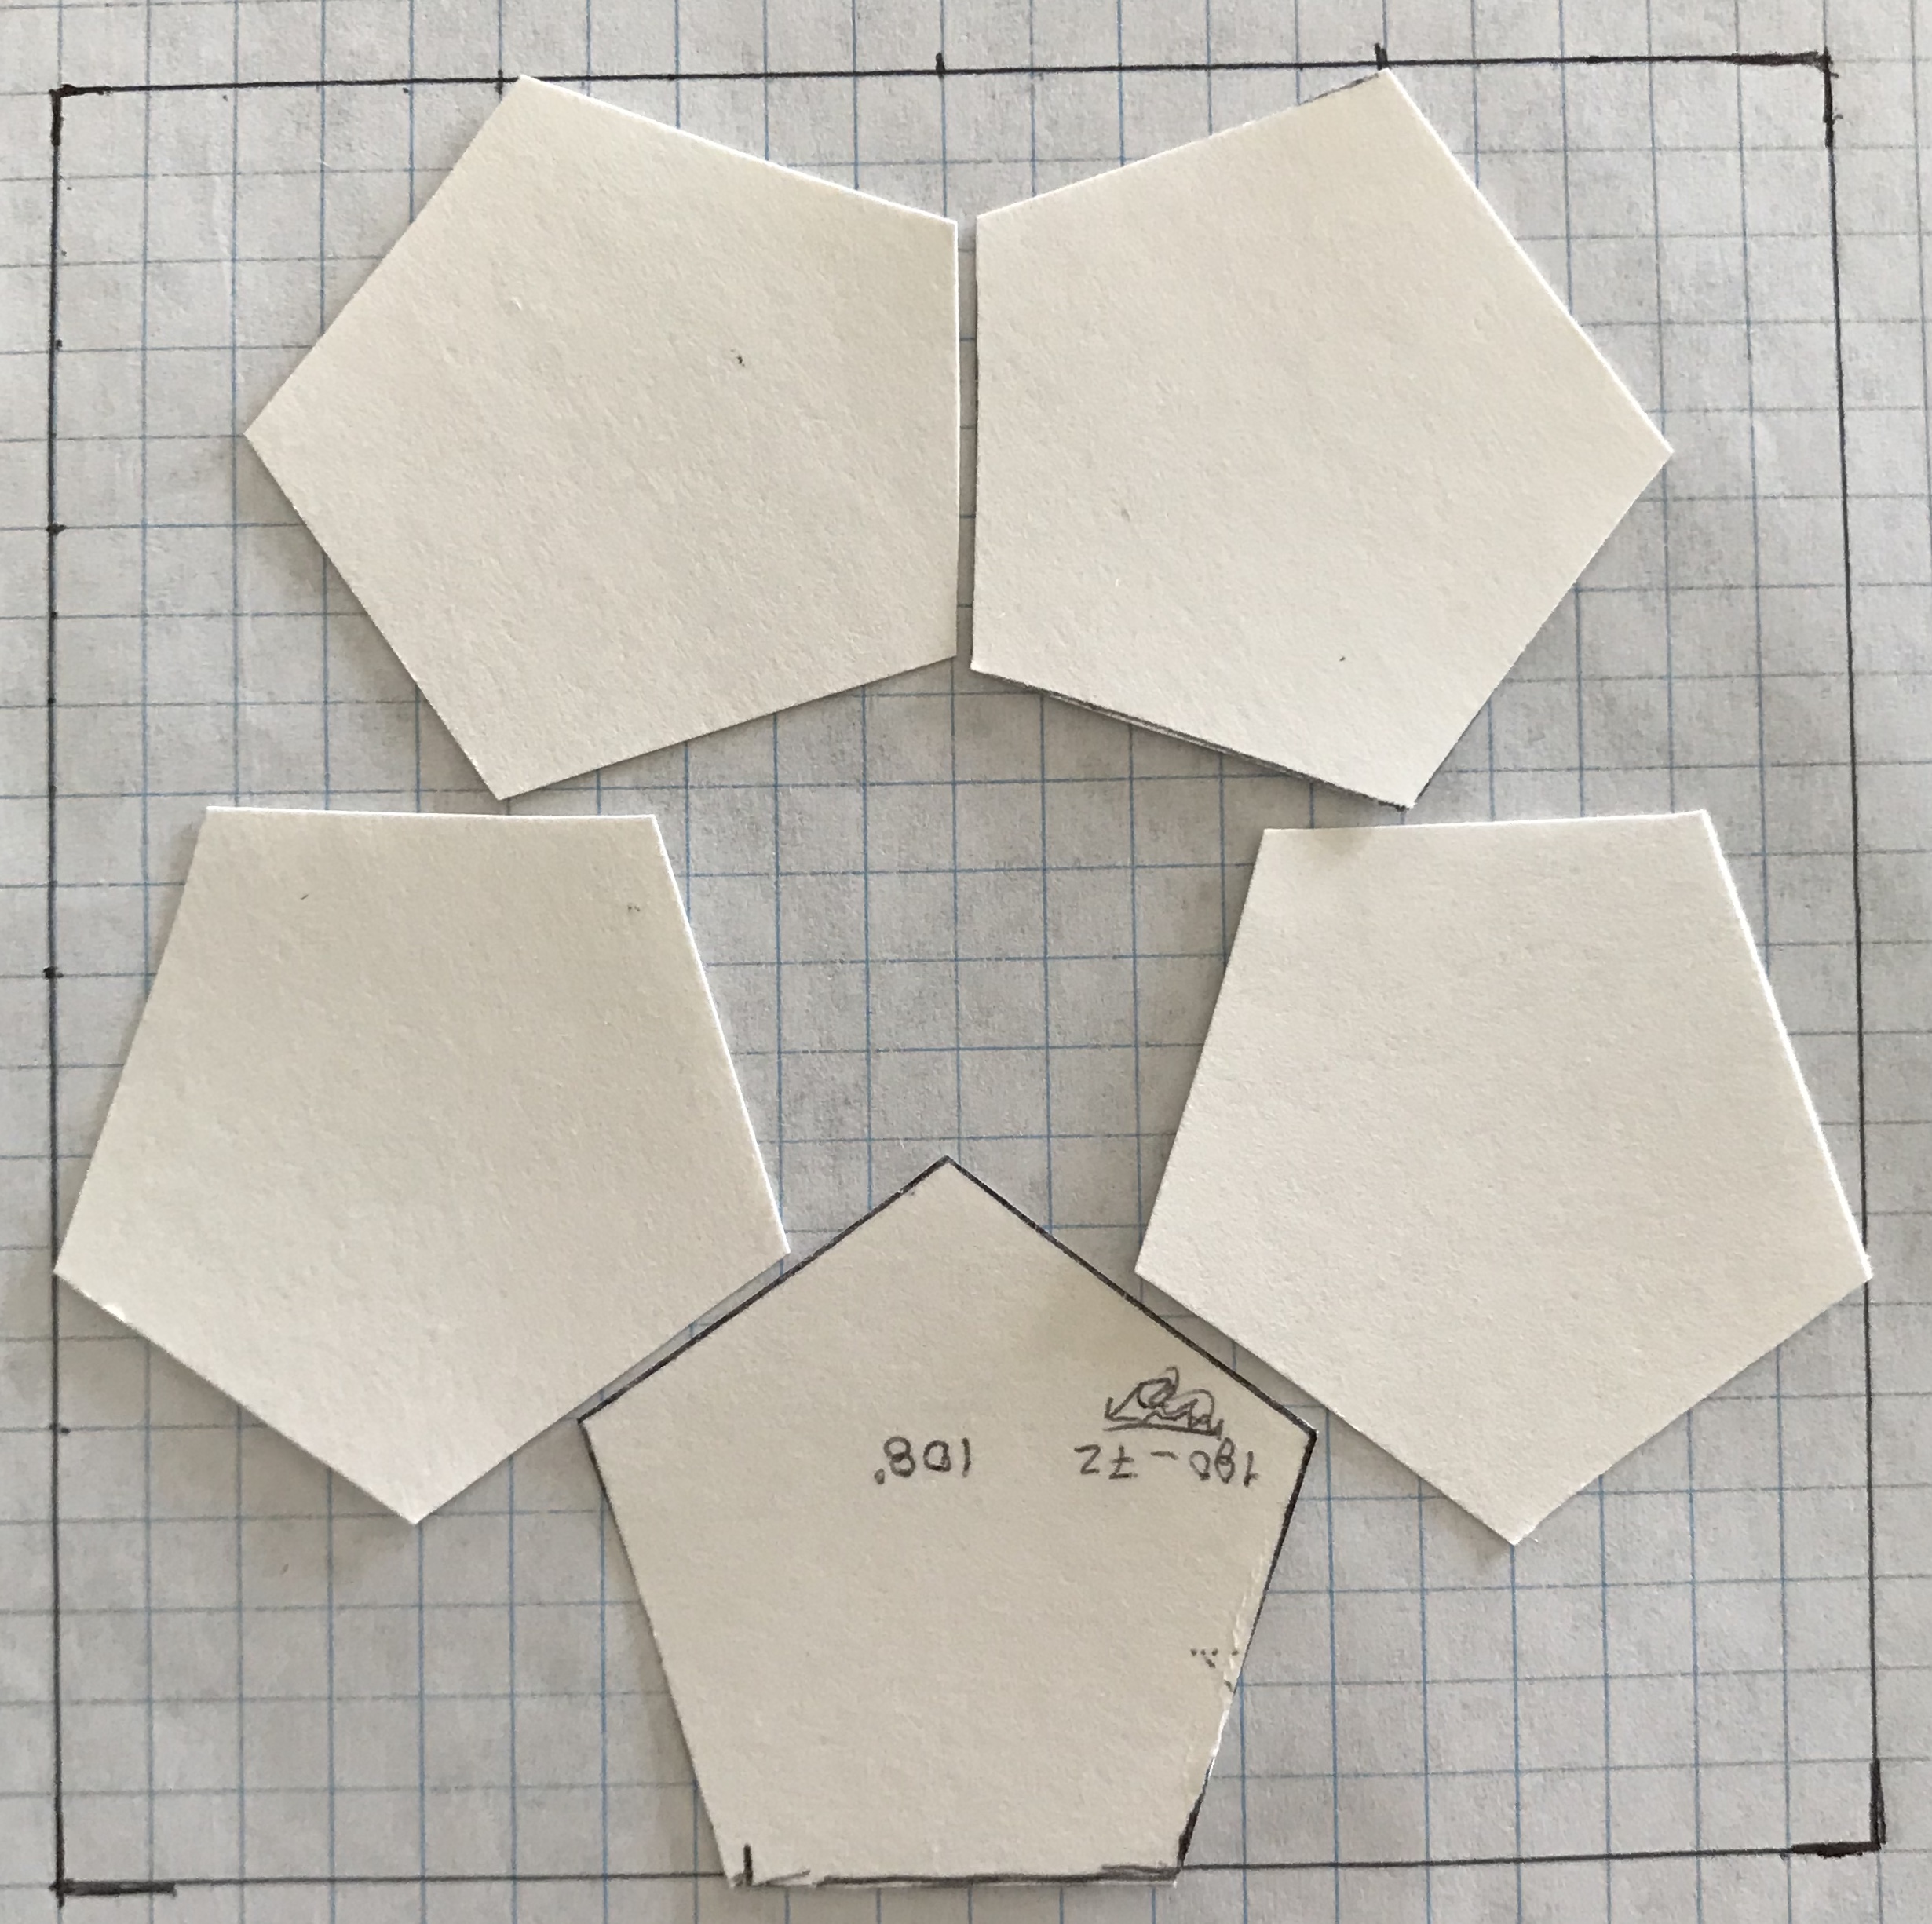
An alternate tiling is an improvement in some respects. The pentagons can be cut out with the table saw. However, the tiling only puts 5 pentagons in the 4' square. This tiling is shown in the picture below. This implies 2 - 4' X 8' sheets of Baltic Birch plywood will need to be ordered from Menards. This was done and the plywood arrived today (2/15). Sandy was kind enough to share her truck for the pickup. When picked up it was wrapped in plastic and seemed to be at least 4 sheets thick. When unwrapped at home it became clear that Menards had packed the Baltic Birch plywood surrounded by some cheap sheets of plywood. Thus the source of the $13 shipping and handling charge. The wood came without damage even though we drove home in the rain.
Cutting out the pentagons will be followed by mitering the edges to 58.29°. Since butt joints are not very strong cutting a dado the length of the mitered edge and using a "spline" to strengthen the joint seems like a reasonable path. The dadoes should not be cut on center but shifted toward the "thicker" edge: the edge that is on the smaller side. The splines should be about 1/4 X 1/2 to fit in the two 1/4 X 1/4 dadoes. One concern was how to fit the pentagons together and whether the splines would make this impossible. Clearly, a pentagon can be added to the Vee of two pentagons with the splines in place. A spline on the third side will need to be added after. Similarly for the fourth spline. Just as obvious is that placing the last pentagon in place must be done without splines, but since this will be the door, there should be little problem.
Take care as the sides of the five pentagons ringing the door opening should not be cut for splines!
Some thought will need to be given to how to avoid splitting the veneer on the edges of the pentagons. Either a 80 tooth blade needs to be used or the cut line will need to be taped.
The first step is to map the layout of pentagons on the plywood received yesterday. The radius of the circumcircle (R) is related to the side length (S) by S/1.176 = R. (Wikipedia.org/wiki/pentagon) Consequently, with a side length of 1.00' the radius of the circumcircle is 0.851'. The large drafting compass was set to 0.851' (10.212") and a circle was drawn. With the compass set to 1.00' the vertices of the pentagon were lightly marked. The final gap between marks was about 5/32", so the length was increased about 1/32" and the vertices were remarked.
The pentagon seems HUGE!! The diameter (vertex to vertex) of the dodecahedron will be about 2'10". The following table (all measurements in inches) was used to compare various dimensions.
| Side Length | Vertex to Side (for pentagon) | Area (in2) | Face to Face | Vertex to Vertex | Volume (in3) | Circumcircle Radius | Inradius |
|---|---|---|---|---|---|---|---|
| 12 | 18.47 | 247.68 | 26.72 | 33.63 | 401.04 | 10.20 | 8.26 |
| 11 | 16.93 | 208.12 | 24.50 | 30.83 | 336.99 | 9.35 | 7.57 |
| 10 | 15.39 | 172.00 | 22.27 | 28.03 | 278.50 | 8.50 | 6.88 |
When asking Rhea about the size as judged by a pentagon with a 12" side, she suggested that I make a prototype from the scrap plywood that came with the Baltic Birch and use duct tape to hold the sides together.
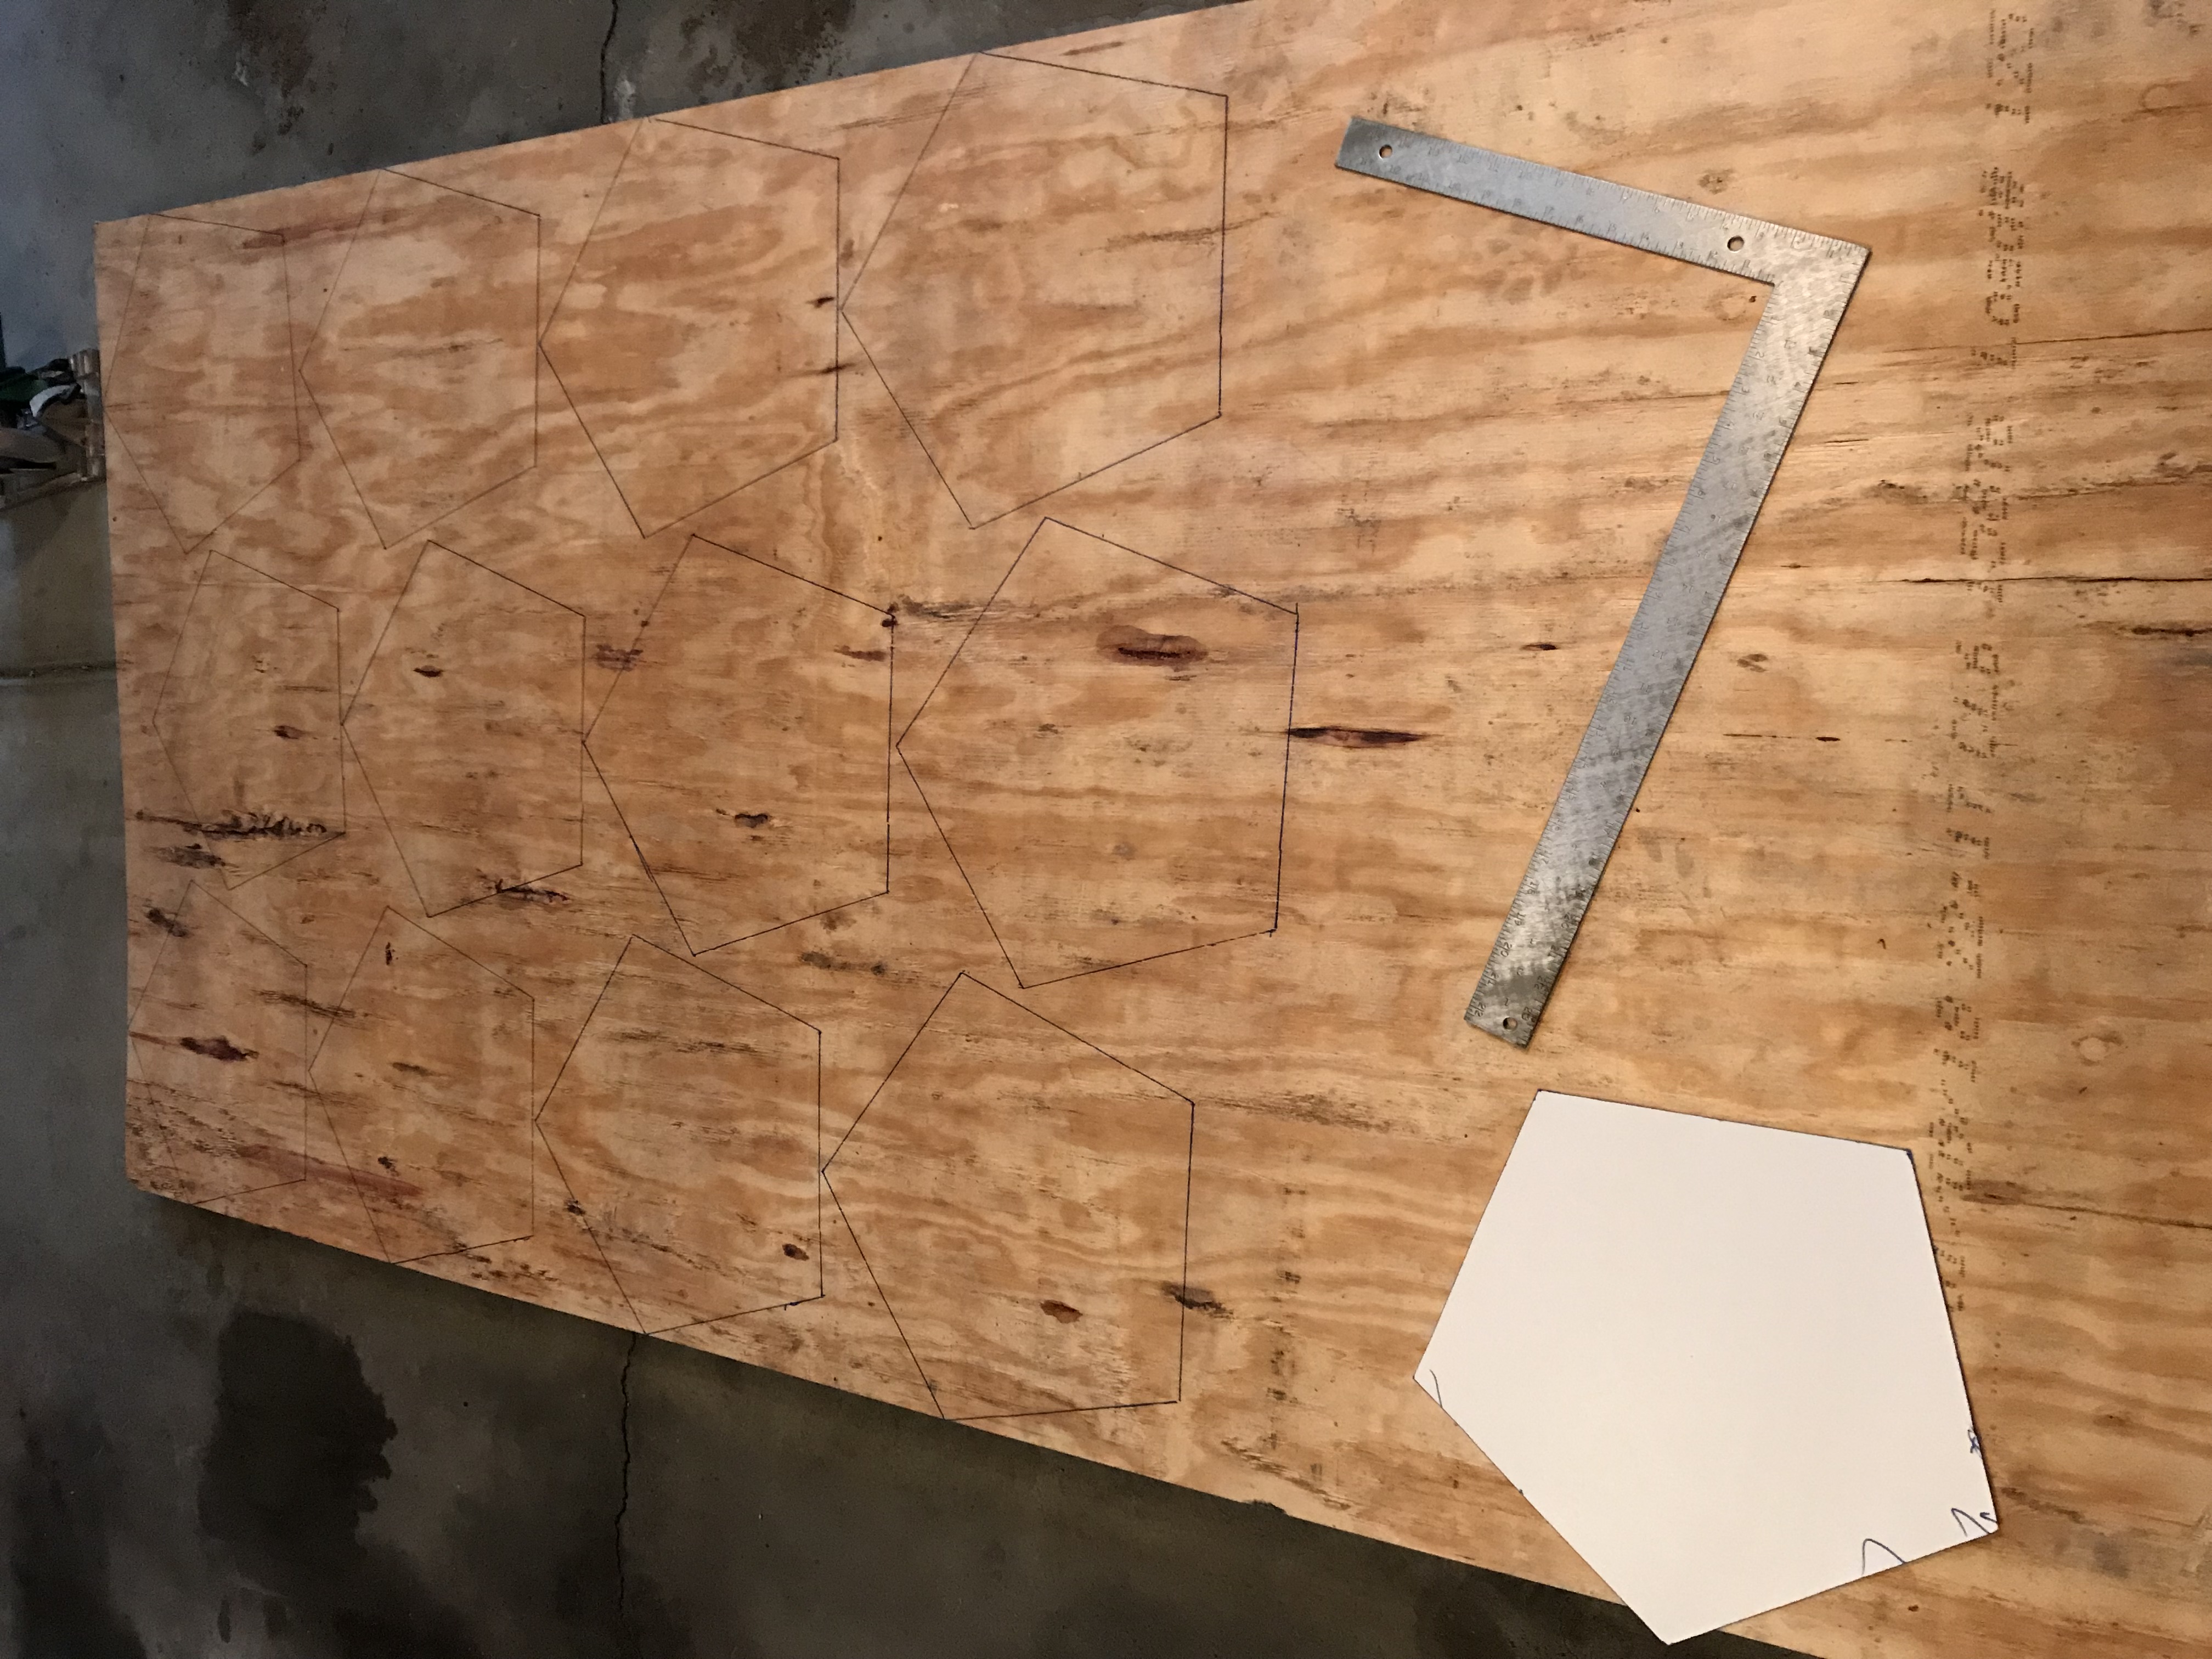
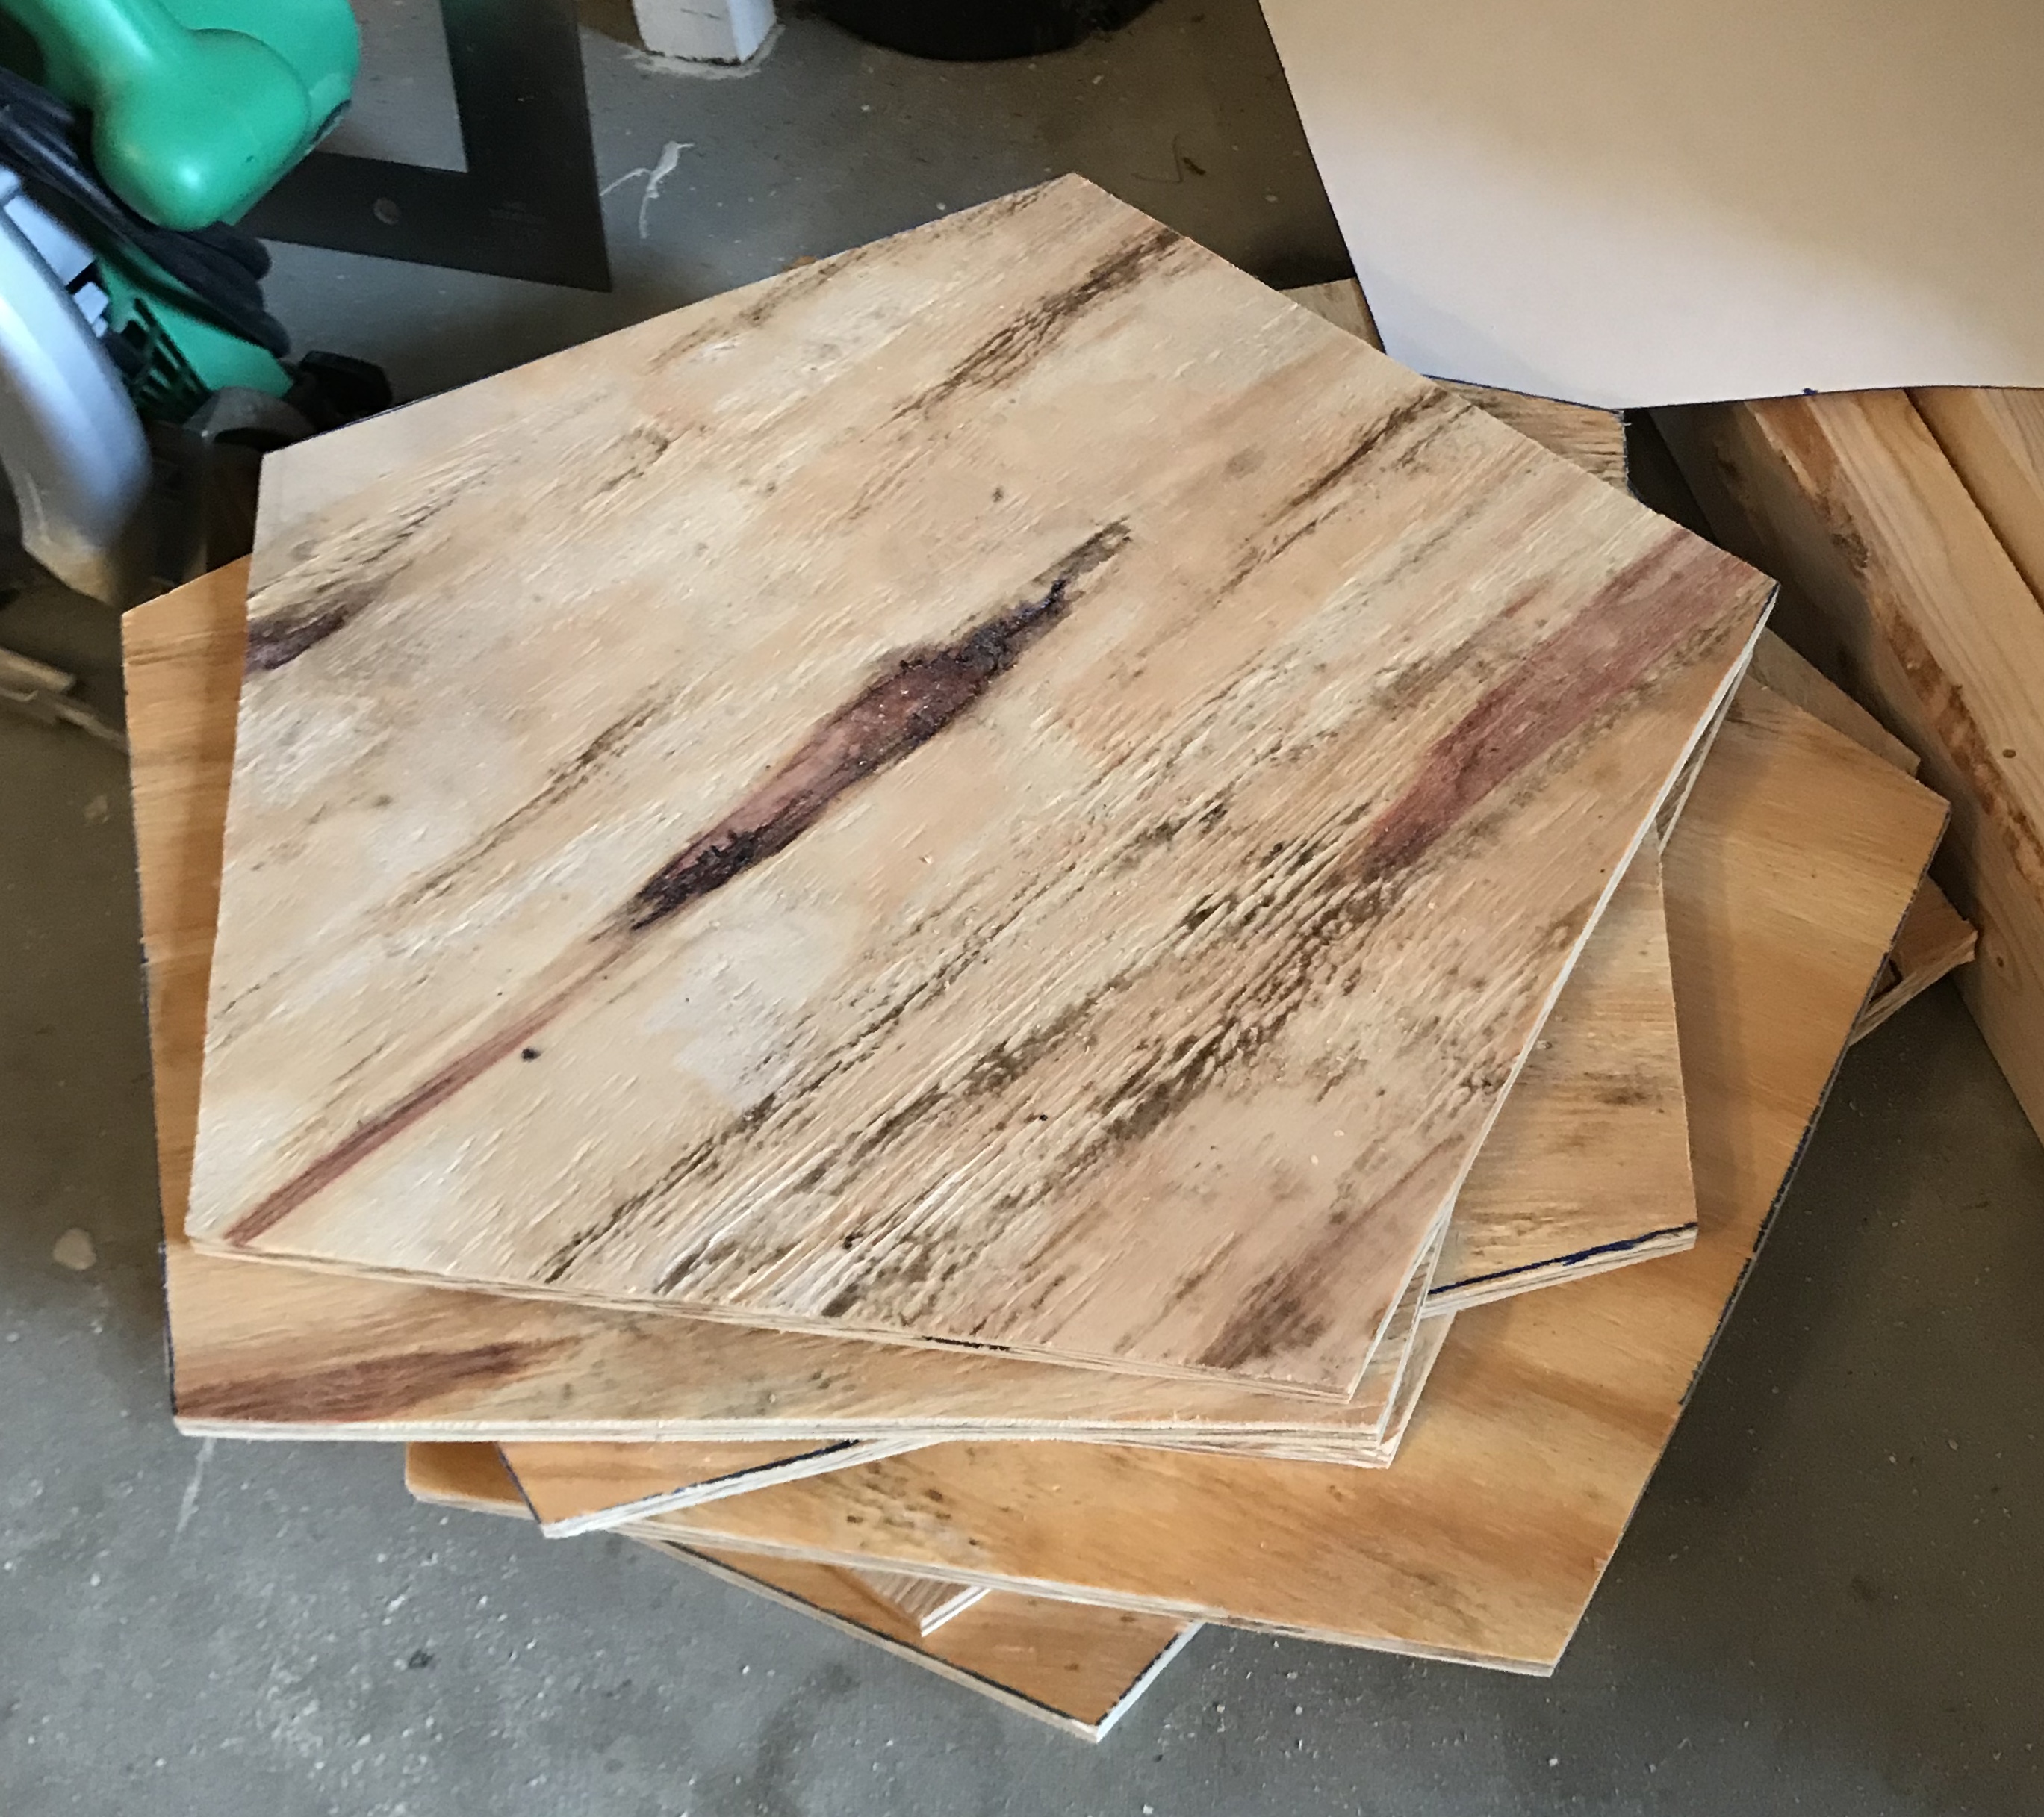
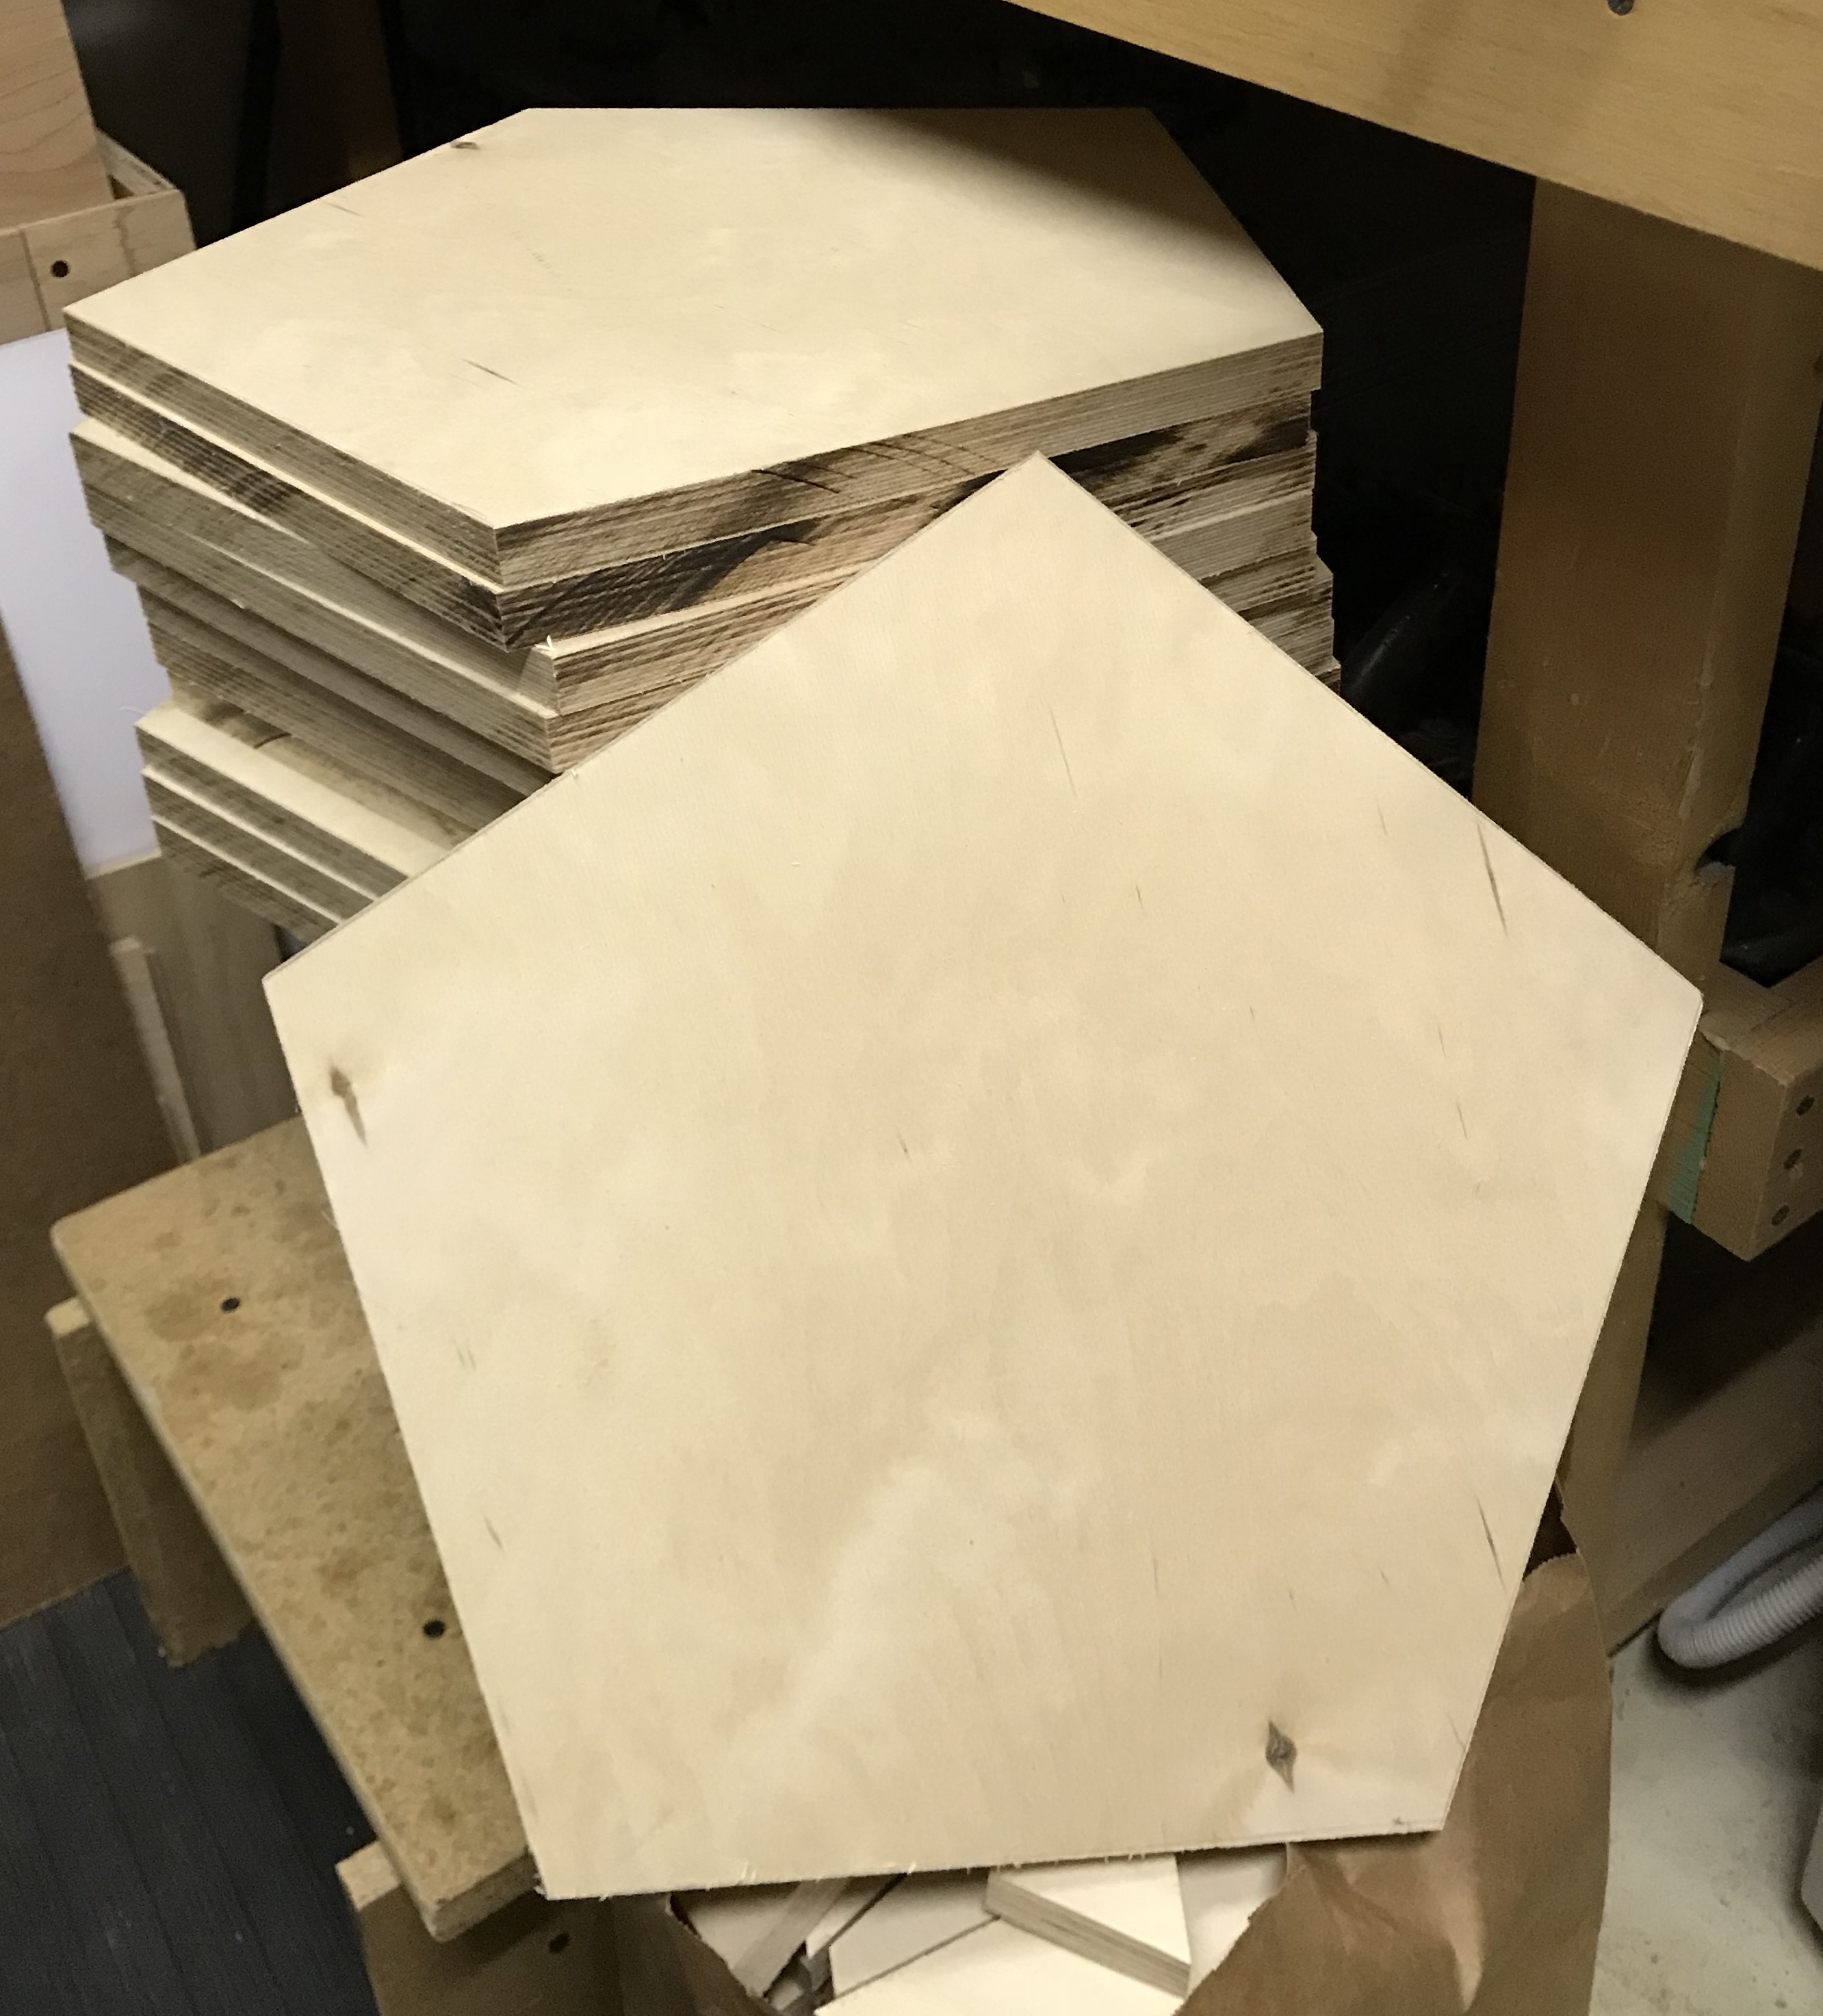
The morning was spent cutting out the pentagons. The first task was laying them out on the 4 X 8 sheet of plywood. Similar to the pentagon with the 12" side drawn above a second pentagon with 10" sides was drawn. This was cut out and used as the template. The pentagons were laid out in a "loose" maximum tiling pattern as seen in the photo below.
The pentagons were then cut out with the circular saw. (No splitting at the edges was seen!) This tiling pattern will not work beyond this prototype as a number of plunge cuts were needed to separate the pentagons. It took about two hours to cut out the pentagons on the floor of the garage. They are displayed in this photo.
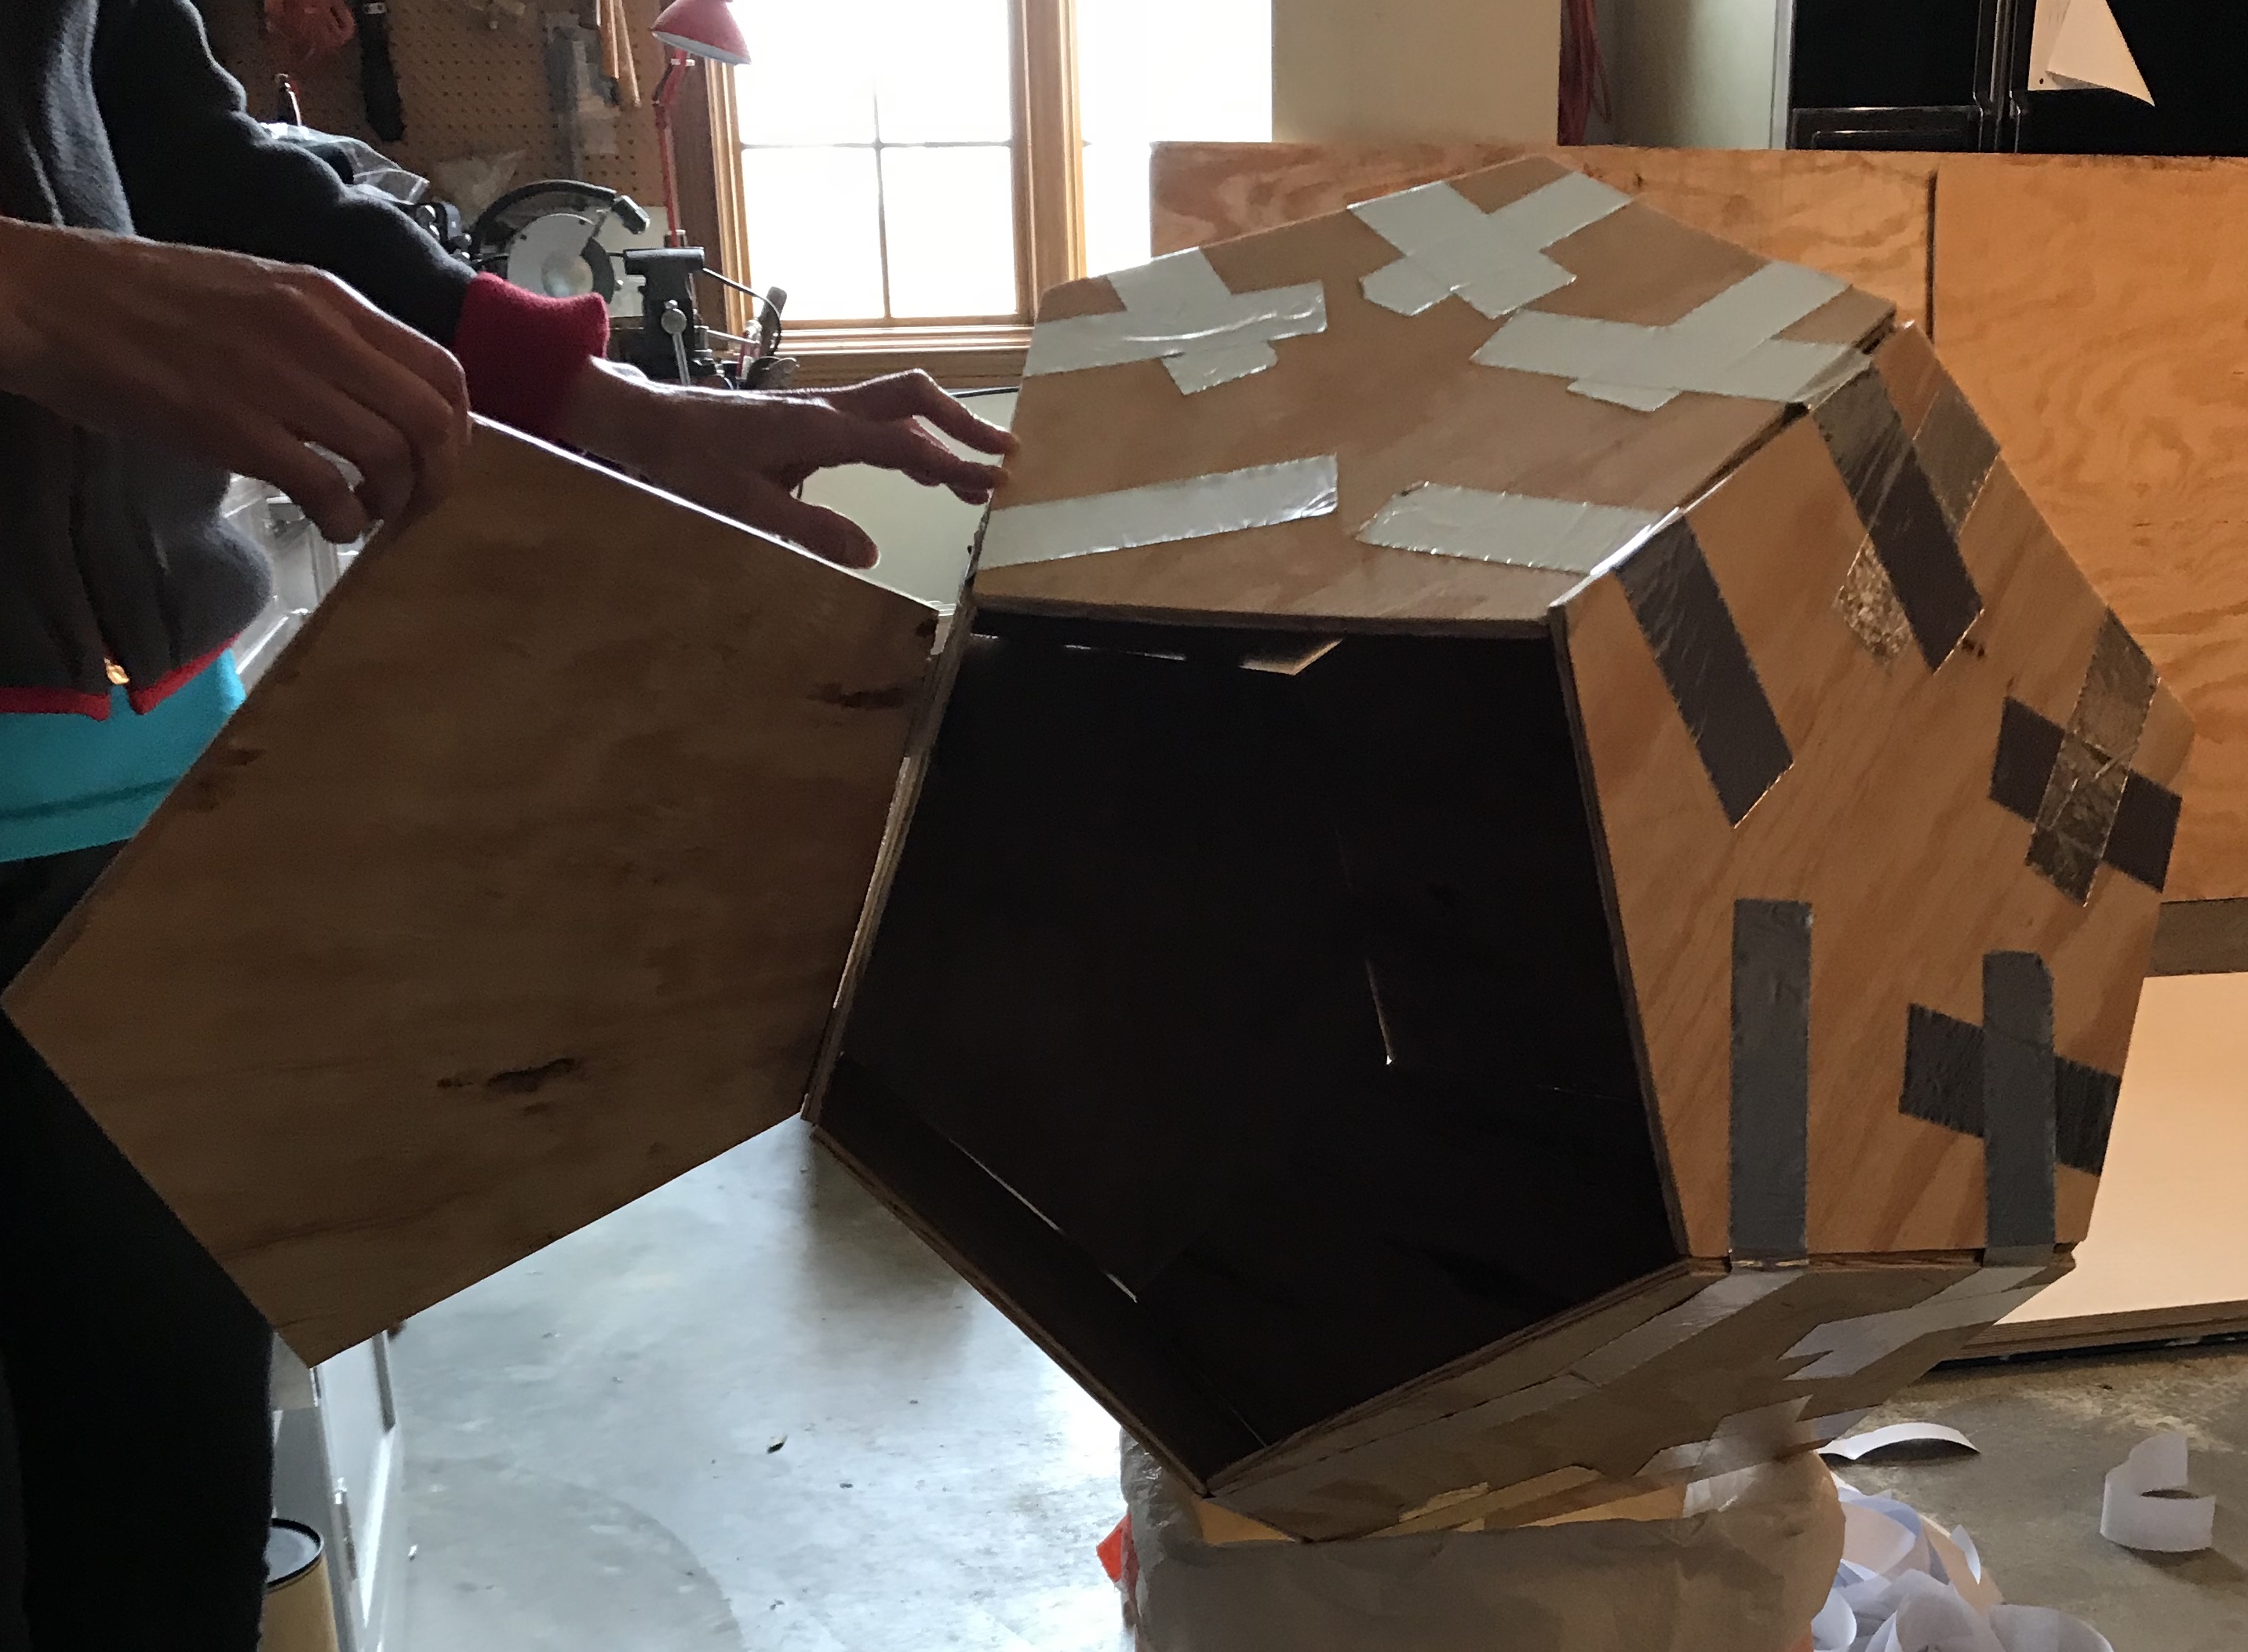
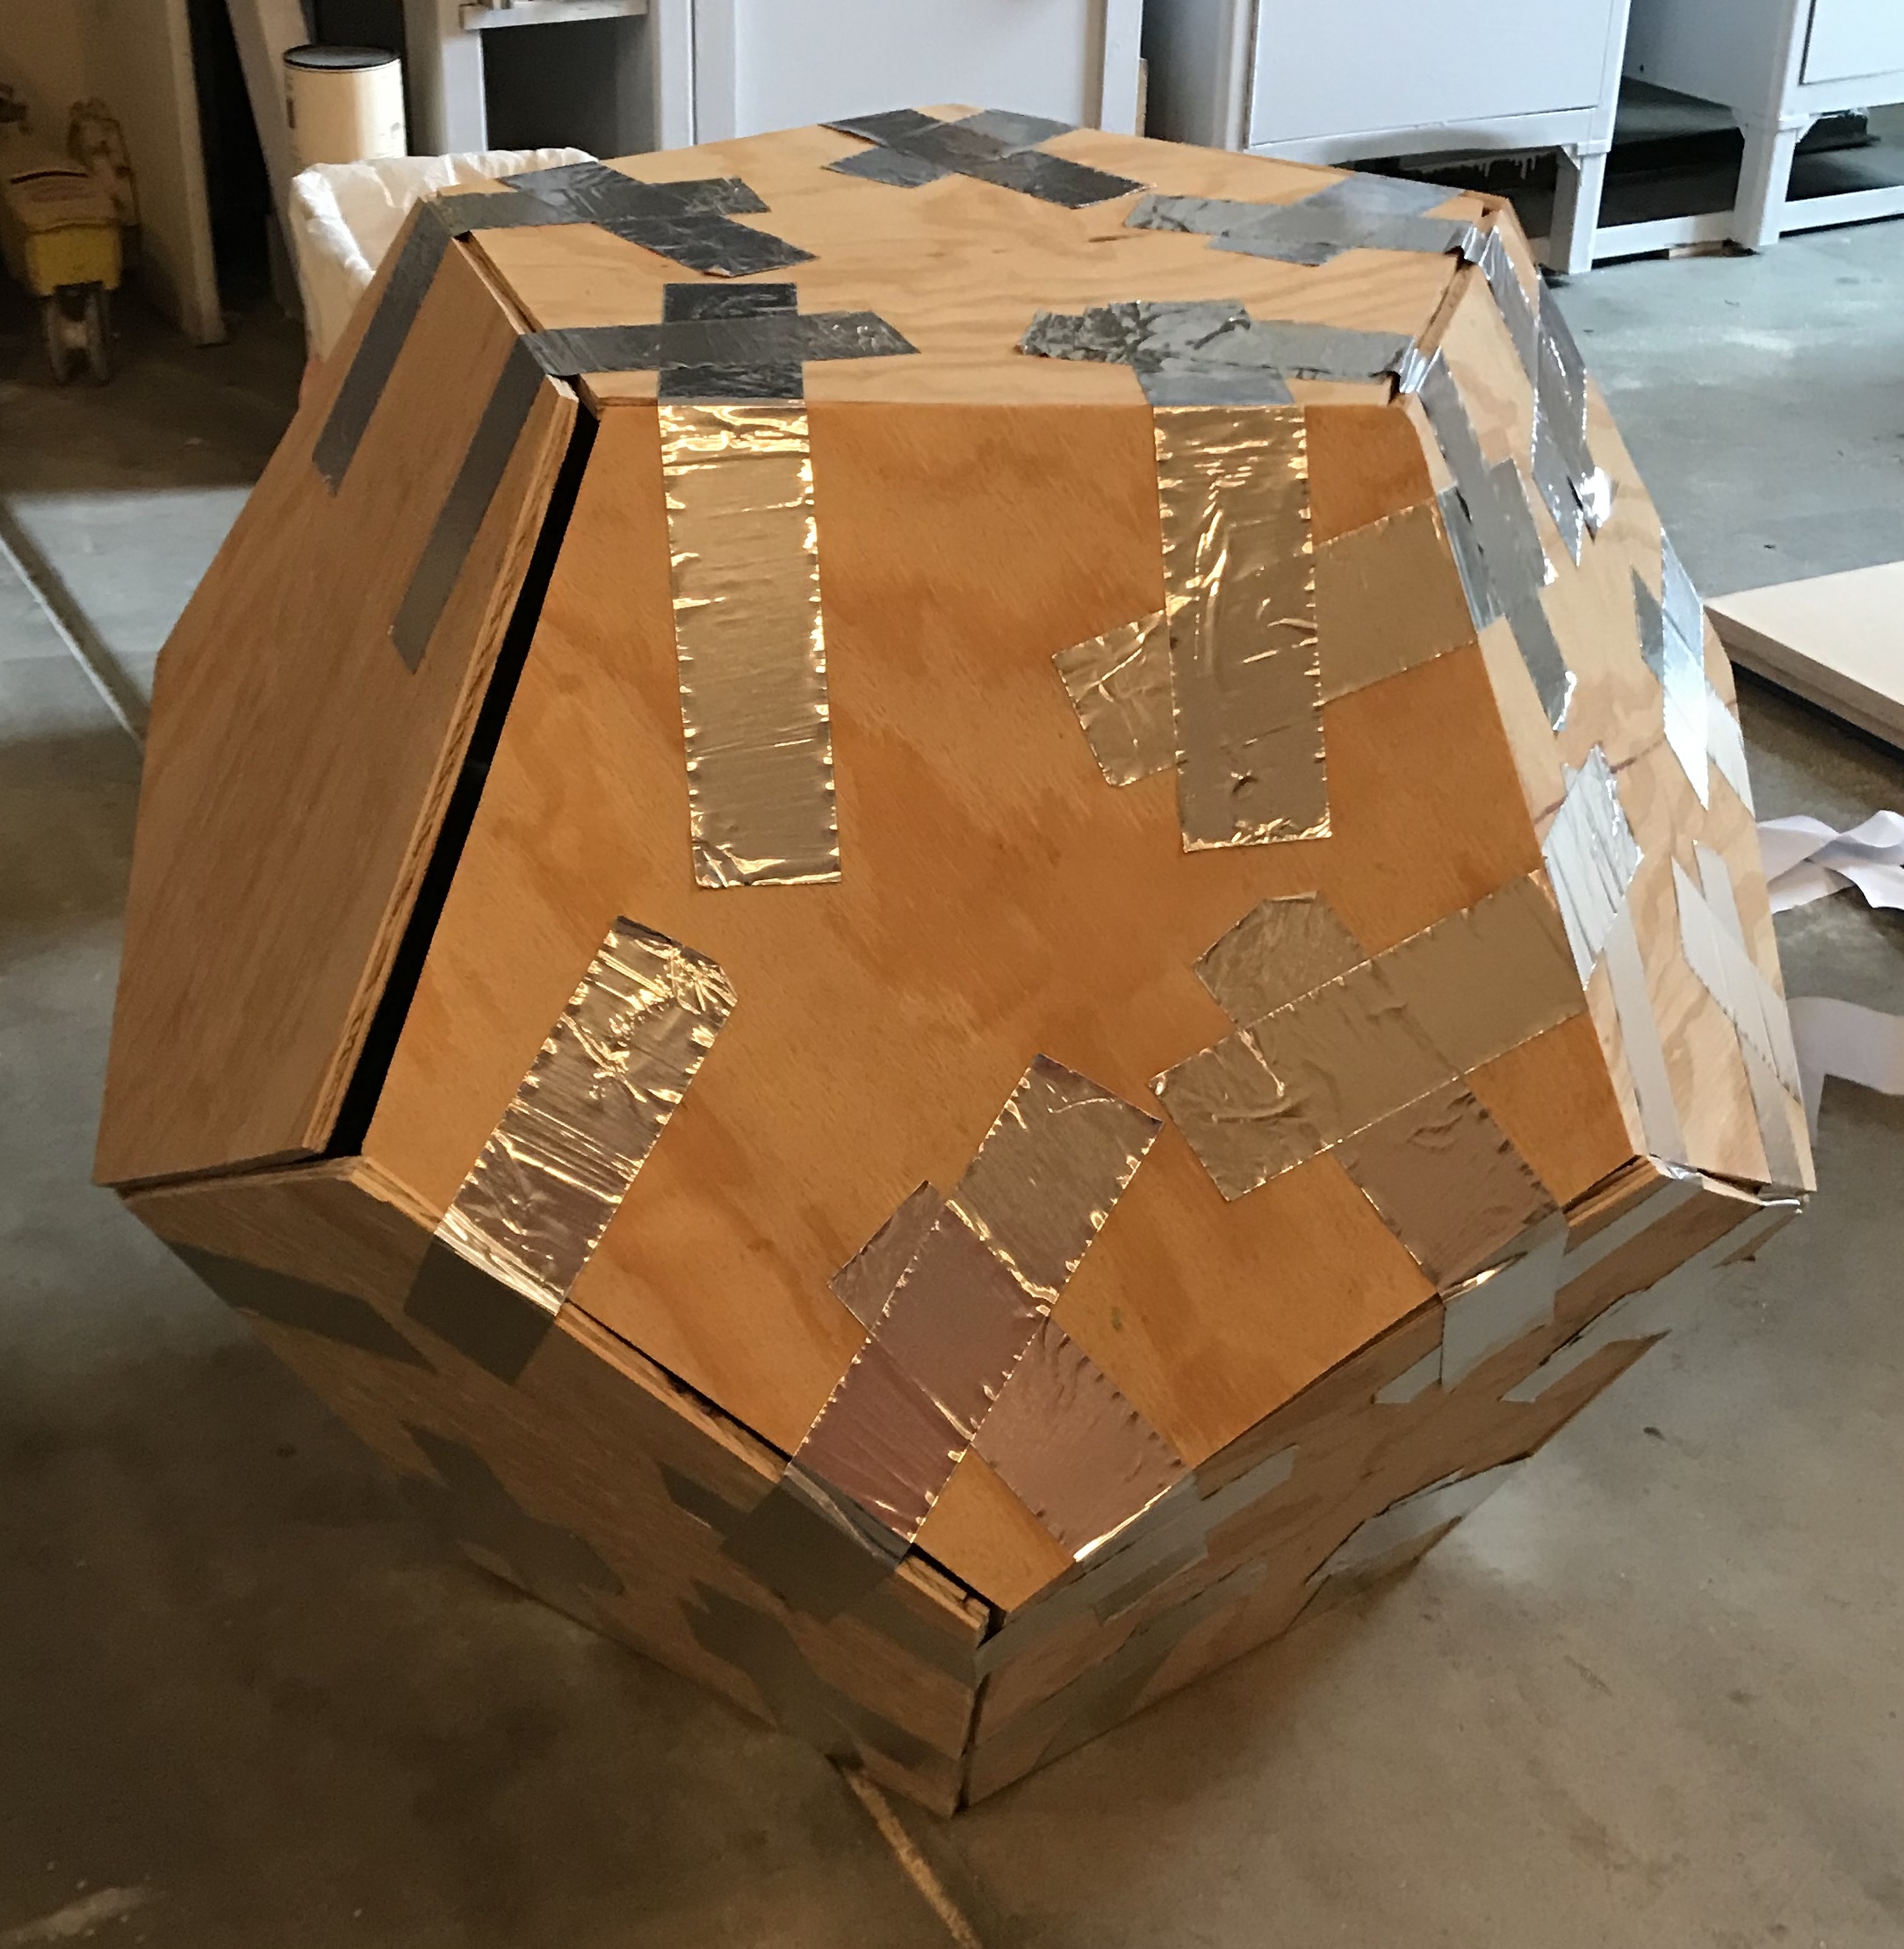
After lunch the pentagons were taped together. Duct tape was tried first, but it did not stick sufficiently well to the wood to be of use. I found some "aluminum tape" (??) that was used by Ryan and I when we installed the subwoofer in Kevin's car. This sticks much better to the plywood, though it has to be cut and a backing removed before use. The pentagons were taped together with two pieces of tape spanning each edge except for the last pentagon which was held on with only two pieces of tape as it is the door. A few pictures of the completed prototype are shown below. It appears to be the perfect size!
A new pentagon tamplate was cut from poster board and used to lay out 12 pentagons on a sheet of Baltic birch plywood. They were laid out in rows of three, leaving about 2 feet of plywood unused. The rows were cut free with the circular saw. The Baltic birch was laying on a sheet of 1/2" plywood, so there was little tear-out on the bottom, but the top had a lot of tear-out. Little of this impacted the pentagons.
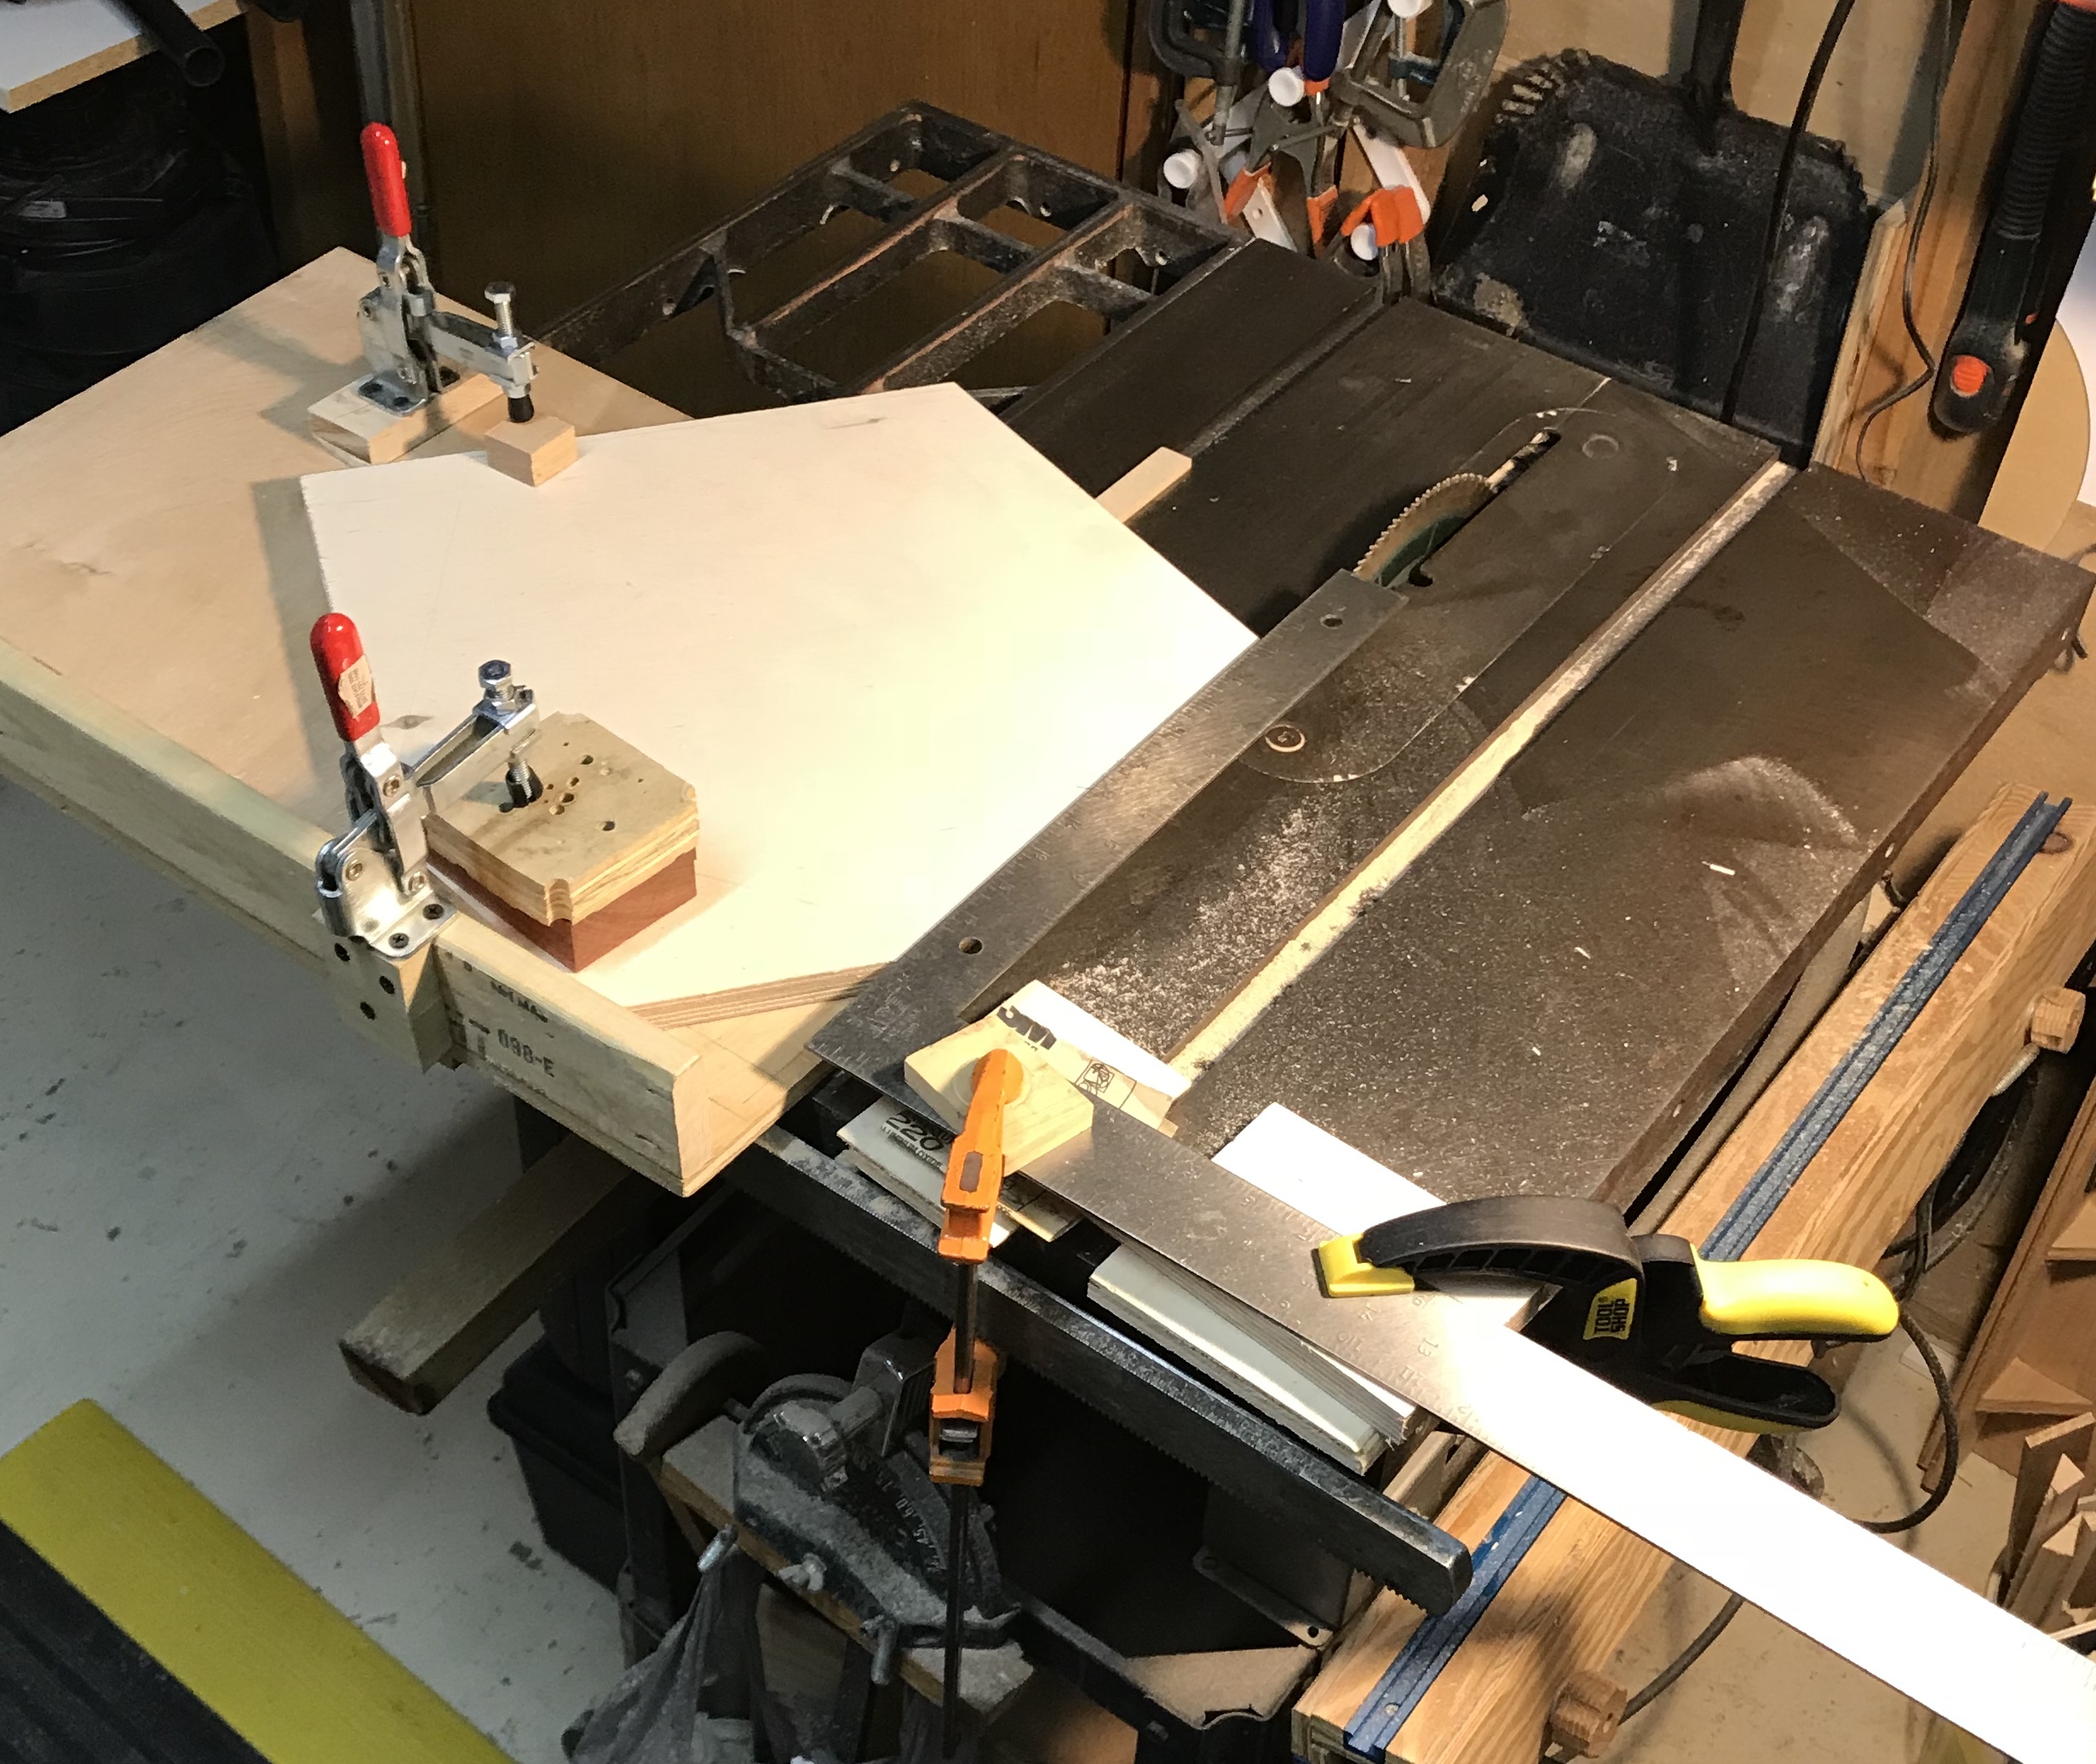
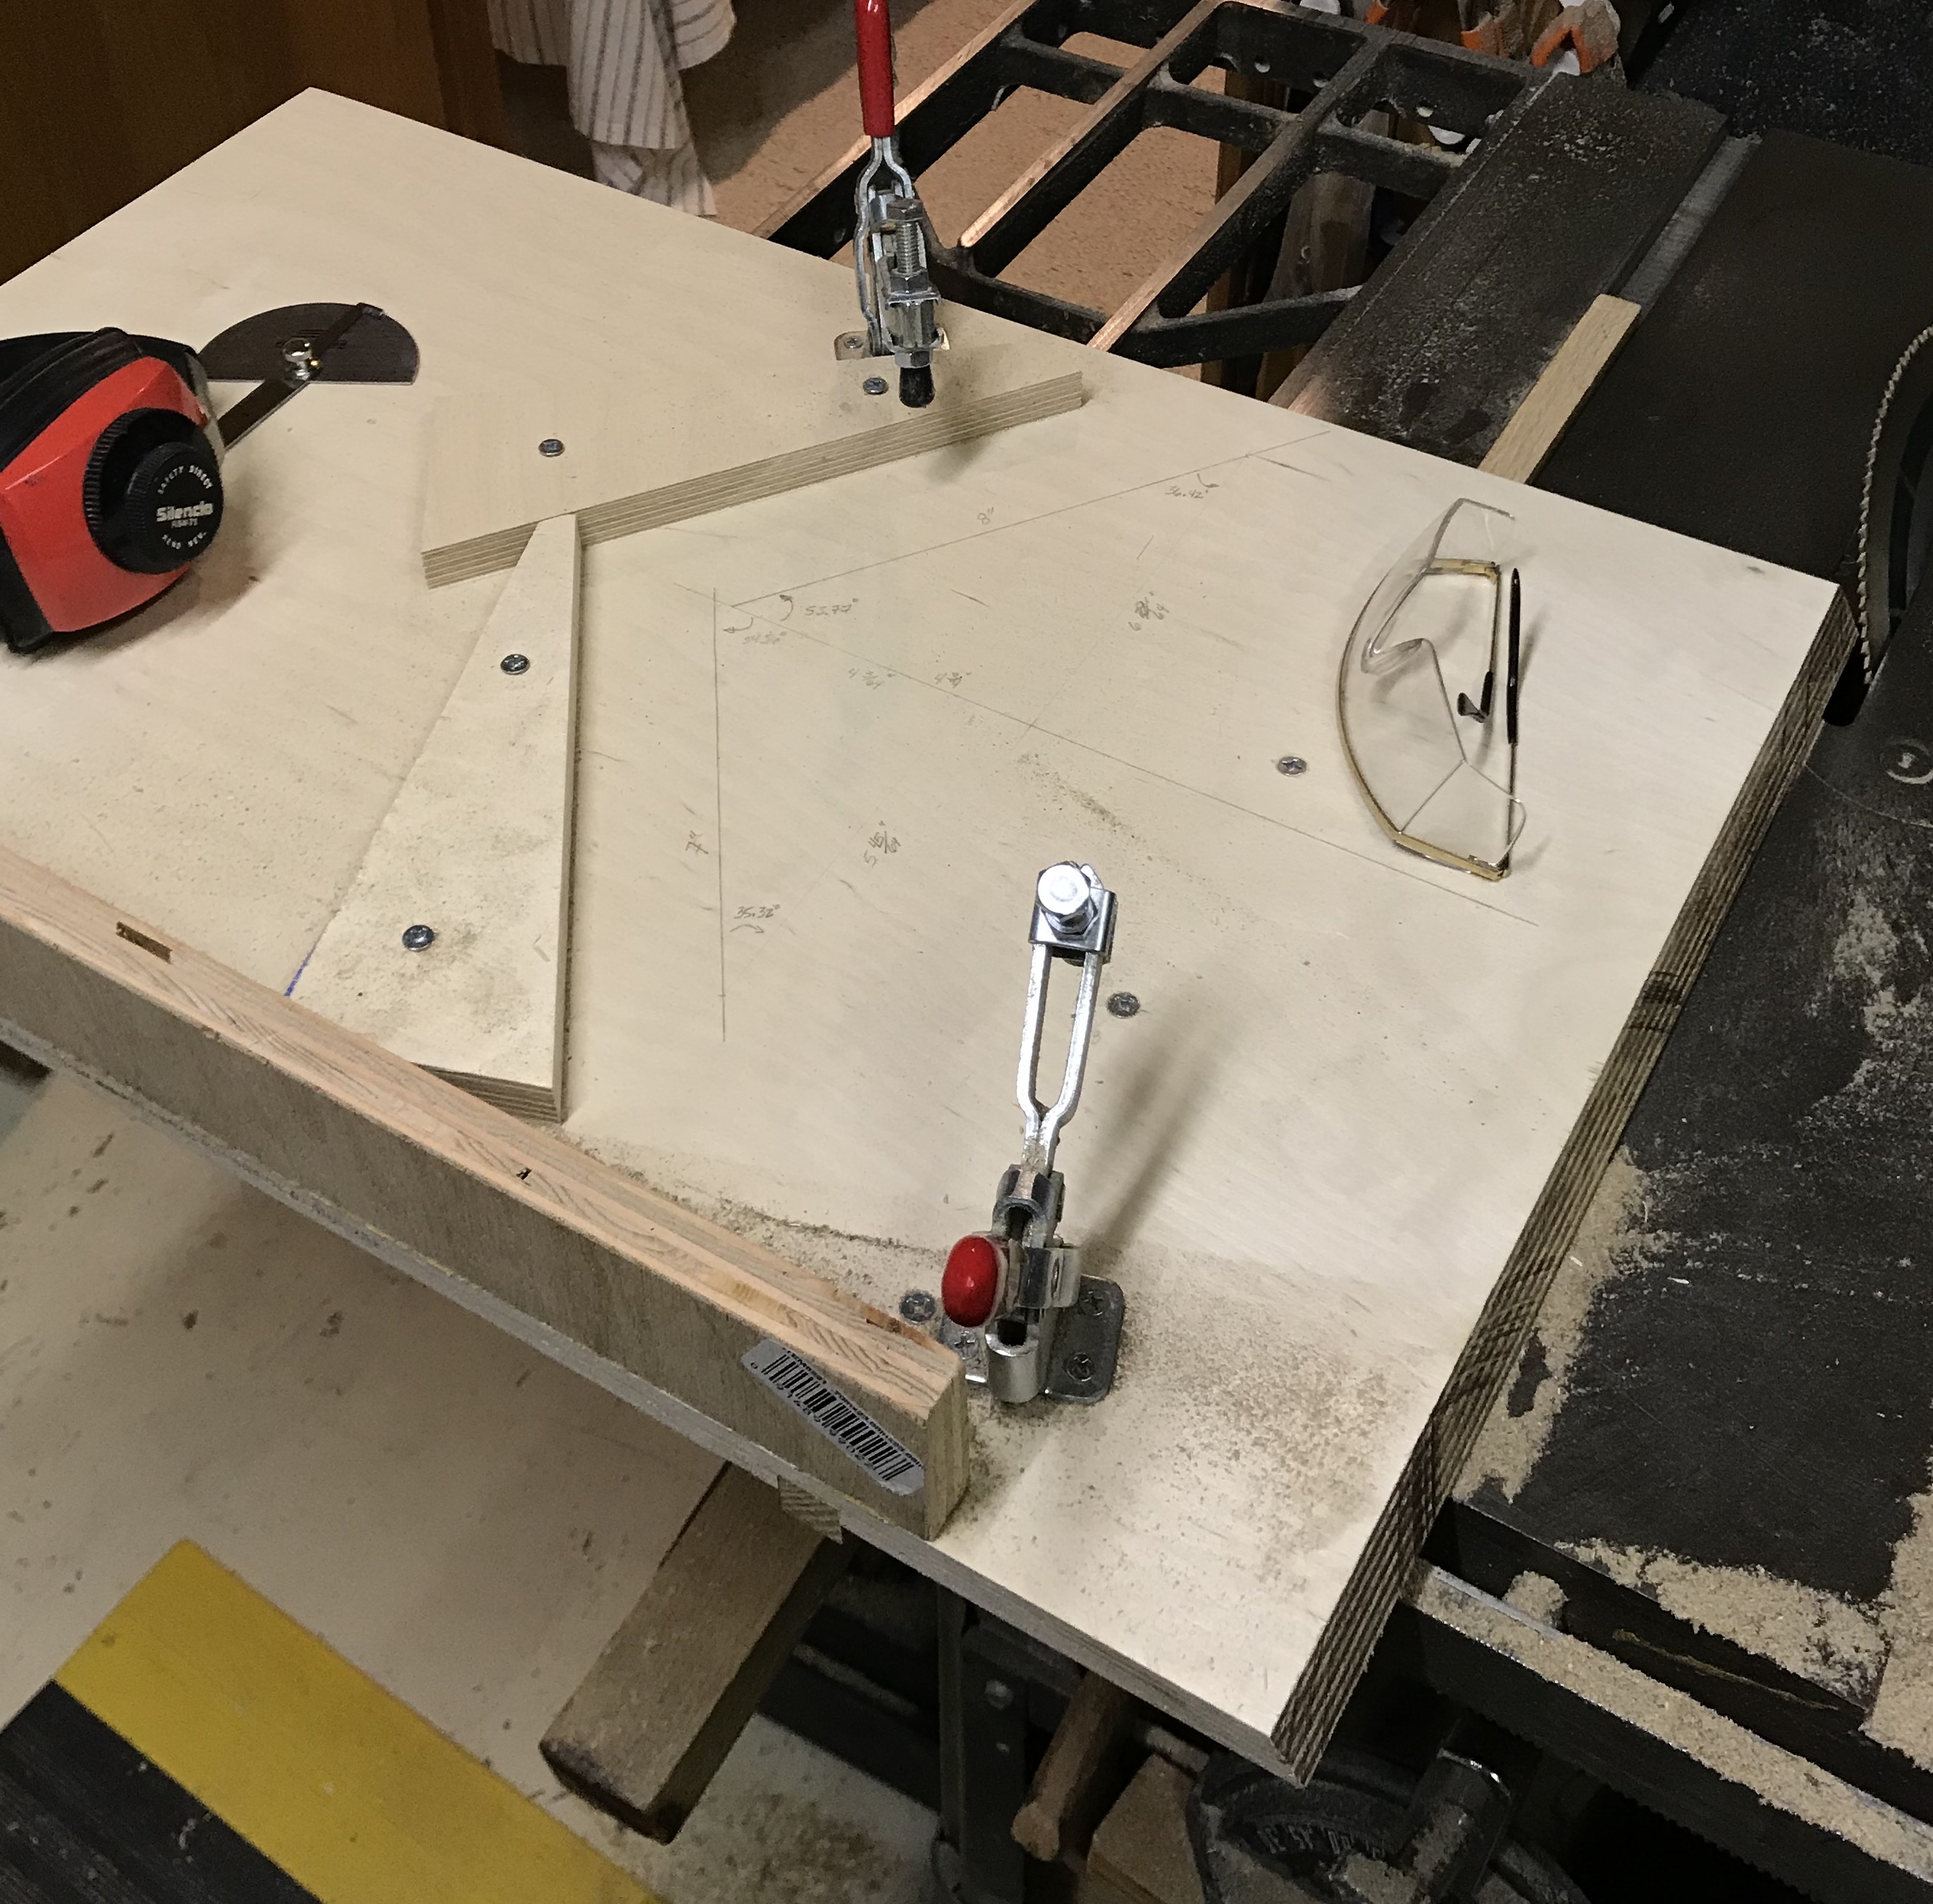
Setting up a jig for cutting out the pentagons to the line was challenging. Two clamps were used to hold the plywood to the cross-cutting sled. One had to be mounted on the back of the sled where there is significant flex. It was also too far from the plywood on occasion. A square was mounted to the table at the height of the top of the plywood. This square was aligned with the blade and clamped in place. The line on each side of the pentagon to be cut was aligned with this square and the plywood was clamped to the cross-sled. A 150 tooth blade was used for cutting and gave minimal tear-out. The picture below probably provides a better description. With all of the difficulties each side was cut to within 1/32" of the line. All sides will be recut at an angle.
All of the pentagons have been cut. A jig for precisely cutting the angles needs to be designed. The jig under consideration is a modification of the cross-cutting sled. Essentially a Vee needs to be attached with the internal angle of the Vee equal to that of the pentagons, 108°. The distance from the point of the Vee to the edge of the sled next to the blade should place the side to be cut at the blade. This is not critical as long as it is the same from pentagon to pentagon. More critical is the angle of this Vee with respect to the edge of the sled. A perpendicular that goes through the angle of the Vee should accurately bisect that angle. If the Vee is not accurately aligned the pentagons will not fit well and may need significant modification. One way to ensure the angle is bisected is using a square and measuring the distances instead of measuring the angles with a protractor.
An 18" X 28" section of Baltic Birch was cut from what was left after making the pentagons. The 150 tooth blade was exchanged for the dado set at 3/4". The long square side of this stock was aligned with the front of the table saw and the side at right angles was used to align the fence at 5 3/8" from the center of the dado stack. A 3/8" deep dado was then cut in the stock perpendicular to the back edge and centered 5 3/8" from the right edge. An old oak towel rod was about 3/4" square in cross section. This was thinned by about 1/32" prior to putting in the dado stack and was a nice sliding fit in the dado. This bar was secured in the dado with four #10 wood screws. A piece of plywood about 3" X 24" was glued to the back edge of the Baltic Birch. The dado blade set was replaced with the 150 tooth blade and the blade was angled to 58.3° This was done by cutting out a poster board triangle with this angle. The sides of the triangle measured 5.25(6)", 8.50(7)", and 10.00(0)". The blade was aligned as well as could be done with a light behind the blade/paper. A further check with the level app on the phone showed a 31.7° angle on the back side of the blade. The leading edge of the base was then cut at this angle. This required significant force to cut and there was a lot of burning. The cuts on the edges of the pentagons may have to be made to 1/2 of the required depth at a time! The two brackets providing the pentagons angle were positioned by aligning them with a pentagon. They were each screwed to the base with two #10 screws. The clamps were then attached with #8 screws.
The first pentagon was cut at 1/2 depth all the way around followed by cutting to full depth. This was repeated on a second pentagon. The two pentagons when placed together on their beveled edges gave a 116.5° angle as best as I could measure. There was significant burning even at half depth! This needs to be ameliorated before any more are cut. The blade was cleaned tooth by tooth with a dental pick. This removed all of the buildup on the blade. Cutting with the cleaned blade was not much better. Then tried 1/4" deep cuts (vertical height of blade over jig), but this was no better so went back to 3/8" cuts. Went out and purchased a new blade, 180 teeth thin kerf. Was no better than the old blade!!! Got them all cut while Rhea was out. When Rhea returned she ran the kitchen exhaust fan and opened a window to remove the smoke smell.
With all of the angled sides cut on the pentagons it was time to set up for the dado to be cut in most of these edges. Before any cutting one pentagon was set aside for the door and five pentagons were marked with one side to have no dado. These sides will line the door opening. The blade was already set at the correct angle. (I proved to myself that standing the pentagon on its edge while cutting would produce a dado that is at right angles to the face of the angled cut.) The fence was set on the opposite blade side from usual and a featherboard was set up on the opposite side of the blade on a 3/4" block of wood. The fence was moved so the cut was about 1/8" from inside edge of the angled cut. The blade was also raised so the cut was about 1/4" deep. All of the edges were dadoed on six pentagons and five of the edges were cut on five of the pentagons, leaving the door opening uncut.
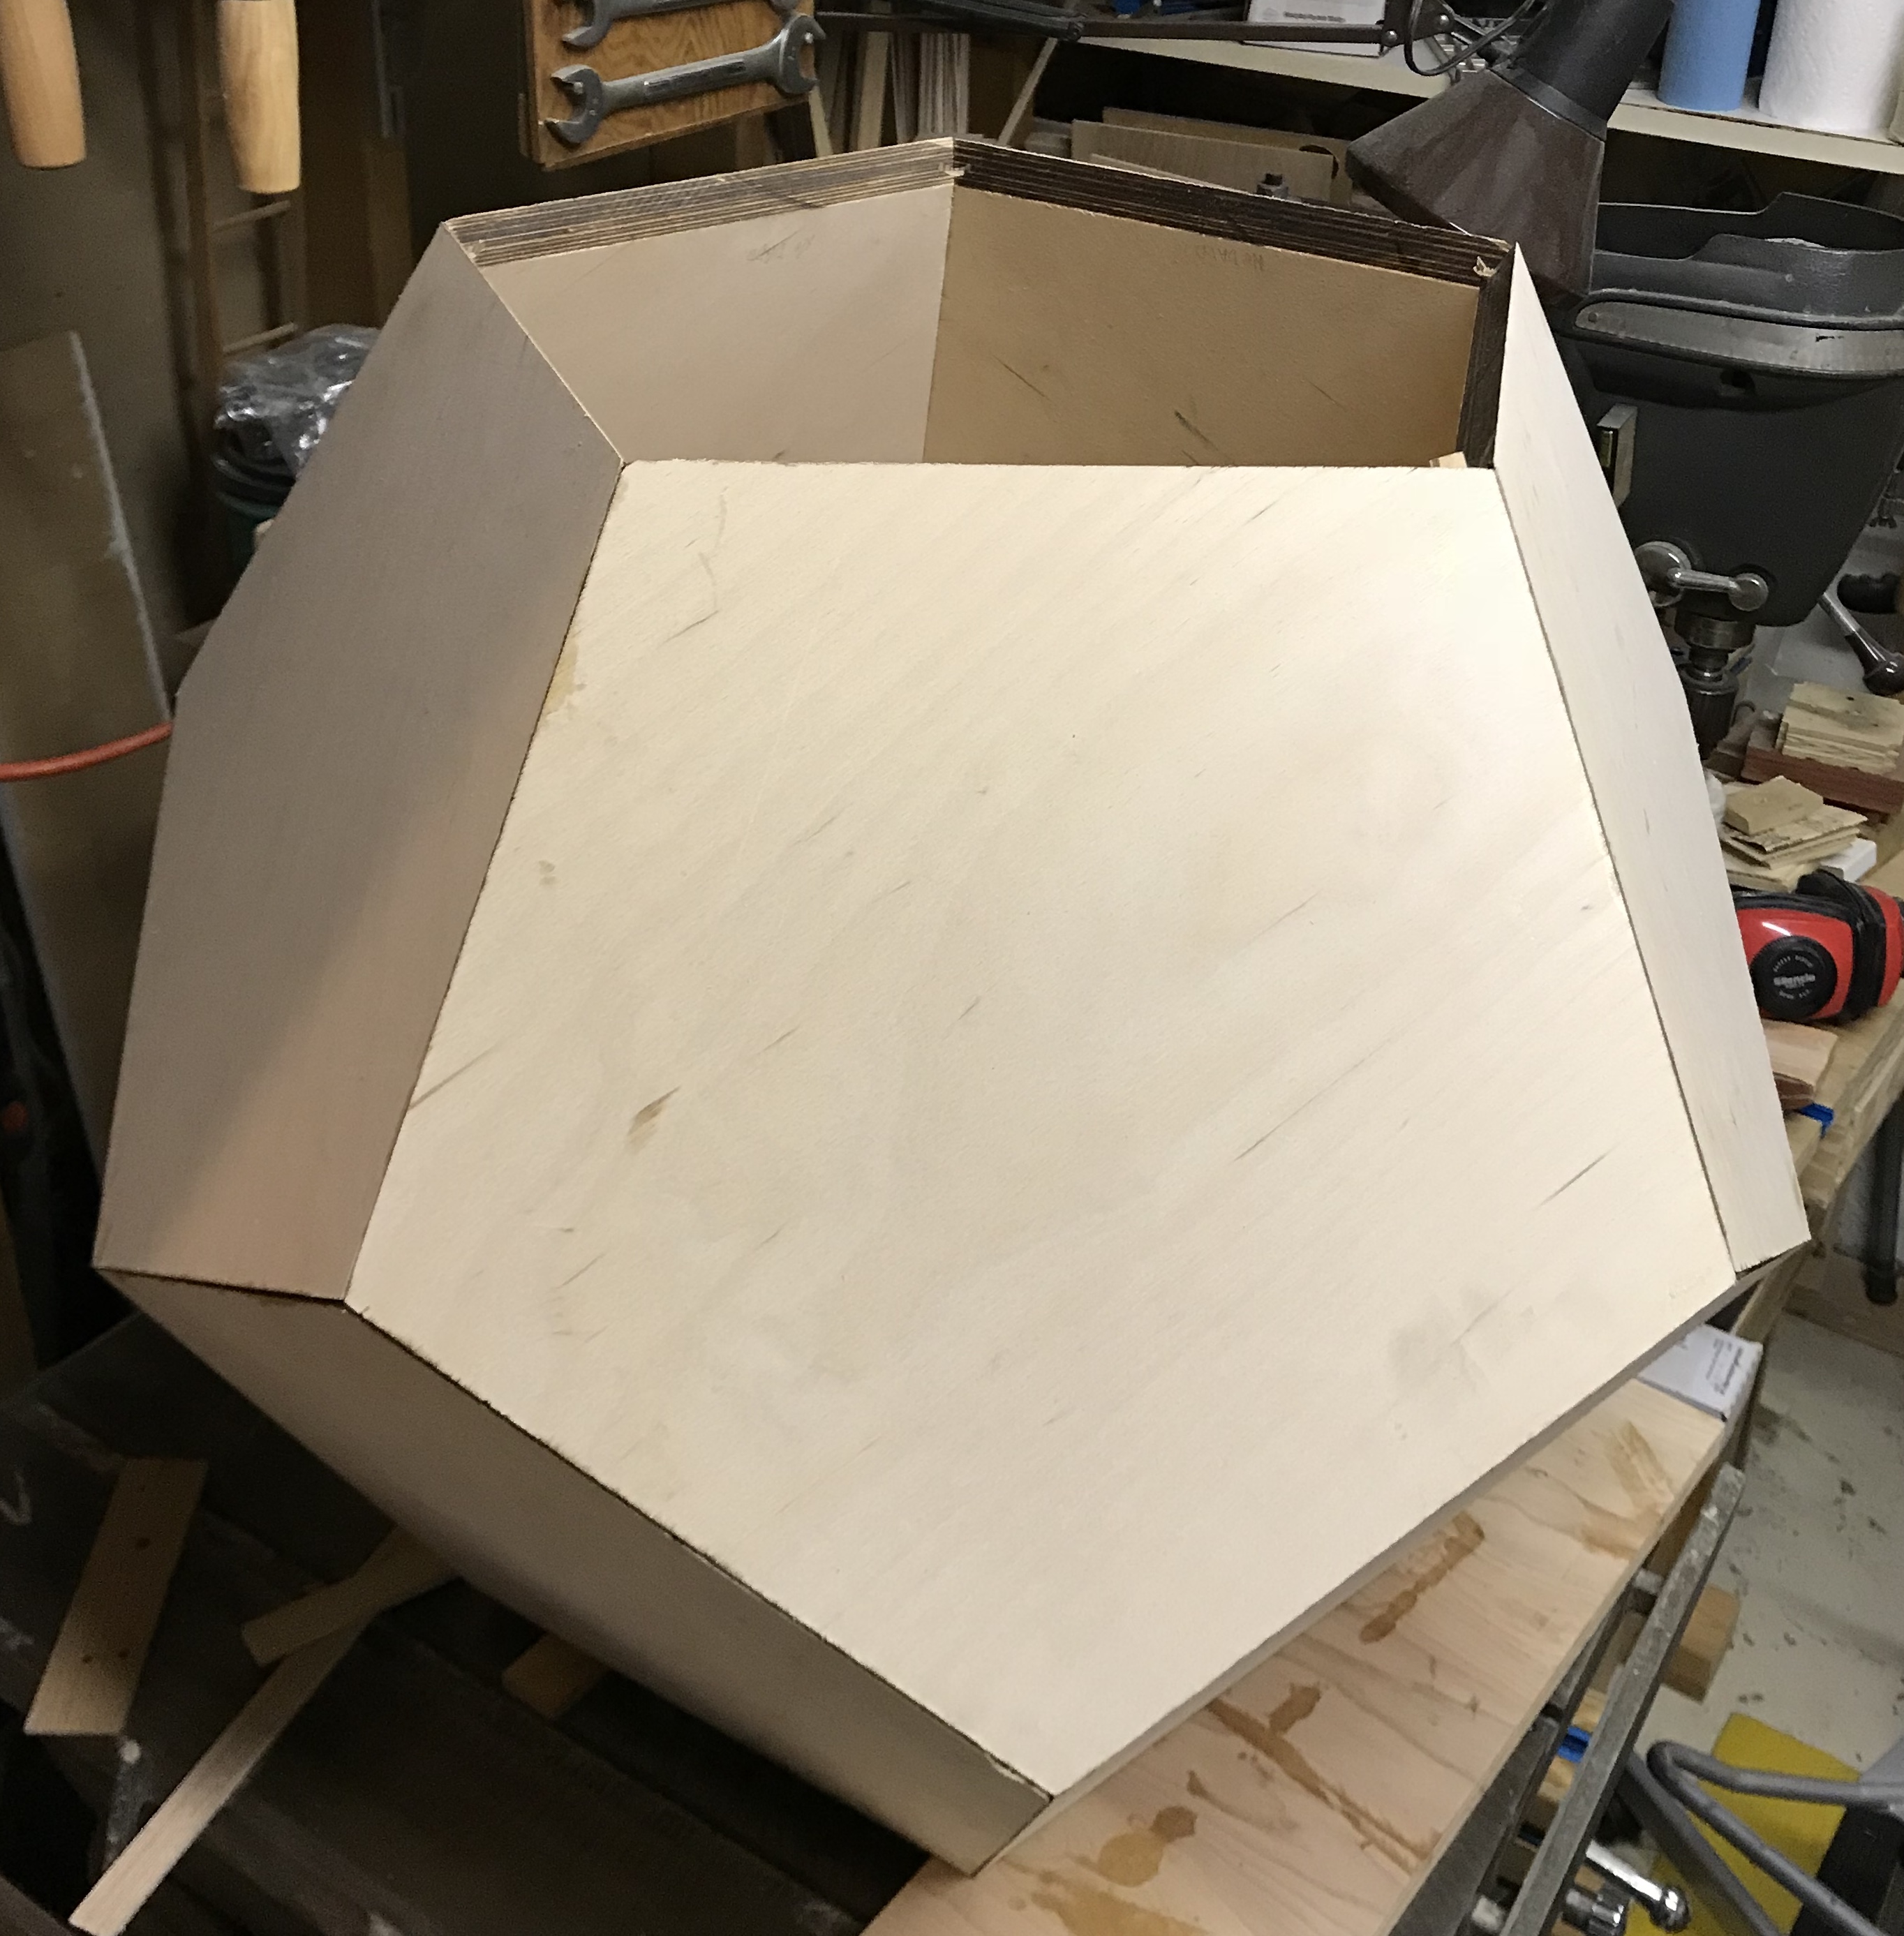
Some 1/8" stock was found and cut to 8 1/2" lengths. The depth of the two cuts when joined was slightly less than 1/2", so this material was cut off in 7/16" widths. Approximately 30 splines were made. Six pentagons were then dry assembled to test the overall plan. Success as you can see from the pictures below!
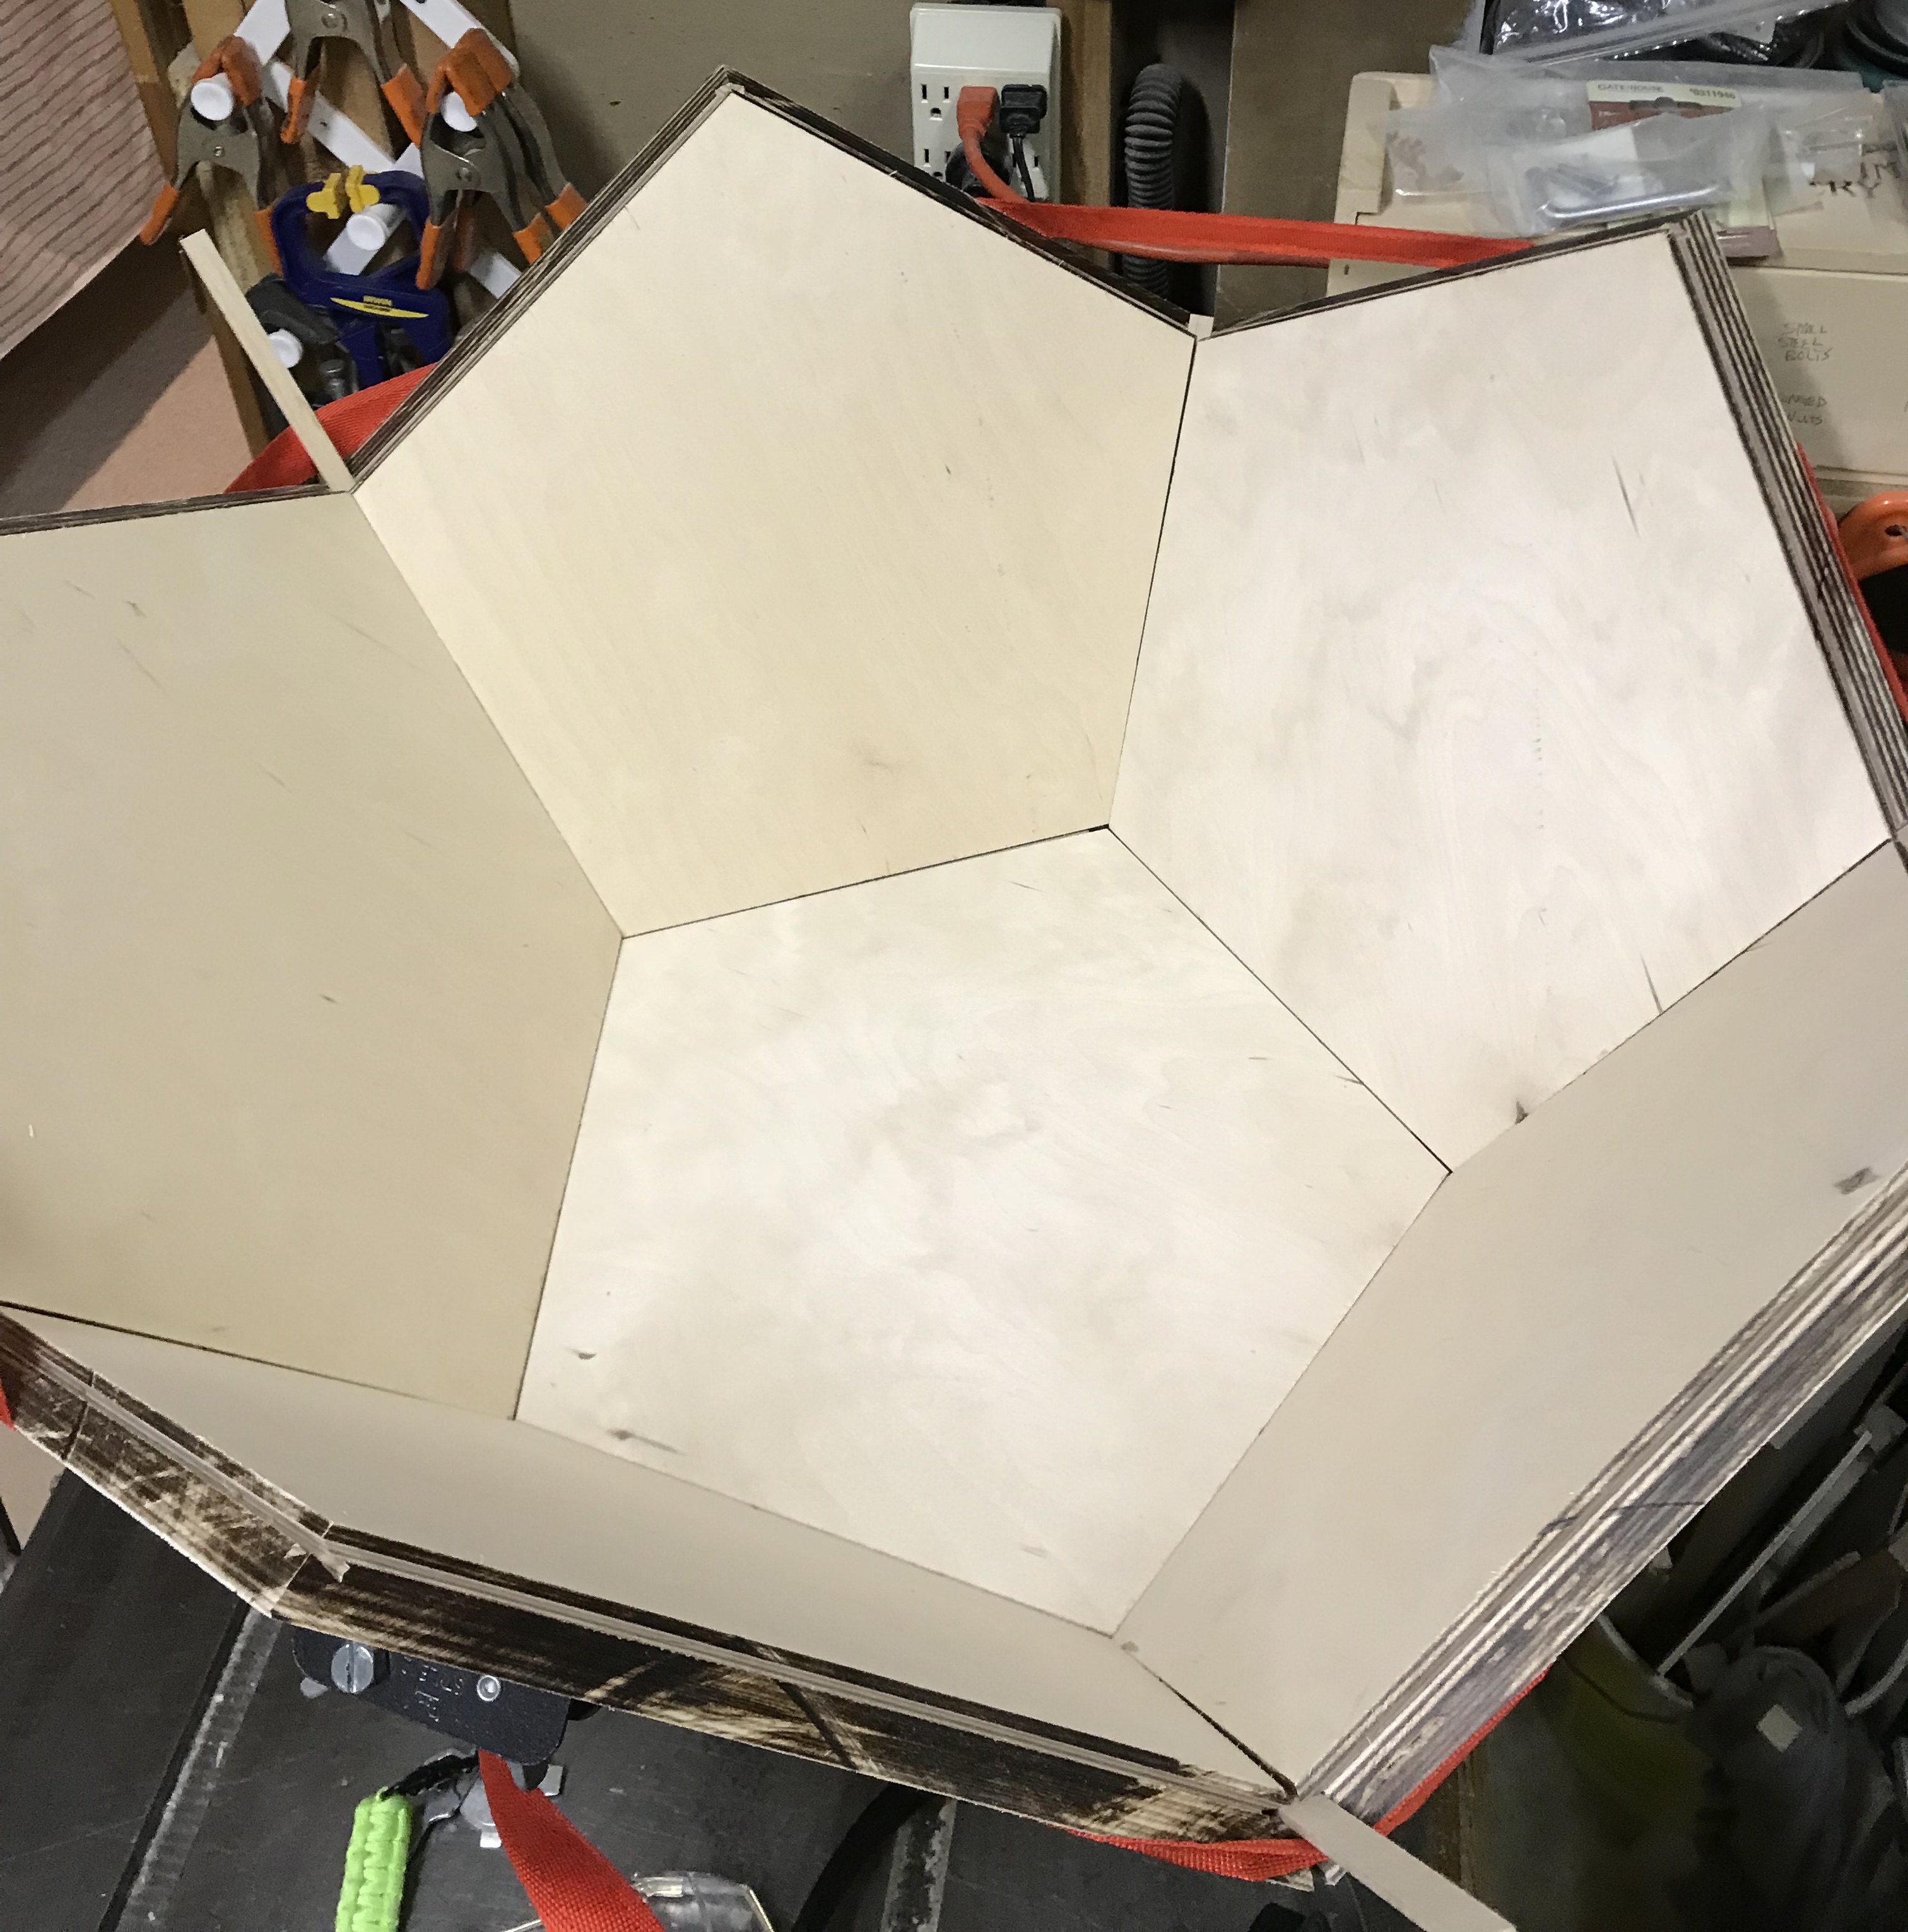
Notice the well toasted pentagon edges. Ah, the sweet smell of burned Baltic birch throughout the house. Even the dadoes were difficult cuts with the regular and sharp carbide tipped blade, but there was no burning.
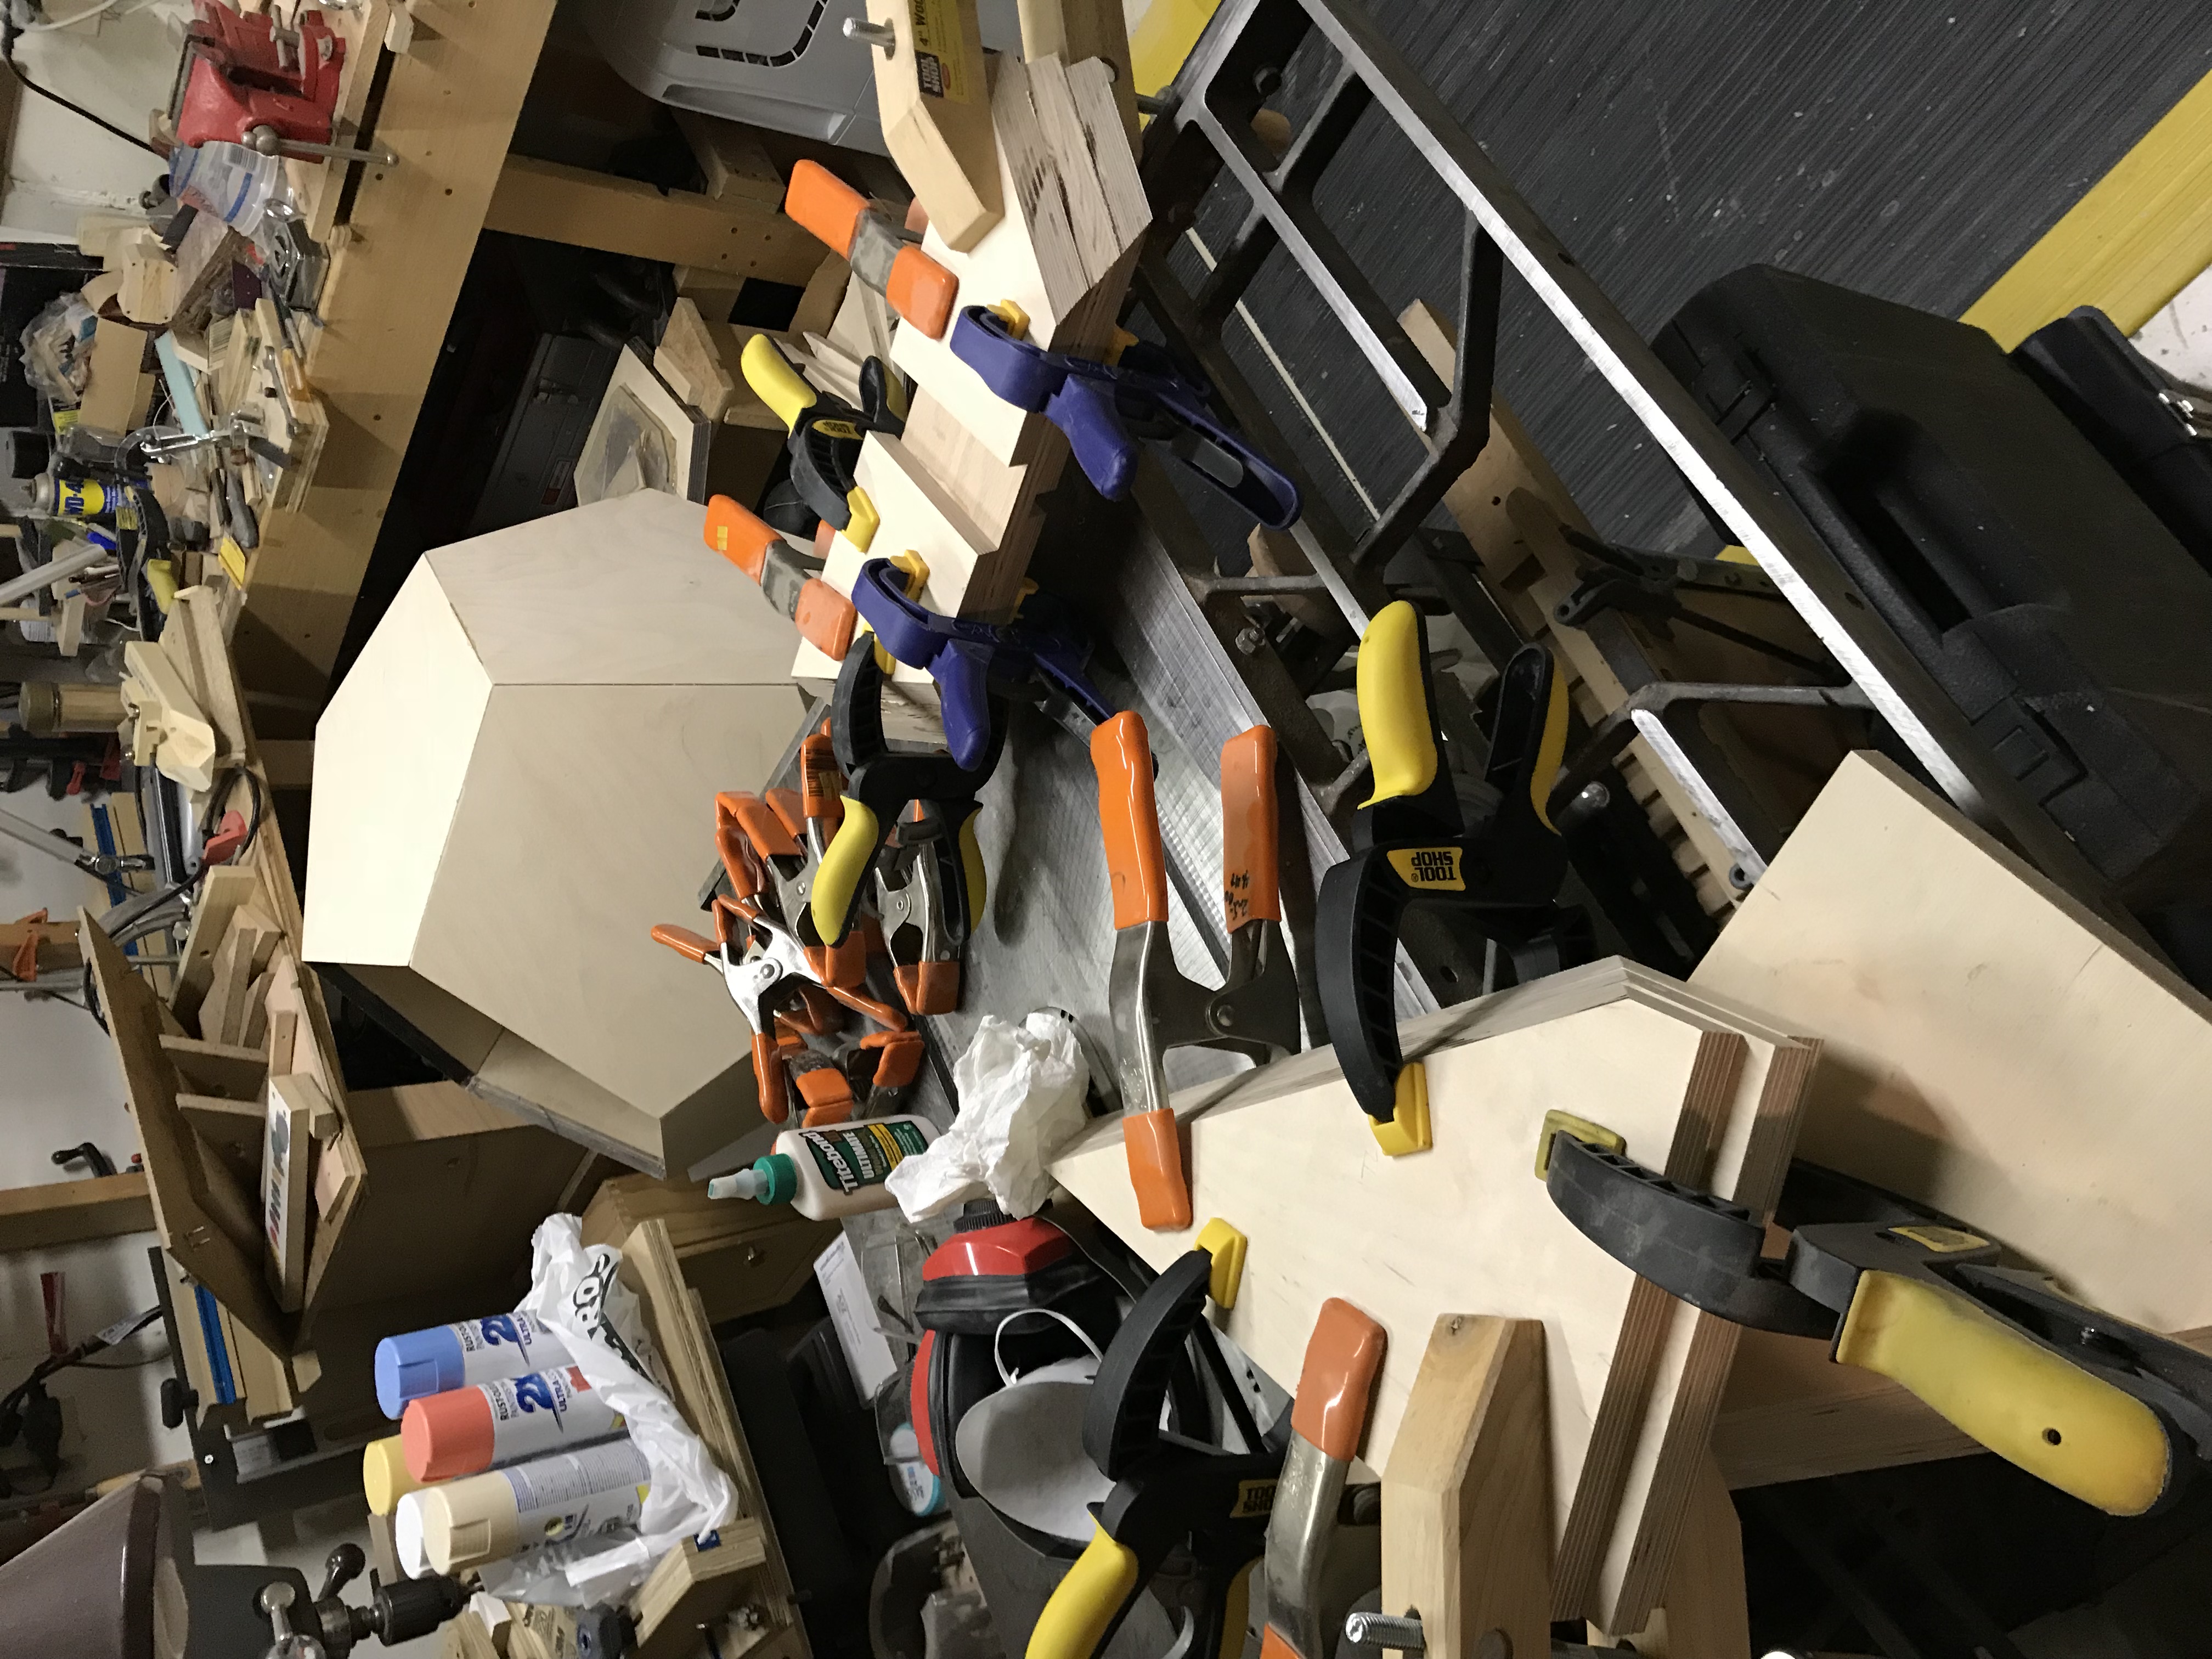
Two part epoxy was used to glue the sides together. A liberal amount was spread on a spline and it was inserted into a dado. Epoxy was then spread on both faces of the joint and on the protruding part of the spline and the sides were attached. As more sides were attached epoxy was also spread on faces to be joined in this first set. It was necessary, but quite difficult to get the first six sides together and bound with a strap clamp. The bottom six sides were left to dry overnight. There was quite a bit of glue runout in some places, so carefully planned support is needed. A bit of light could also be seen through some of the corners. These will need to be sealed. This was at least partially accomplished by spreading epoxy along the gaps on the inside of the dodecahedron as it exists so far. This seemed to do a nice job of filling the gaps. Will do the same on the inside of the remainder when finished as well as on the outside.
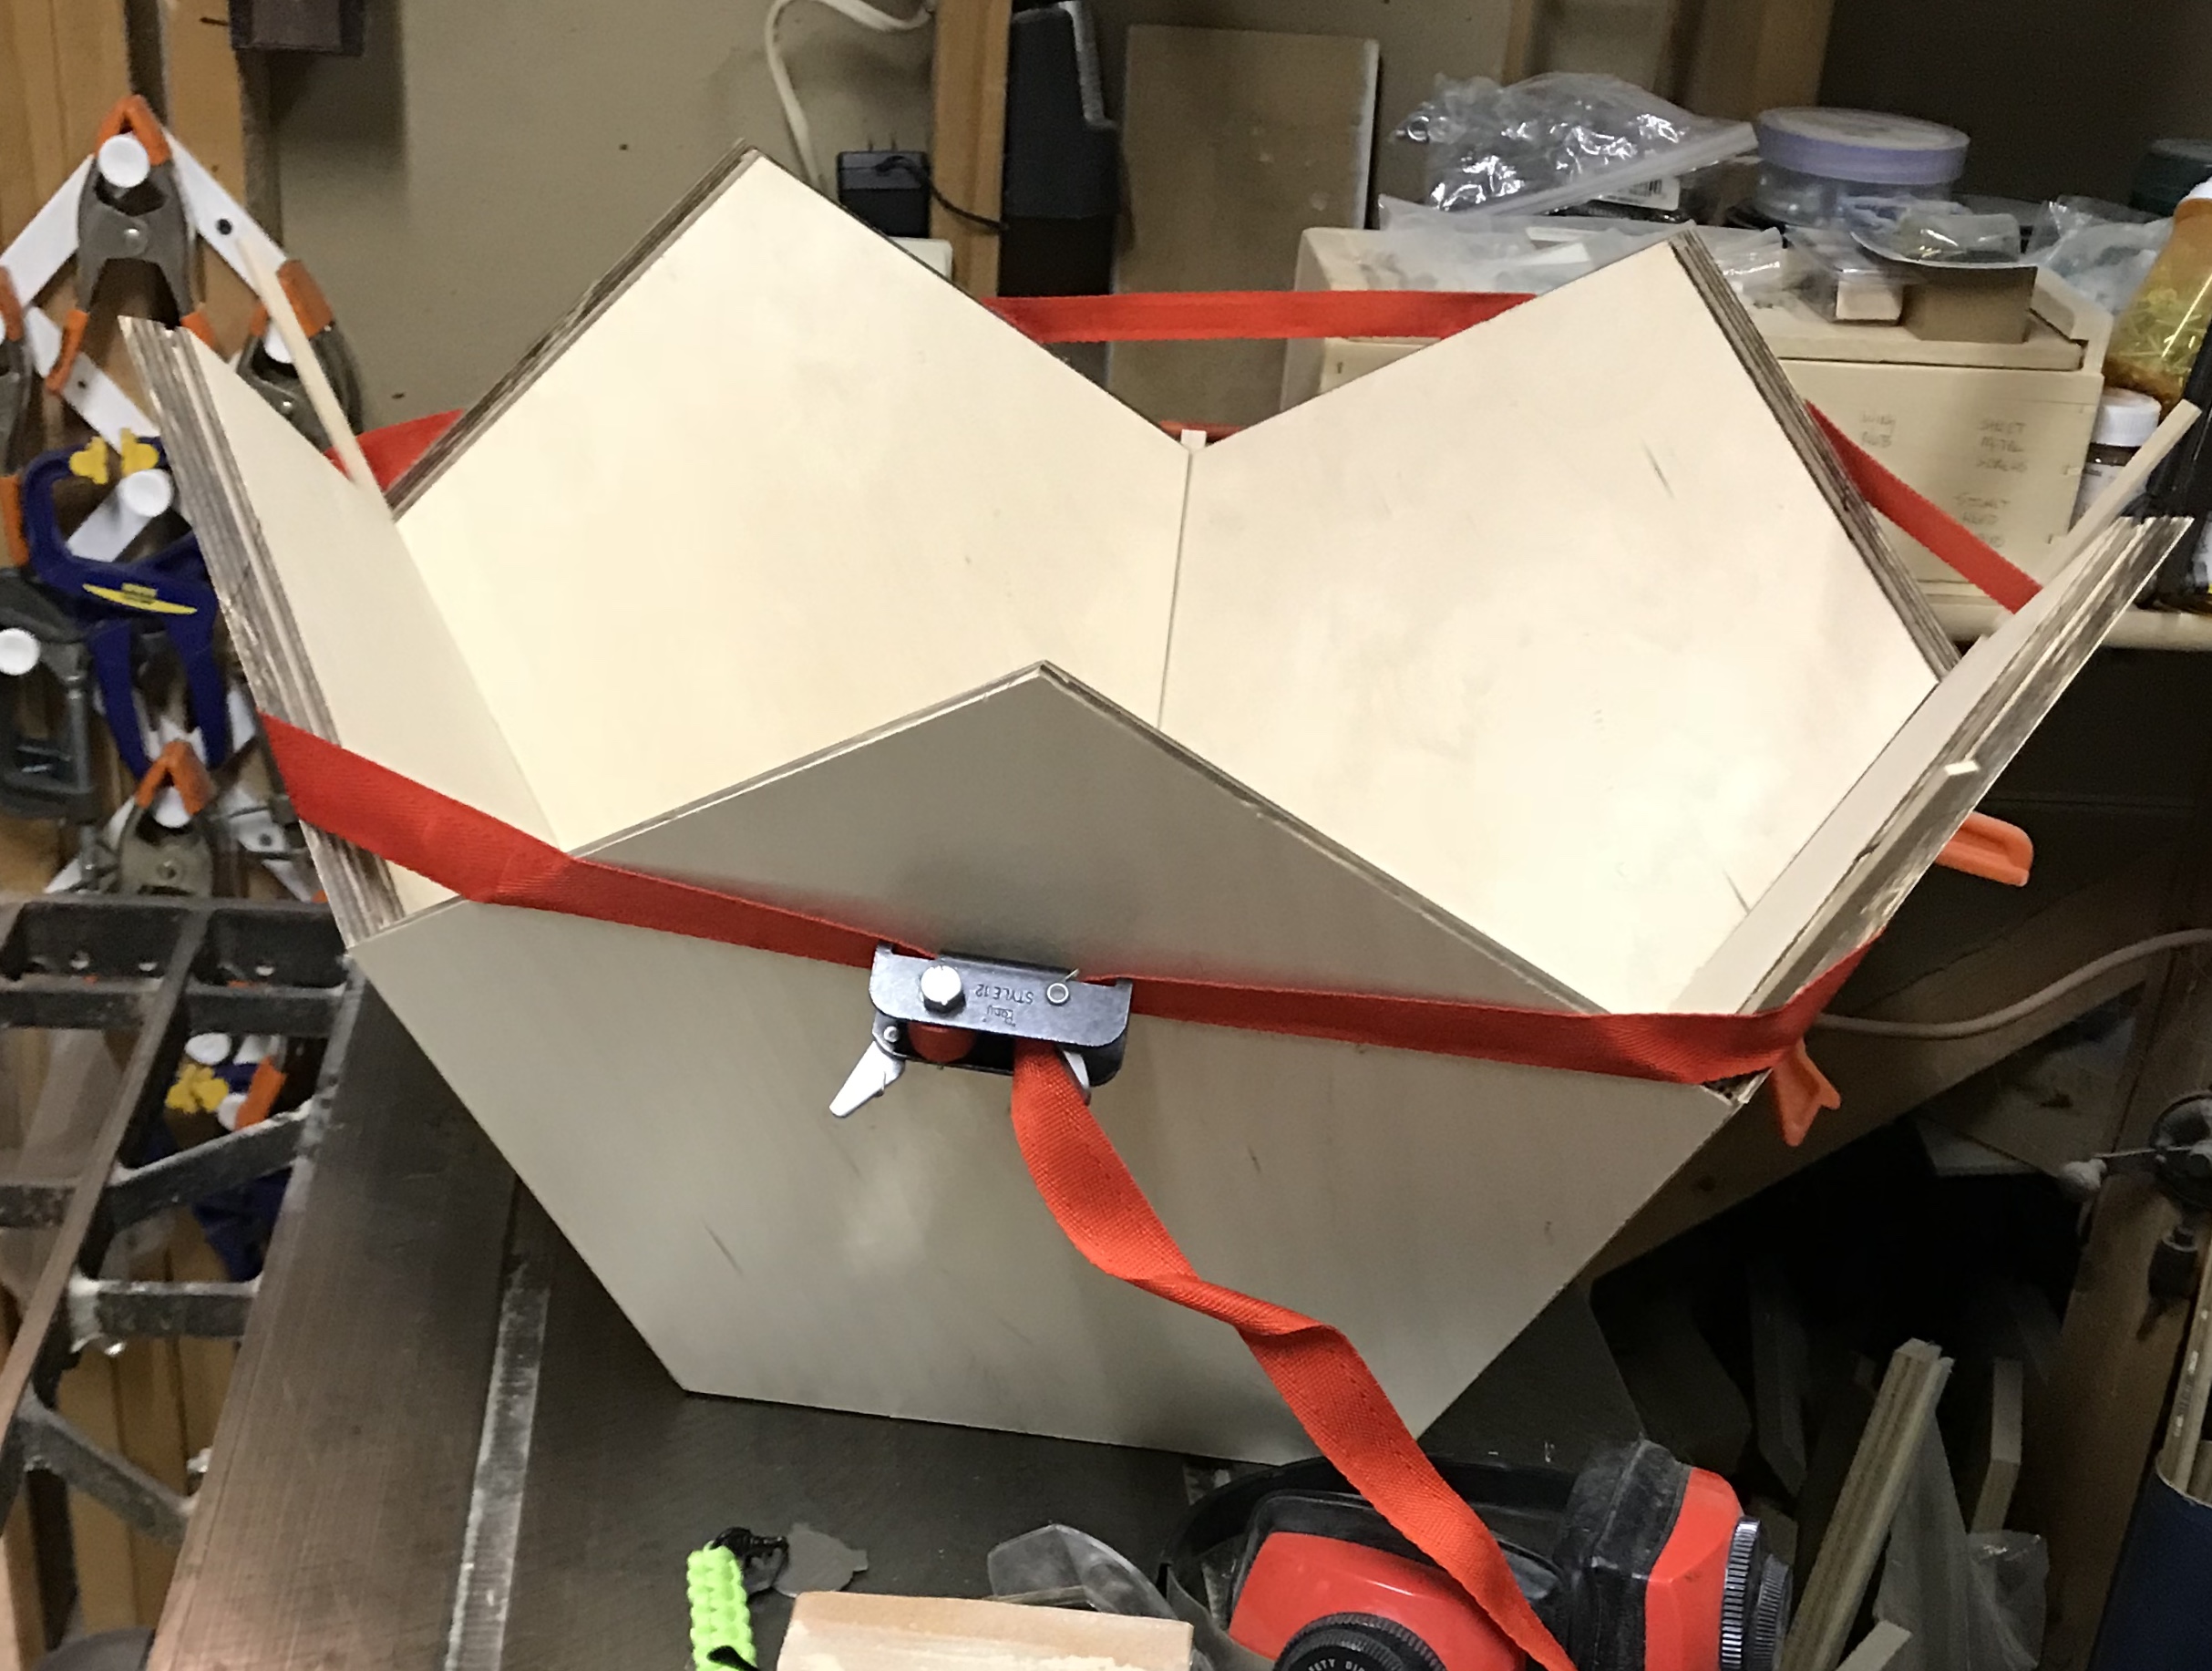
The final five sides were glued on next. They all went on smoothly including the last which required mating the side to two splines before sliding home the last two splines. One joint required clamping. This was accomplished by clamping C clamps on either side of the joint and clamping the C clamps together with a bar clamp. The photo below shows the dodecahedron with all sides glued. Epoxy was spread along the joints to fill any gaps both inside and out. This was done over multiple days as only top edges could be filled due to the thin nature of the epoxy.
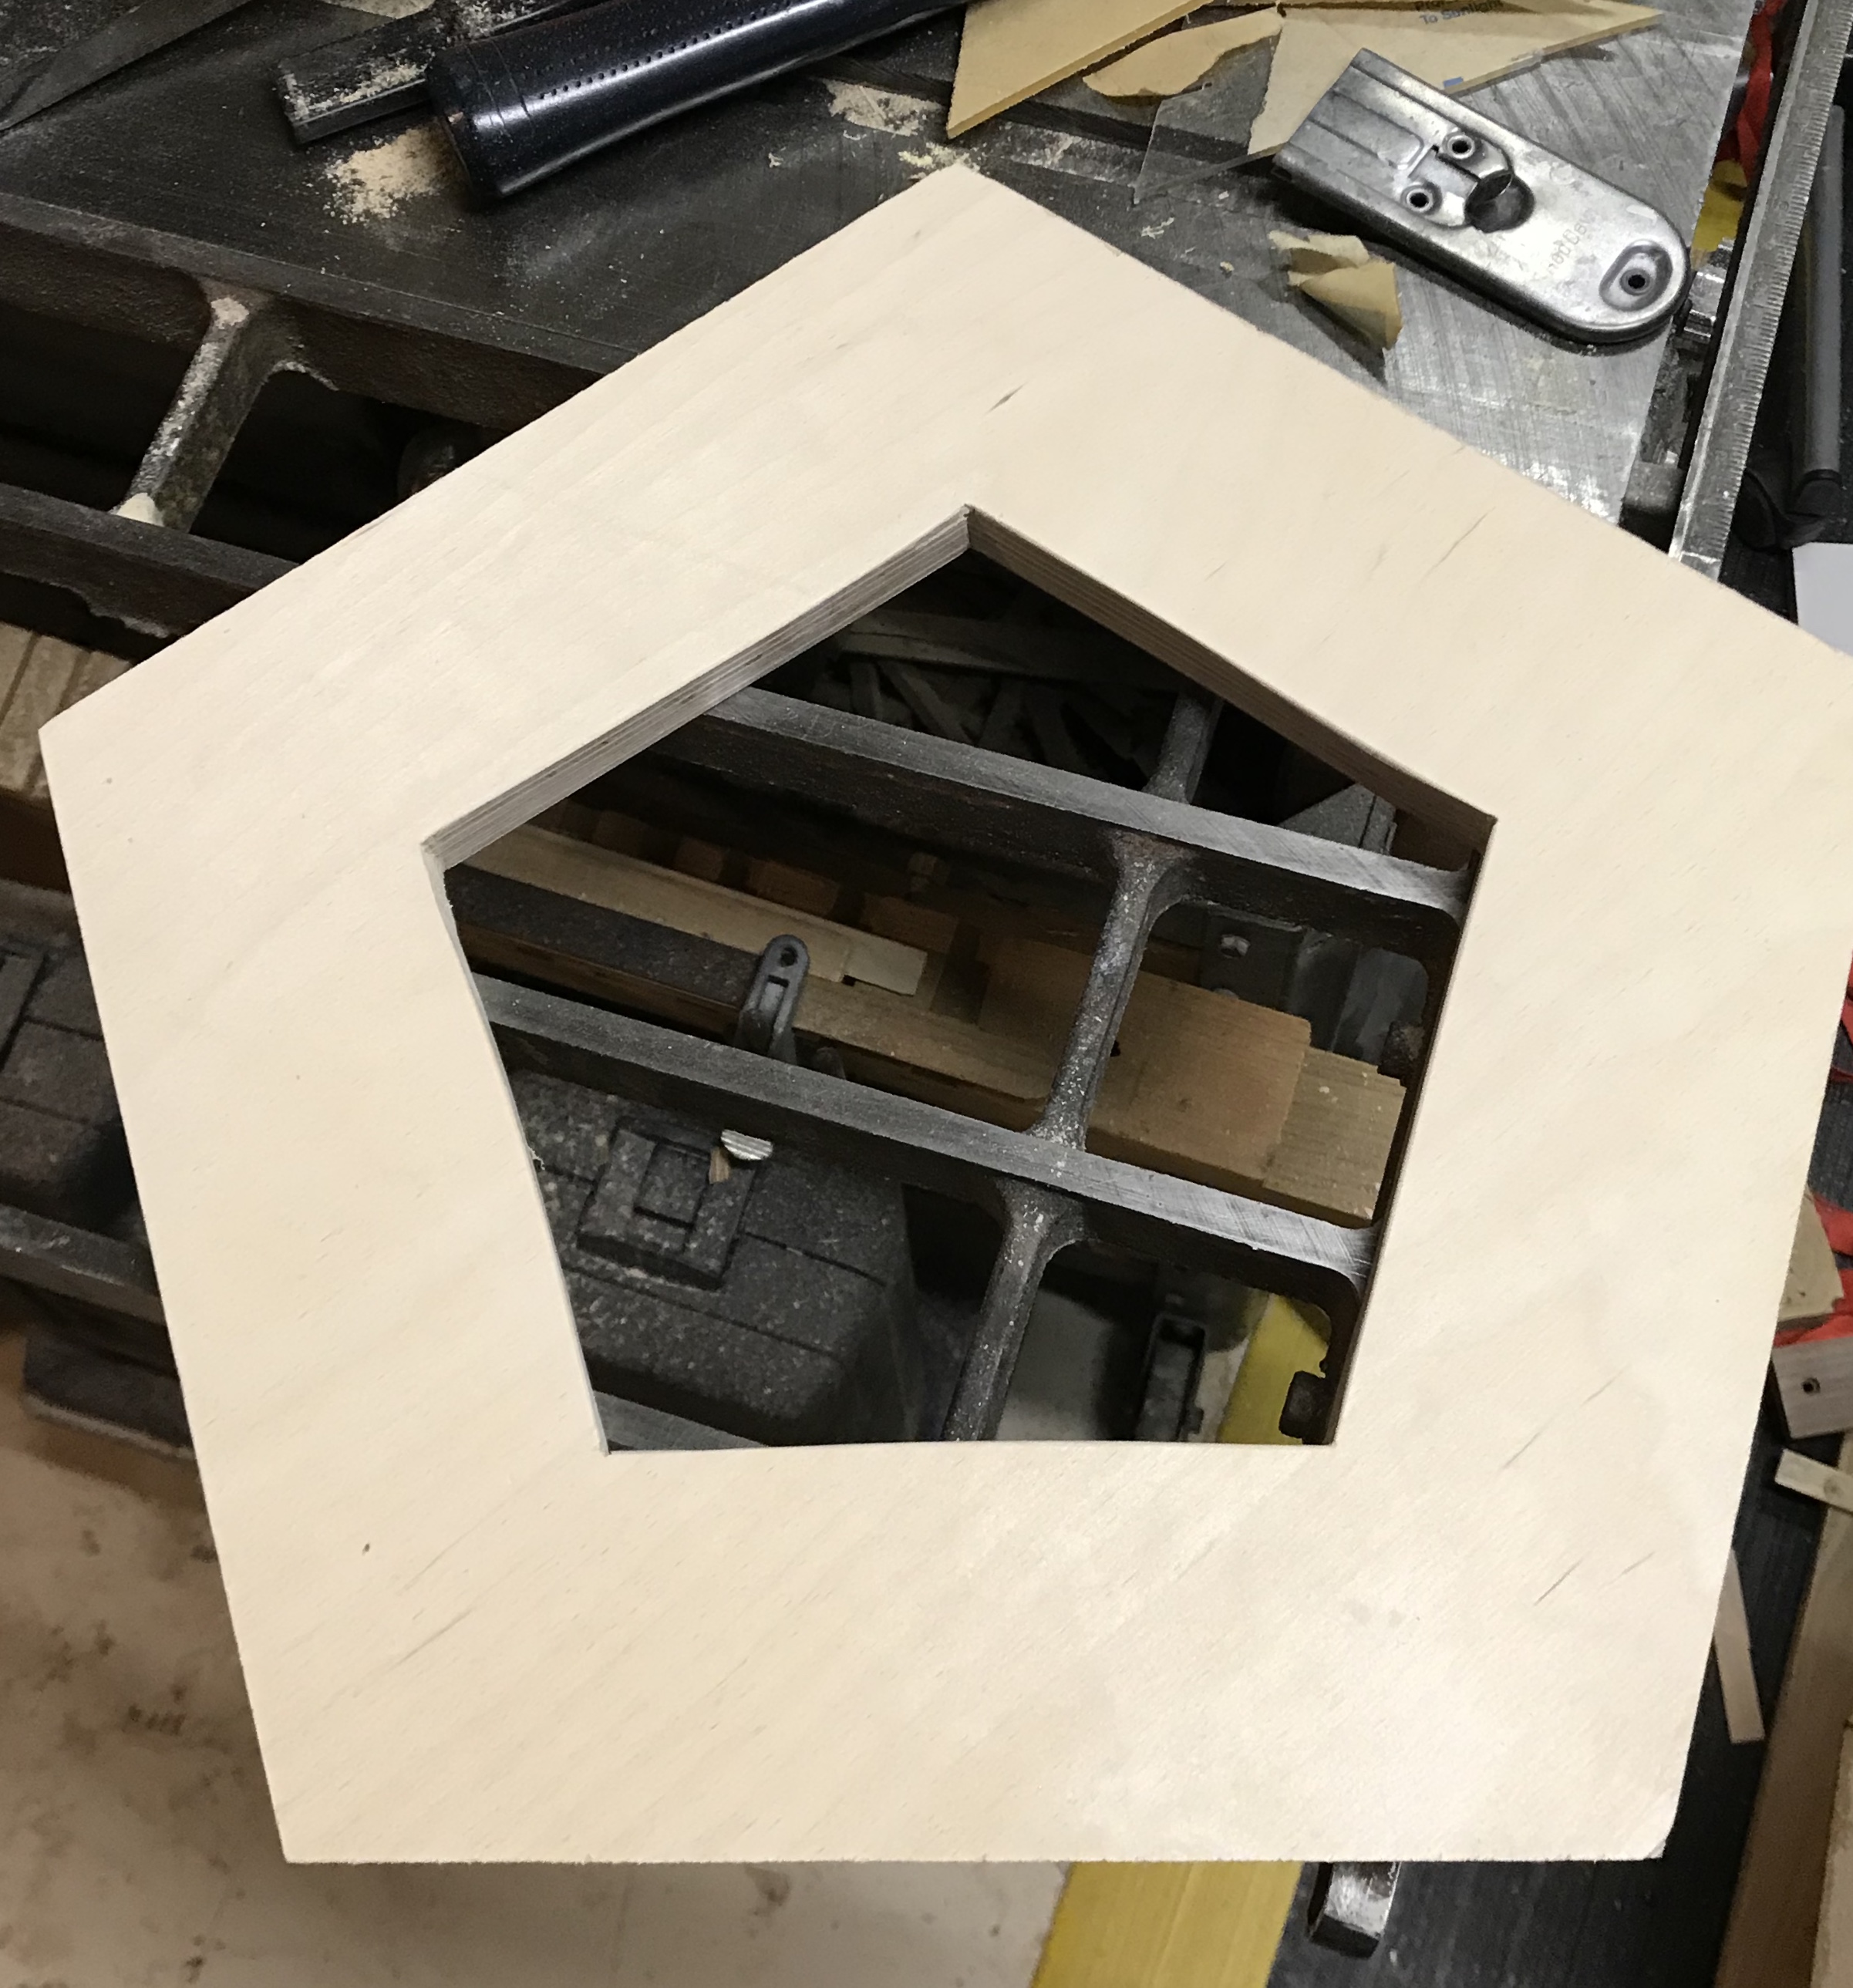
A section of Lexan plastic that was about 1/8" thick was cut in the approximate shape of a pentagon with the sabre saw using a fine tooth blade. The cut went well. Unfortunately, peeling the paper off left hardened glue, that could not be scraped off, nor would acetone dissolve it without etching the plastic. Meanwhile, the back of the door was marked for a pentagonal hole two inches from each side. Holes (5/16") were drilled 3/16" from each side in the corners. The sabre saw with a Bosch blade was used to cut the pentagon out. This went well with only a little off-line wander. The outside edges were rounded off with sand paper. A sheet of 1/4" acrylic plastic was purchased at Menard's and cut to the approximate shape of a pentagon. This plastic cutting had more problems with melting probably because it was thicker.
The plastic was glued to the back of the door with a thin layer of epoxy and was held in place with 9-10 clamps. It was easy to see the clamps squeeze out the air bubbles in the epoxy. Made sure there was a little glue on the front inside edges squeezed out to provide a good water seal.
Spray paint was purchased at Menard's. Rustoleum Painter's Touch 2X was selected. Primer and four gloss colors were chosen. The colors are called spa blue, warm yellow, coral, and ivory. Using the web color selectors were not directly useful, but helped me focus on fewer choices.
The base was a challenge to plan. Essentially it needs to consist of a 16" square with an equilateral triangle cutout. The triangle must have sloped sides to fit a point of the dodecahedron. When the dodecahedron rests on a point the door is positioned most like a regular door. A piece of the Baltic birch remained from cutting out the pentagons so parts were laid out on it. Three rectangles were cut 8" wide in lengths of 18 1/4", 19 1/16", and 19 7/8". These were then cut in half on the sled used above with the blade set at 32.25° and the wood held at a 30° angle. These form two sides of the triangle and will be stacked so that the angled sides will align to form a continuous slope. The third sides of the triangle were also cut from rectangles (16" X 4 9/32", 5 3/32", and 5 29/32") by mitering the long side at 32.25° and mitering the short sides again with the wood held at a 30° angle.The miters on the long sides were on opposite faces relative to the miters on the short sides. Two of these rectangles were too short as there was insufficient wood. These pieces were cut in half. The pieces were glued to form the stack with space between them so the mitered ends were aligned. The pieces were then glued together face-to-face to form the three layer thick stack. Two small rectangles of plywood were cut to fit the gaps after gluing up the stack. The sides of these stacks were cut to length on two opposite ends. The end with the two long pieces aligned in the middle was faced with a rectangle (2 1/4" X 16") of plywood (screwed and glued). The screws were countersunk and the holes were plugged with plugs cut from a 3/8" dowel rod.
The lengths of the mirror image sides cut from the same rectangle were very poorly selected. The cut line needs to be adjusted in one direction or the other about 3/8" or so, but for the life of me I could not figure out how to do this, so the lengths varied substantially. Thus the "cutting to length" above.
While gluing up the base the dodecahedron was sanded. Before sanding the larger globs of hardened epoxy were carefully removed with a chisel. Sanding by hand was attempted first. It was very slow and not very productive even with a coarse grit of paper. The orbital sander with 100 grit paper was tried next and this quickly removed the excess epoxy and left a smooth finish on the faces of the dodecahedron. Many gaps were filled with multiple layers of glue. This was also the case with the base.
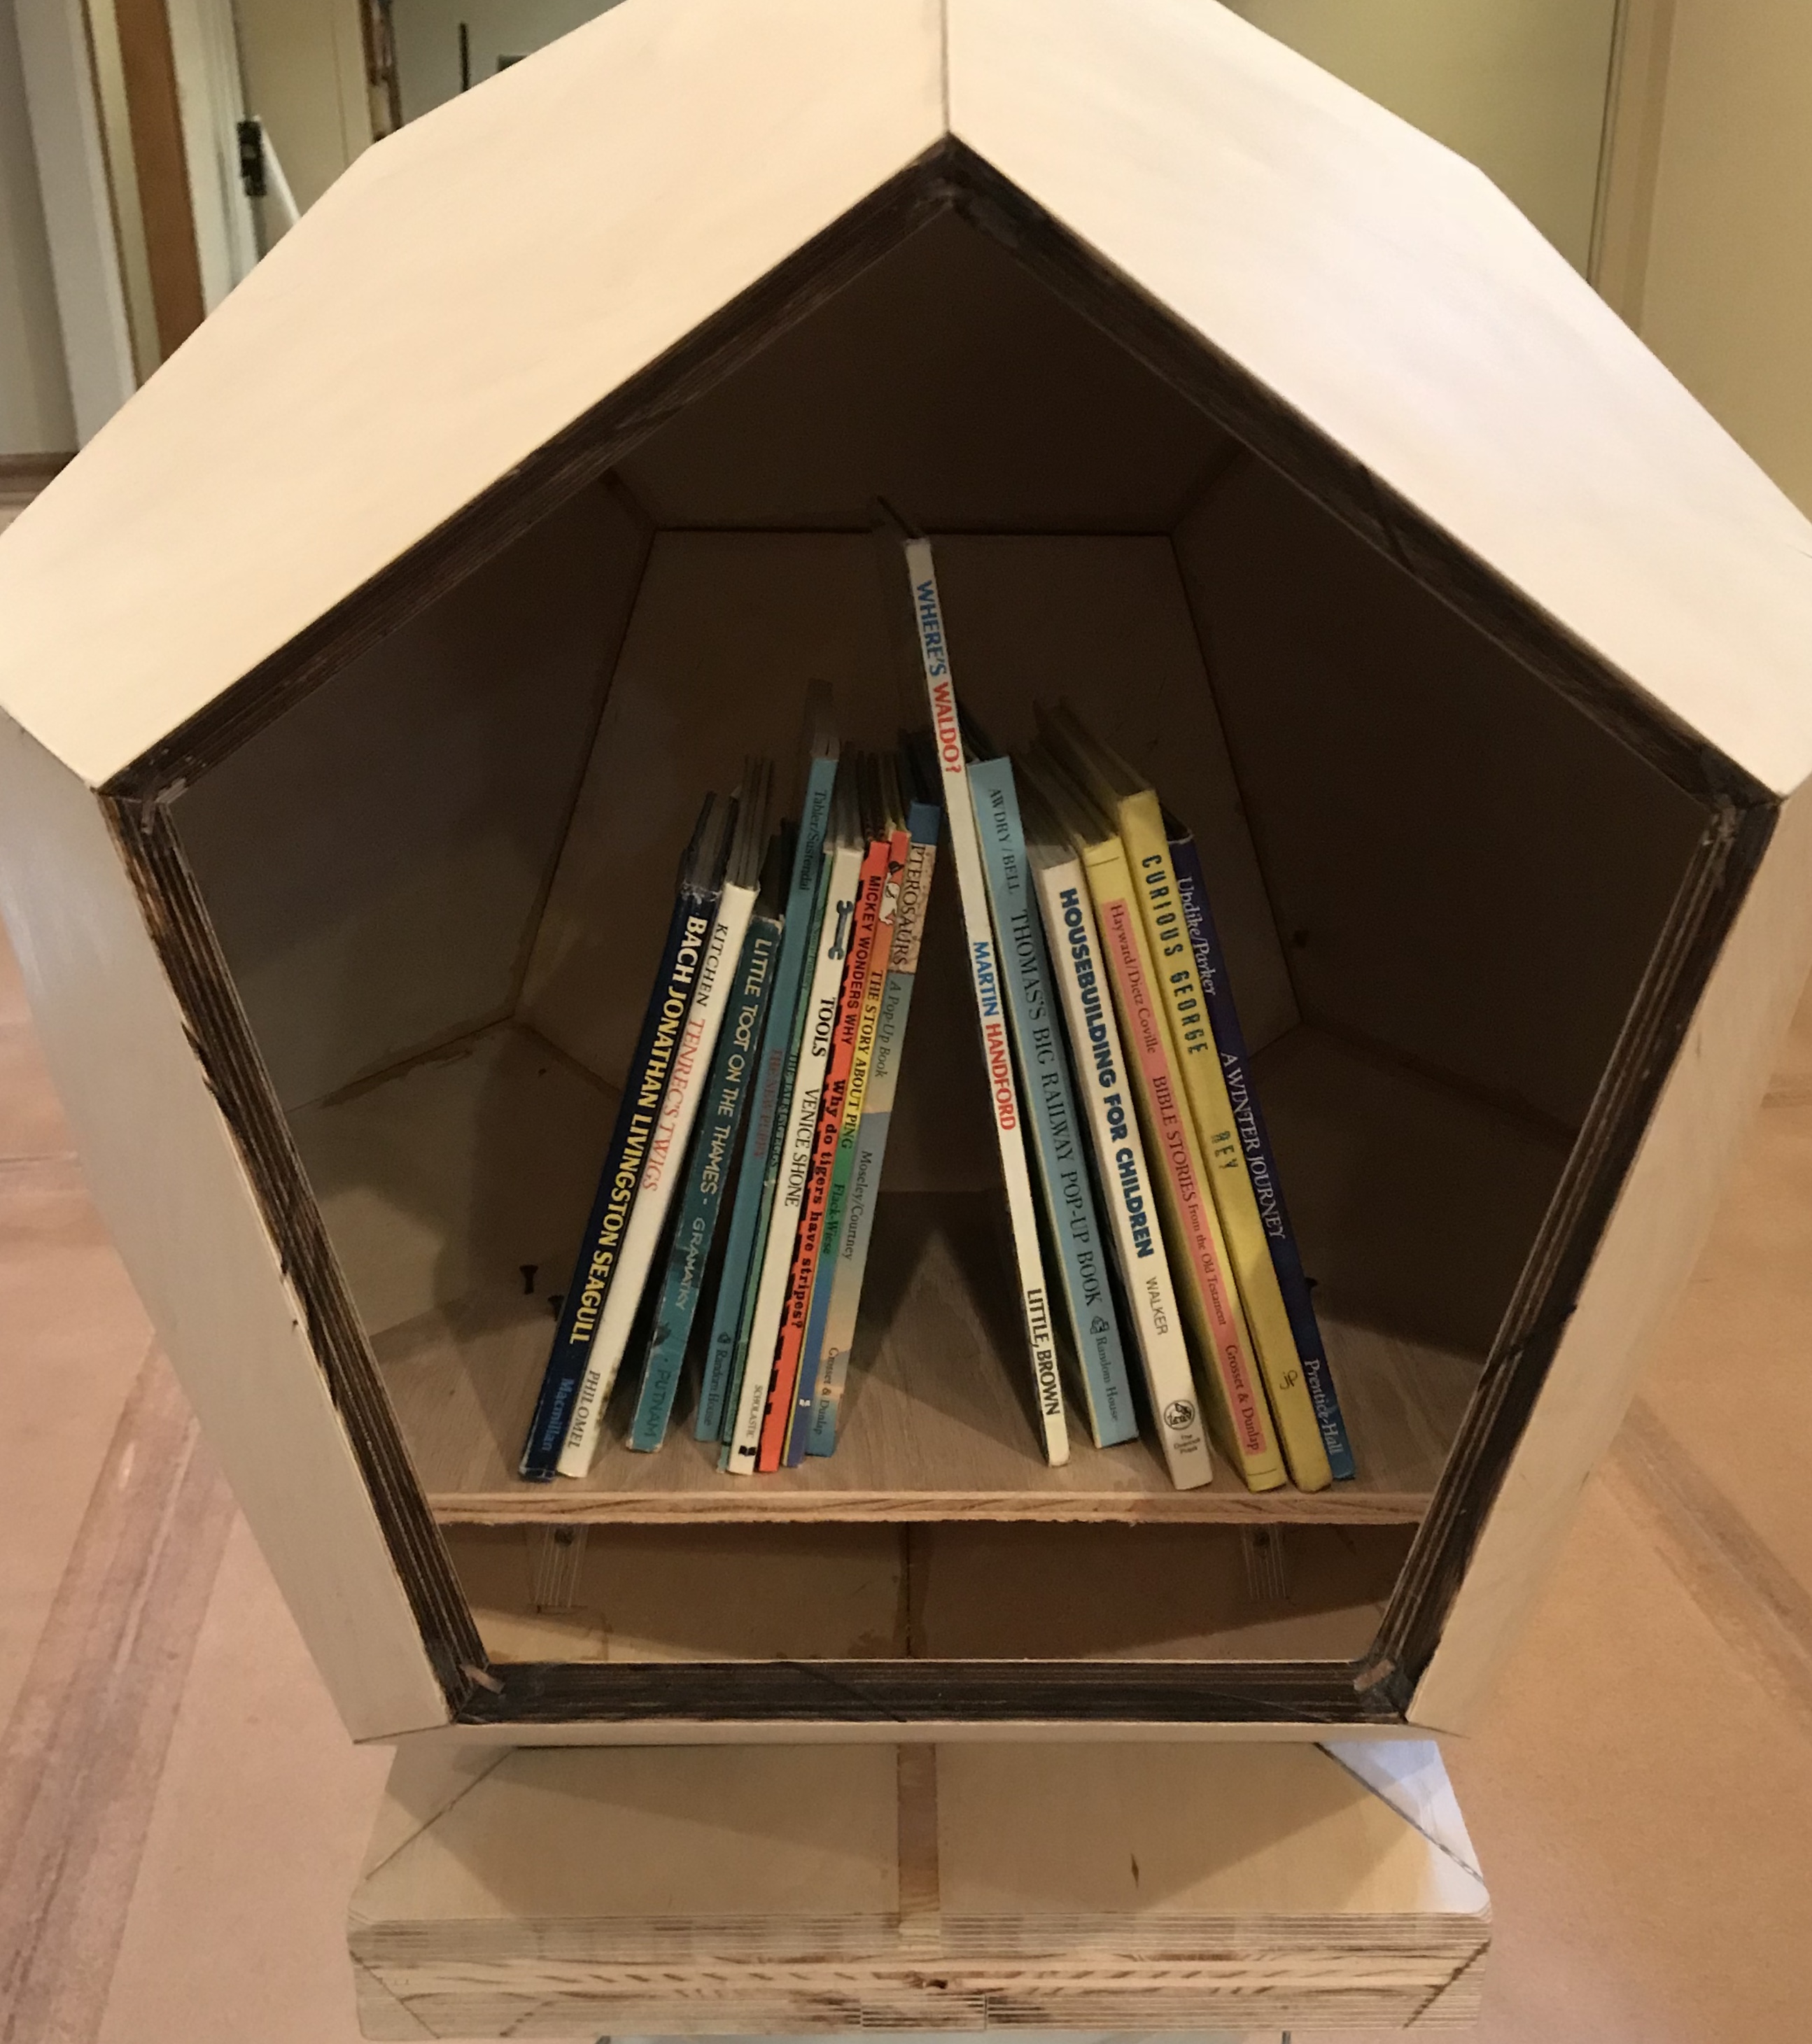
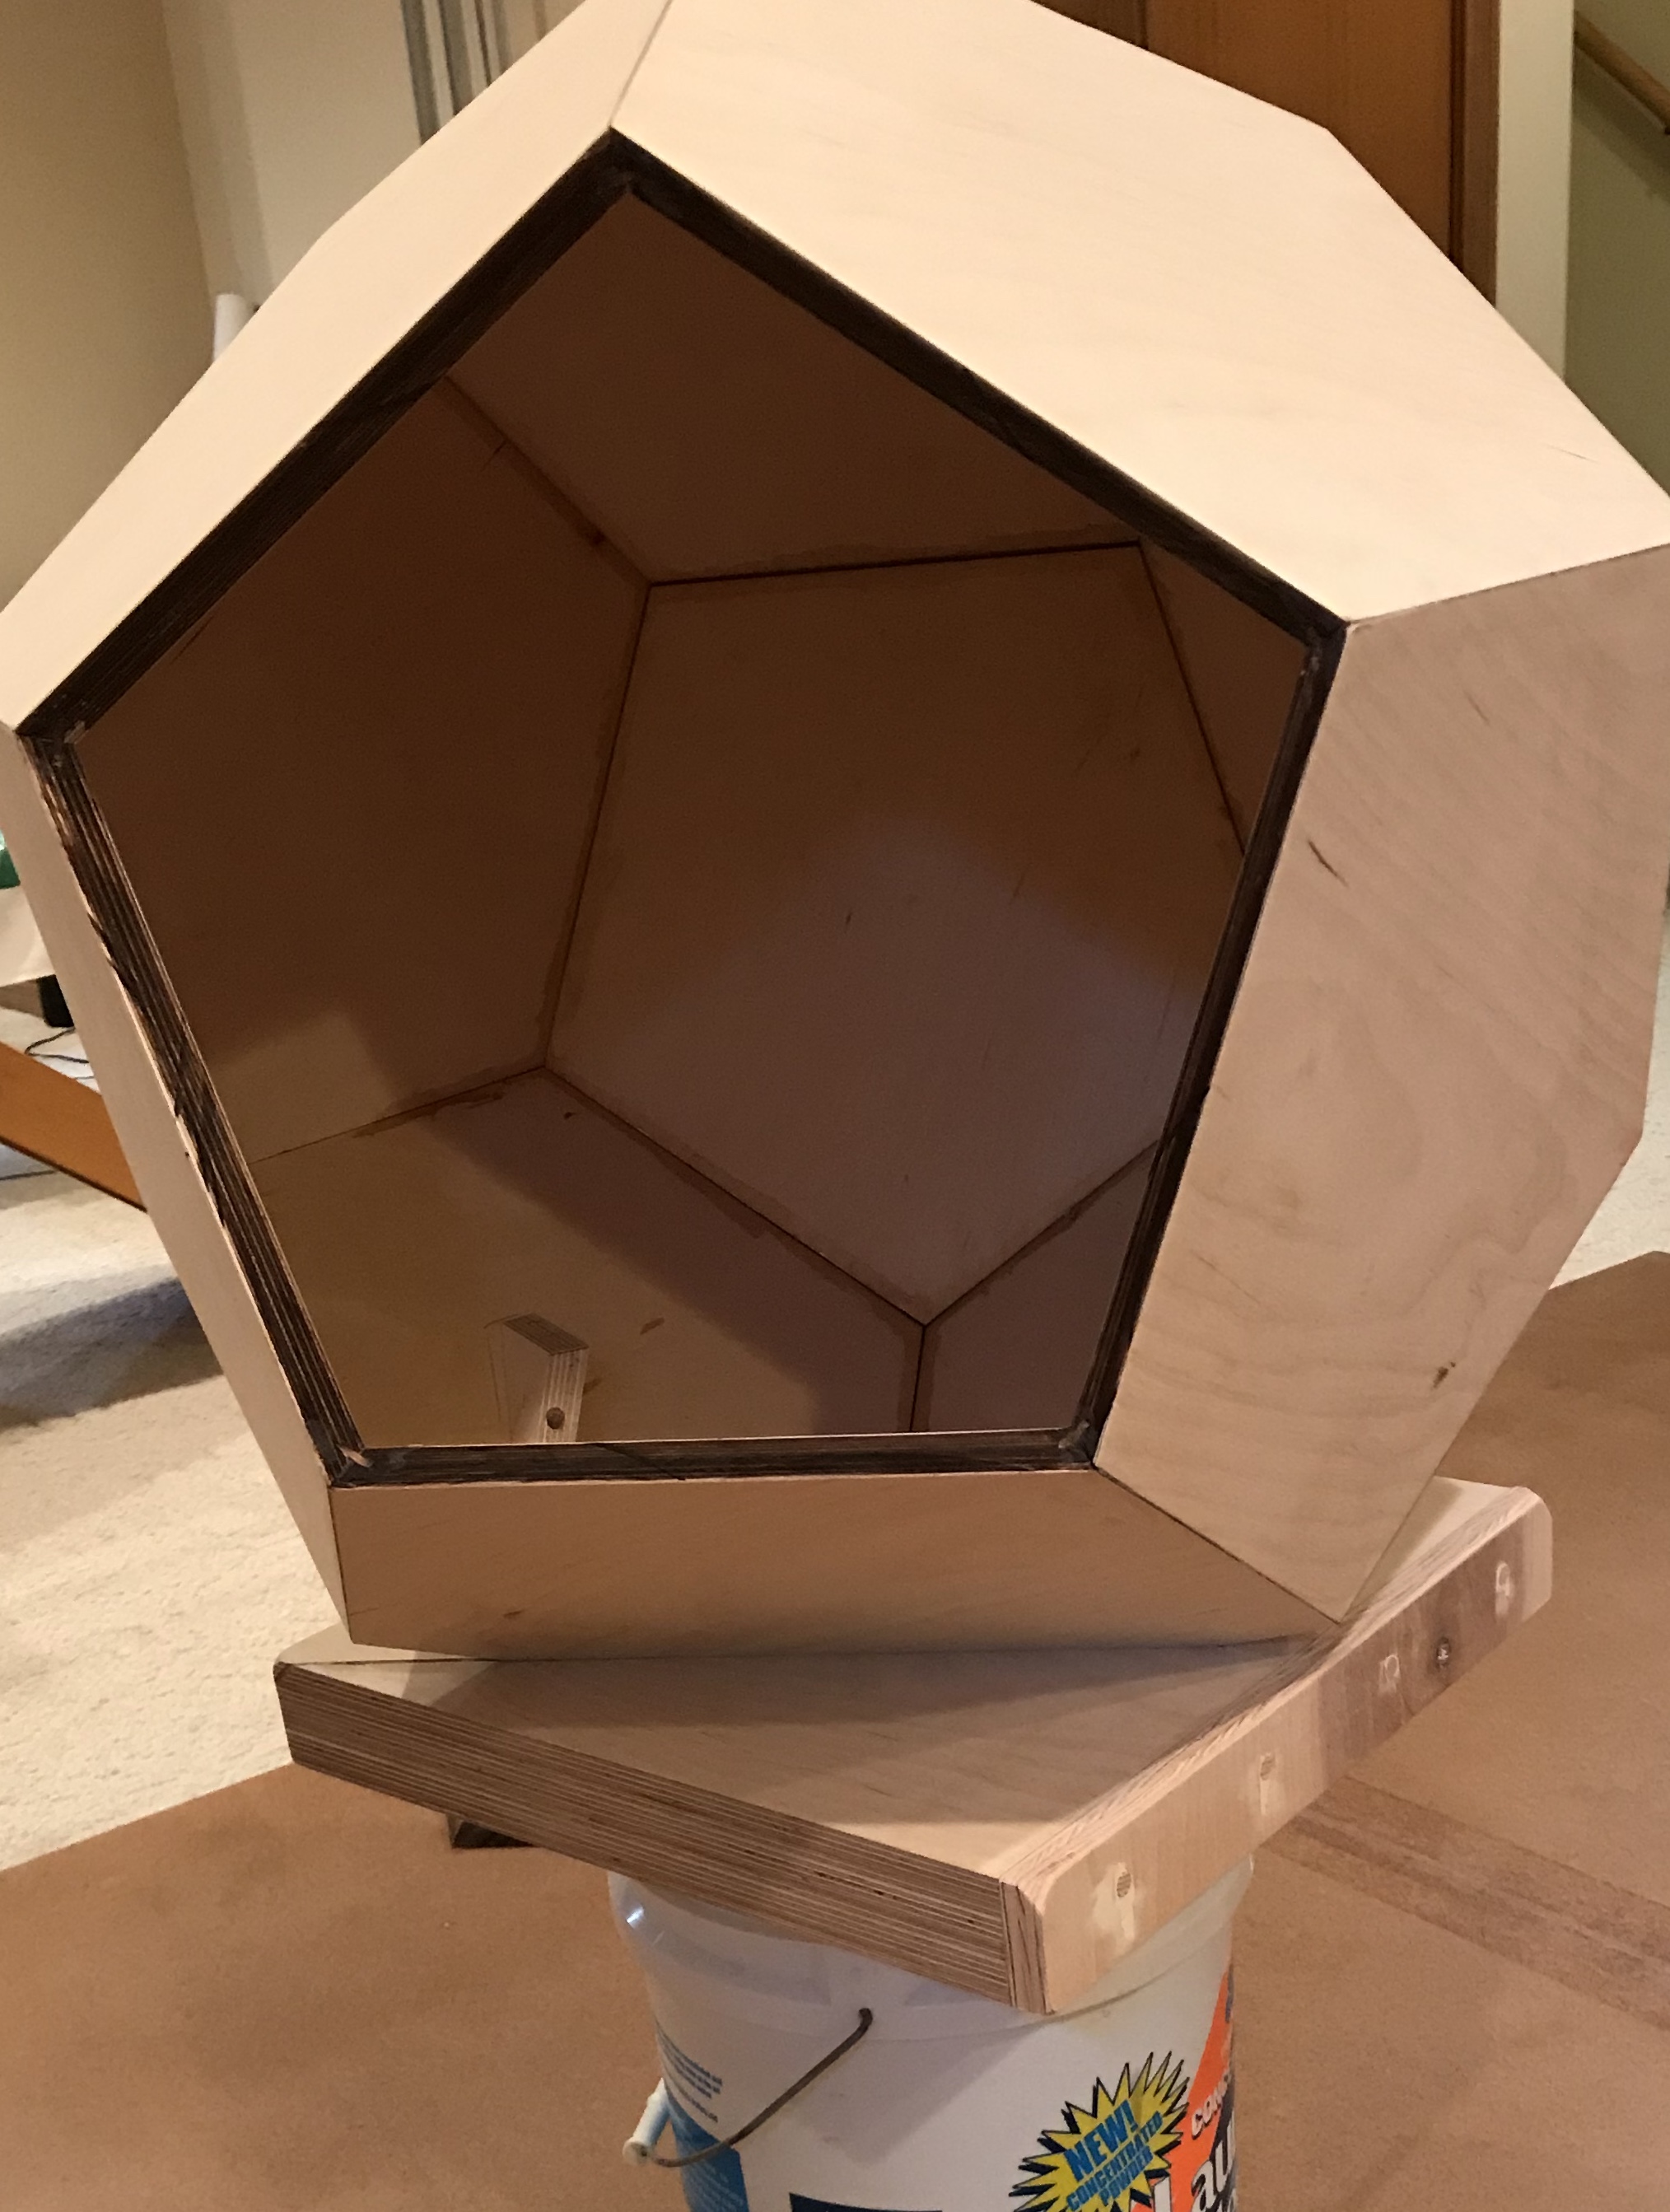
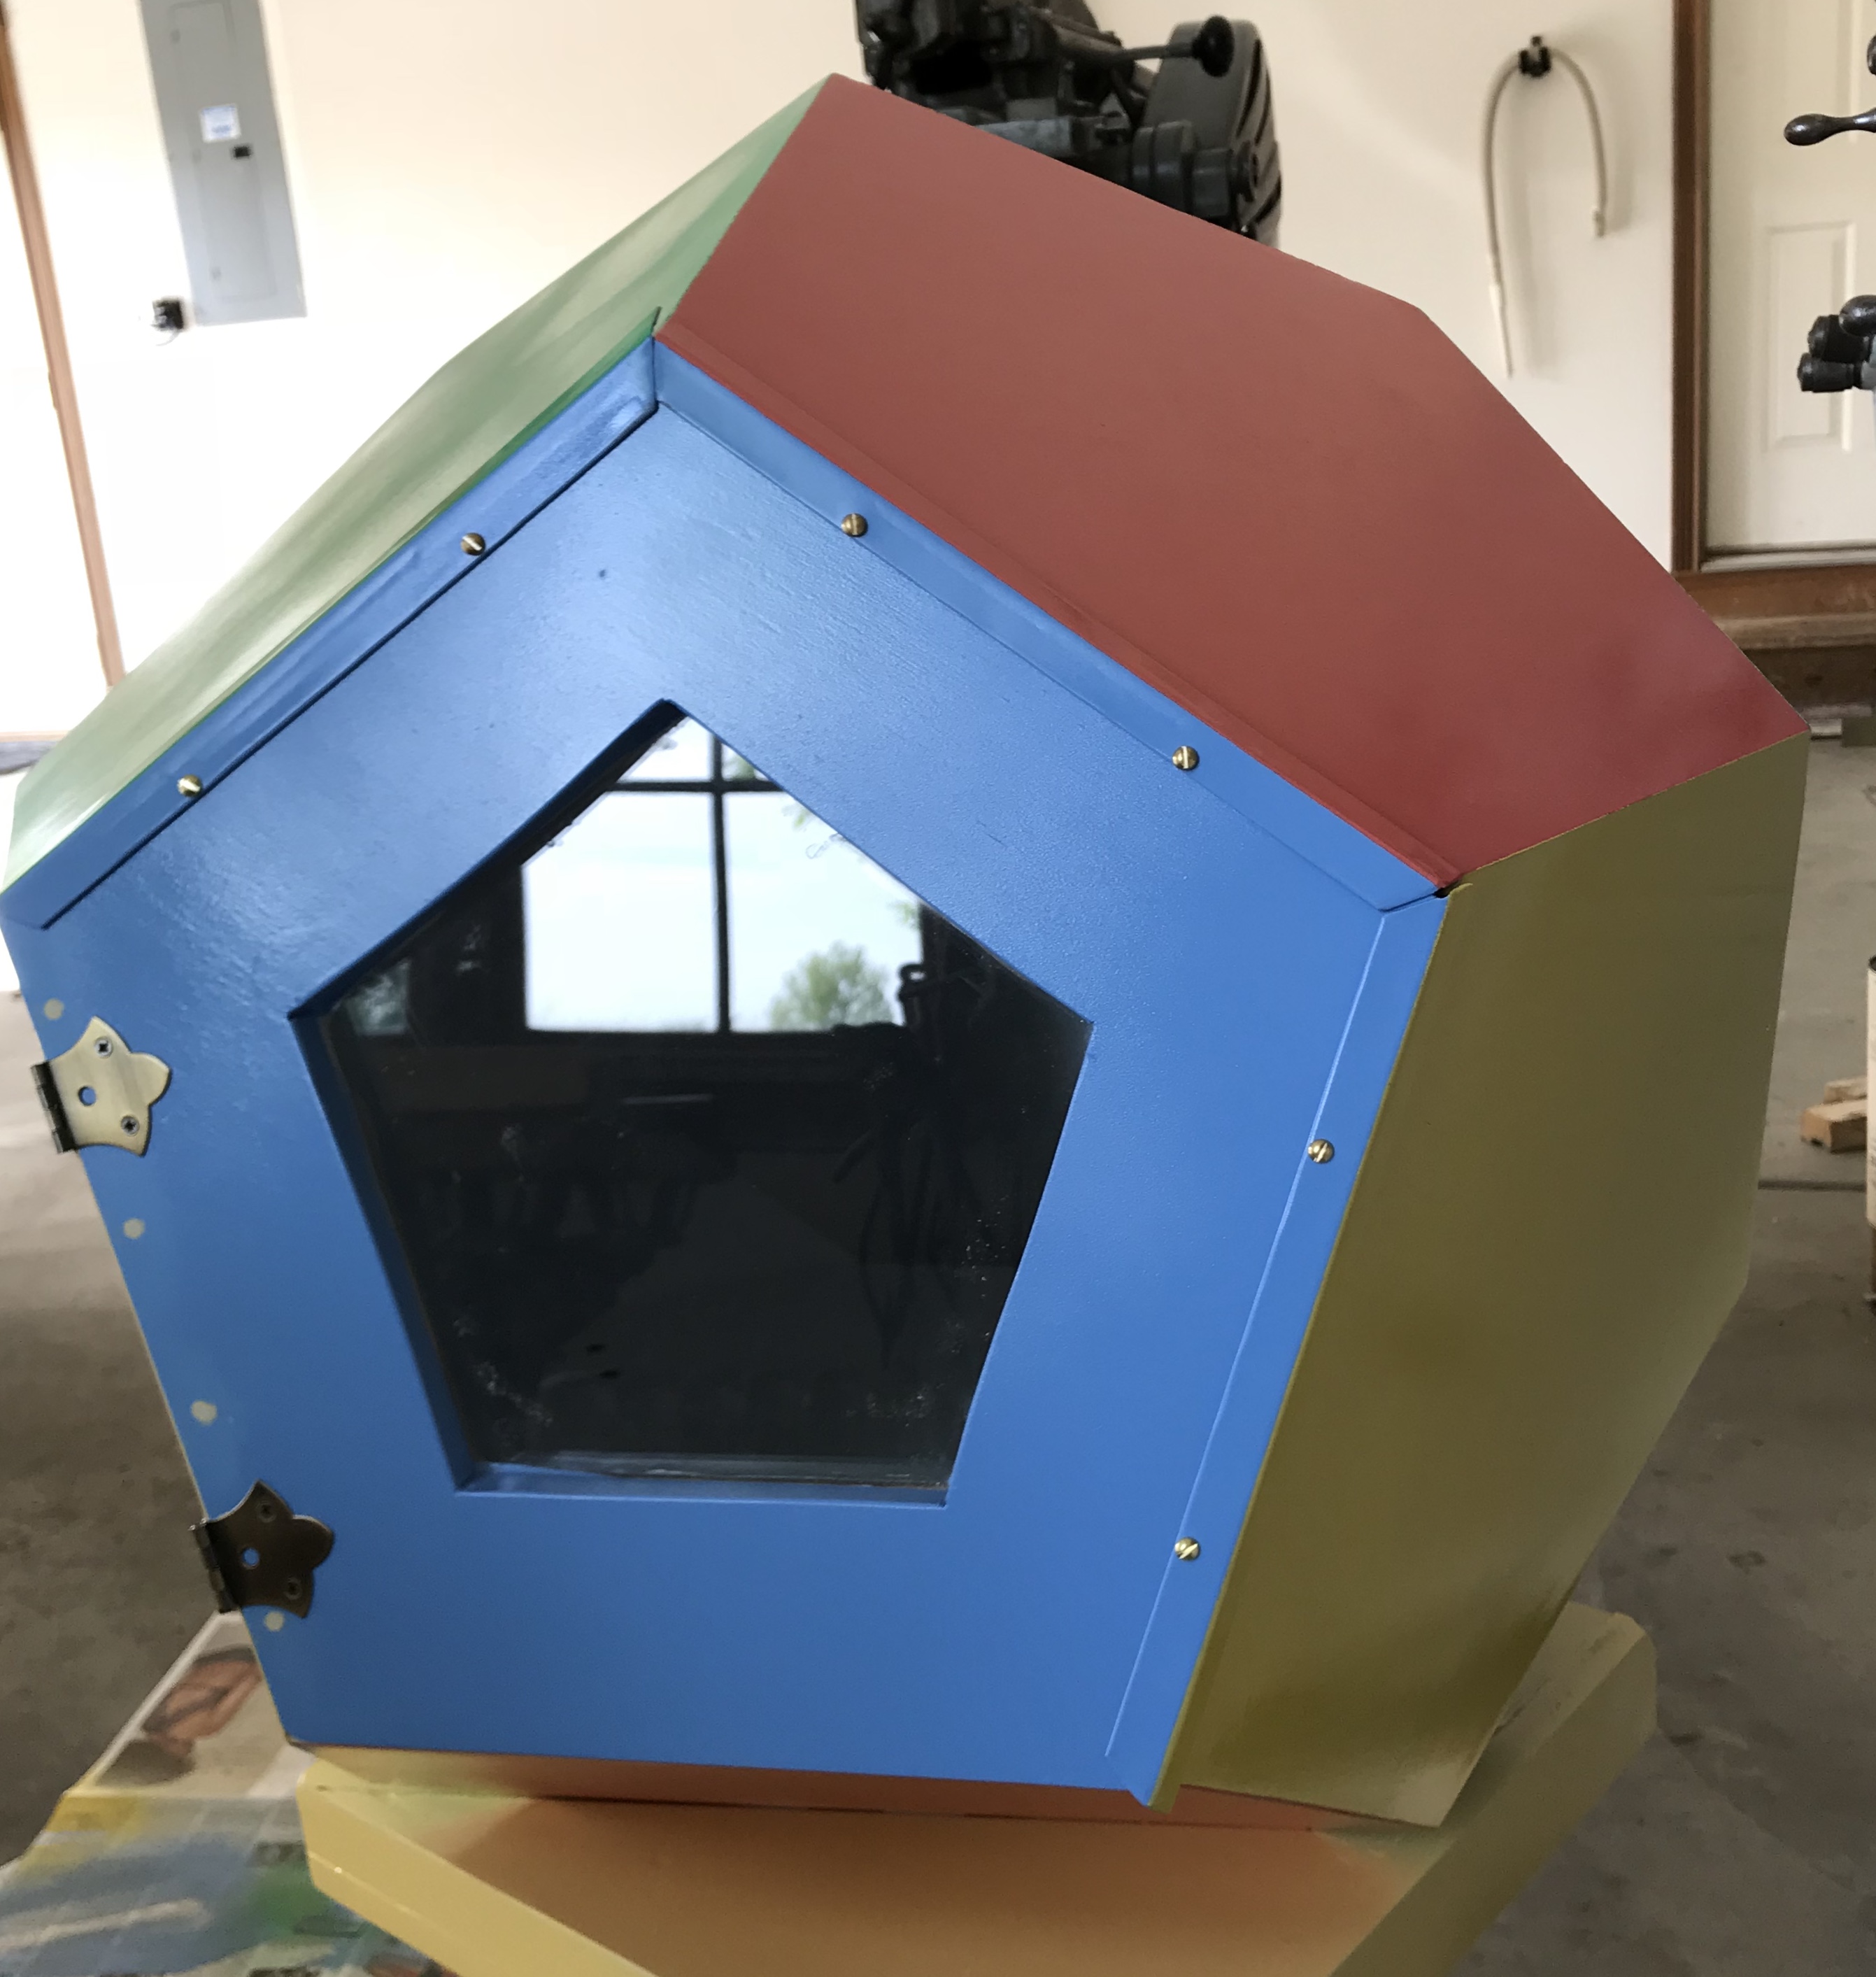
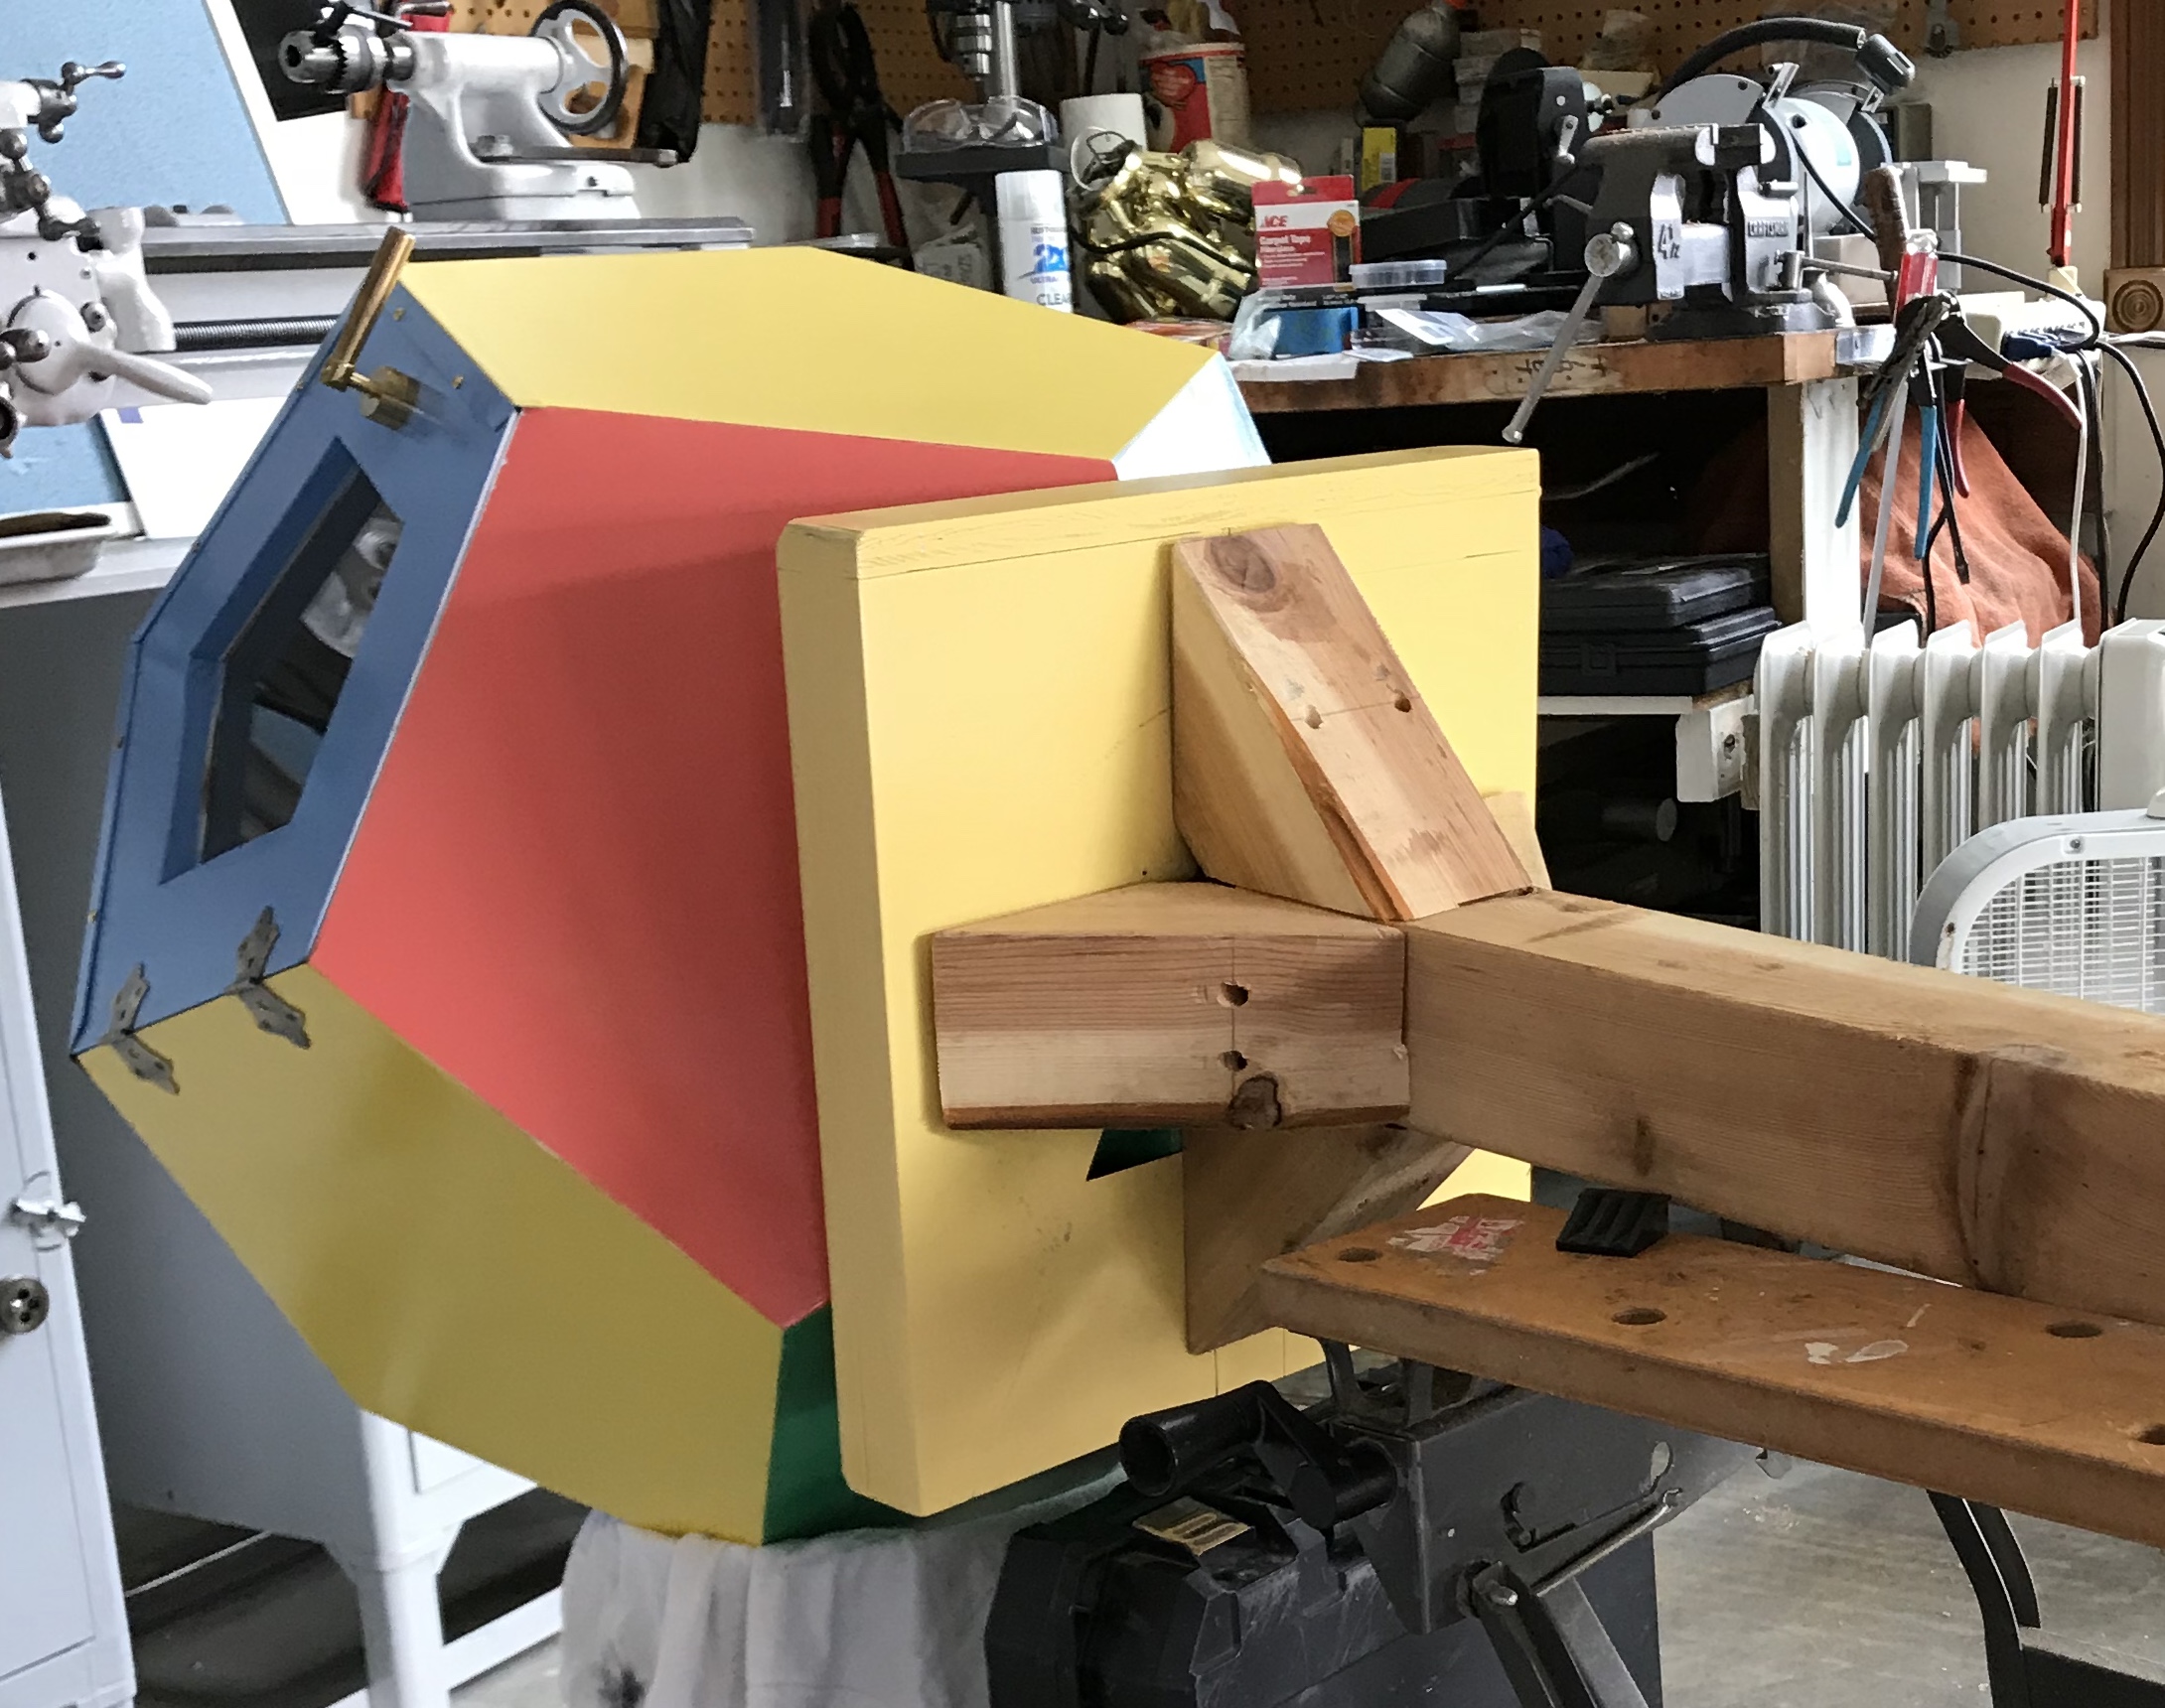
Once the base was completed it was set on a 5 gallon bucket and the dodecahedron was placed on it. The marked hinge side of the door was aligned appropriately. Then the shelf and supports were planned. With the planned supports sitting "vertically" as judged by perpendicularity with the top edge of their respective pentagons the angle was measured as 52°. With a right triangle cut with one angle of 52° the top was not level as determined with the aid of the cell phone app, iHandy Level. In order for the top to be level it needed to be cut at a 32° angle. When this was done the level was reasonably close (about 3° off). Both of the supports were secured with carpet tape about 4 1/2" in from the nearest edge and 1 1/2" up from the bottom join of the pentagon. At this point a rectangular board was placed on the supports temporarily as a shelf. The shelf only contacted one edge of each support. Consequently the top edge of each support needed to be angled. Again the level app indicated a 21° miter was needed. This miter was cut on the tops of both supports. With this done the temporary shelf was reasonably level in all directions and it sat firmly on the the supports. The shelf was planned to reasonably match the sides of the dodecahedron. The backing from a note pad was placed on the supports and the sides bent up to approximate the angles of the sides of the dodecahedron. Once these angles were fairly close the backing was cut with a razor. A few measurements were taken and the semi-hexagonal shape was marked out on a 1/2" oak faced plywood board. This was cut and it fit well on the supports. The supports were marked for two screws each and through holes (1/8") were drilled perpendicular to the face of the support against the wall of the dodecahedron. Putting the supports back in place a transfer punch was used to mark the sides of the dodecahedron. Screw holes were drilled about 1/2" deep. The holes in the supports were countersunk as deep as needed so 1/2" of the 1 1/4" screw would protrude when fully driven into the support. The supports were then attached. A pencil was broken in half and used to mark the outlines of the supports on the bottom of the shelf. The shelf was drilled through and a punch was used to mark the supports. The supports were drilled and the shelf holes were countersunk for the heads of the screws. Installing the shelf temporarily allowed me to test the entire package as seen in the picture below.
The dodecahedron was attached to the base with six 1 1/2" wood screws. The best orientation for the dodecahedron relative to the base was located and can be seen in the picture below. The edge of the base that has the attached strip is just to the right of the door. The distance from the edge of the door opening to the base on the outside is 10 7/8" and with a drop of 3/8" along the miter, the corresponding distance on the inside is 10 1/2". Similar measurements for the other two sides of the triangular opening were the same. Holes for the six screws were located 1" below this distance and about 1 3/4" in from the sides of the pentagons. They were drilled using a wood screw drill adapter perpendicular to the face being drilled. The screws were installed with wax on their threads. Flipped the dodecahedron over. Low and behold, the faces of the dodecahedron do not match the miters cut on the base! Not surprising considering all of the trouble these angles have provided.
The angle that should have been used for these miters is the angle spanned by one face and one edge instead of the angle spanned by two faces. Consequently, there is a large gap between the dodecahedron and the mitered inside edge of the base of 19°. The screws were installed above span this gap. It is not clear how deeply they penetrate the base, but probably not enough for comfort. [Interestingly, the gap was noticed while drilling.] The plan for remediating this error is to make six wedges to span this gap and provide additional purchase for the screws. The wedges will be glued to the bottom of the dodecahedron and drilled for the longer screws (2"). Holding the wood while cutting on the table saw at the correct angle presents some challenges. The wedges may all need to be cut from the end of a long board. Cutting some of the sides by hand is another possibility. The two shorter sides of the wedges need to be cut to 1 3/8" and 2 1/4". The angles at the corners of the wedges are 19°, 122° and 39°. One wedge was made by hand to test the angles and it fit well. The other five were laid out on a 5" wide plywood board. They were aligned with the miter so the table saw could be used for the cuts. After cutting them out They were tested and labelled 1-6 as was the base. They were glued over the previously drilled holes with Tite Bond III. After drying overnight through holes were drilled through the wedges. The holes in the base were drilled about 1/4" deeper. All of the screws went right into place, so the 2" brass screws were screwed in with some wax on the threads.
Made one final pass with the epoxy to seal all remaining gaps in both the dodecahedron and in the base. After drying for a few days a final sanding was done with 150 grit paper in the hand sander. All four parts were cleaned with a vacuum brush to remove dust [after fixing the vacuum which was blowing out most of what went in]. It is now ready for priming whenever the temperature gets consistently over 50°.
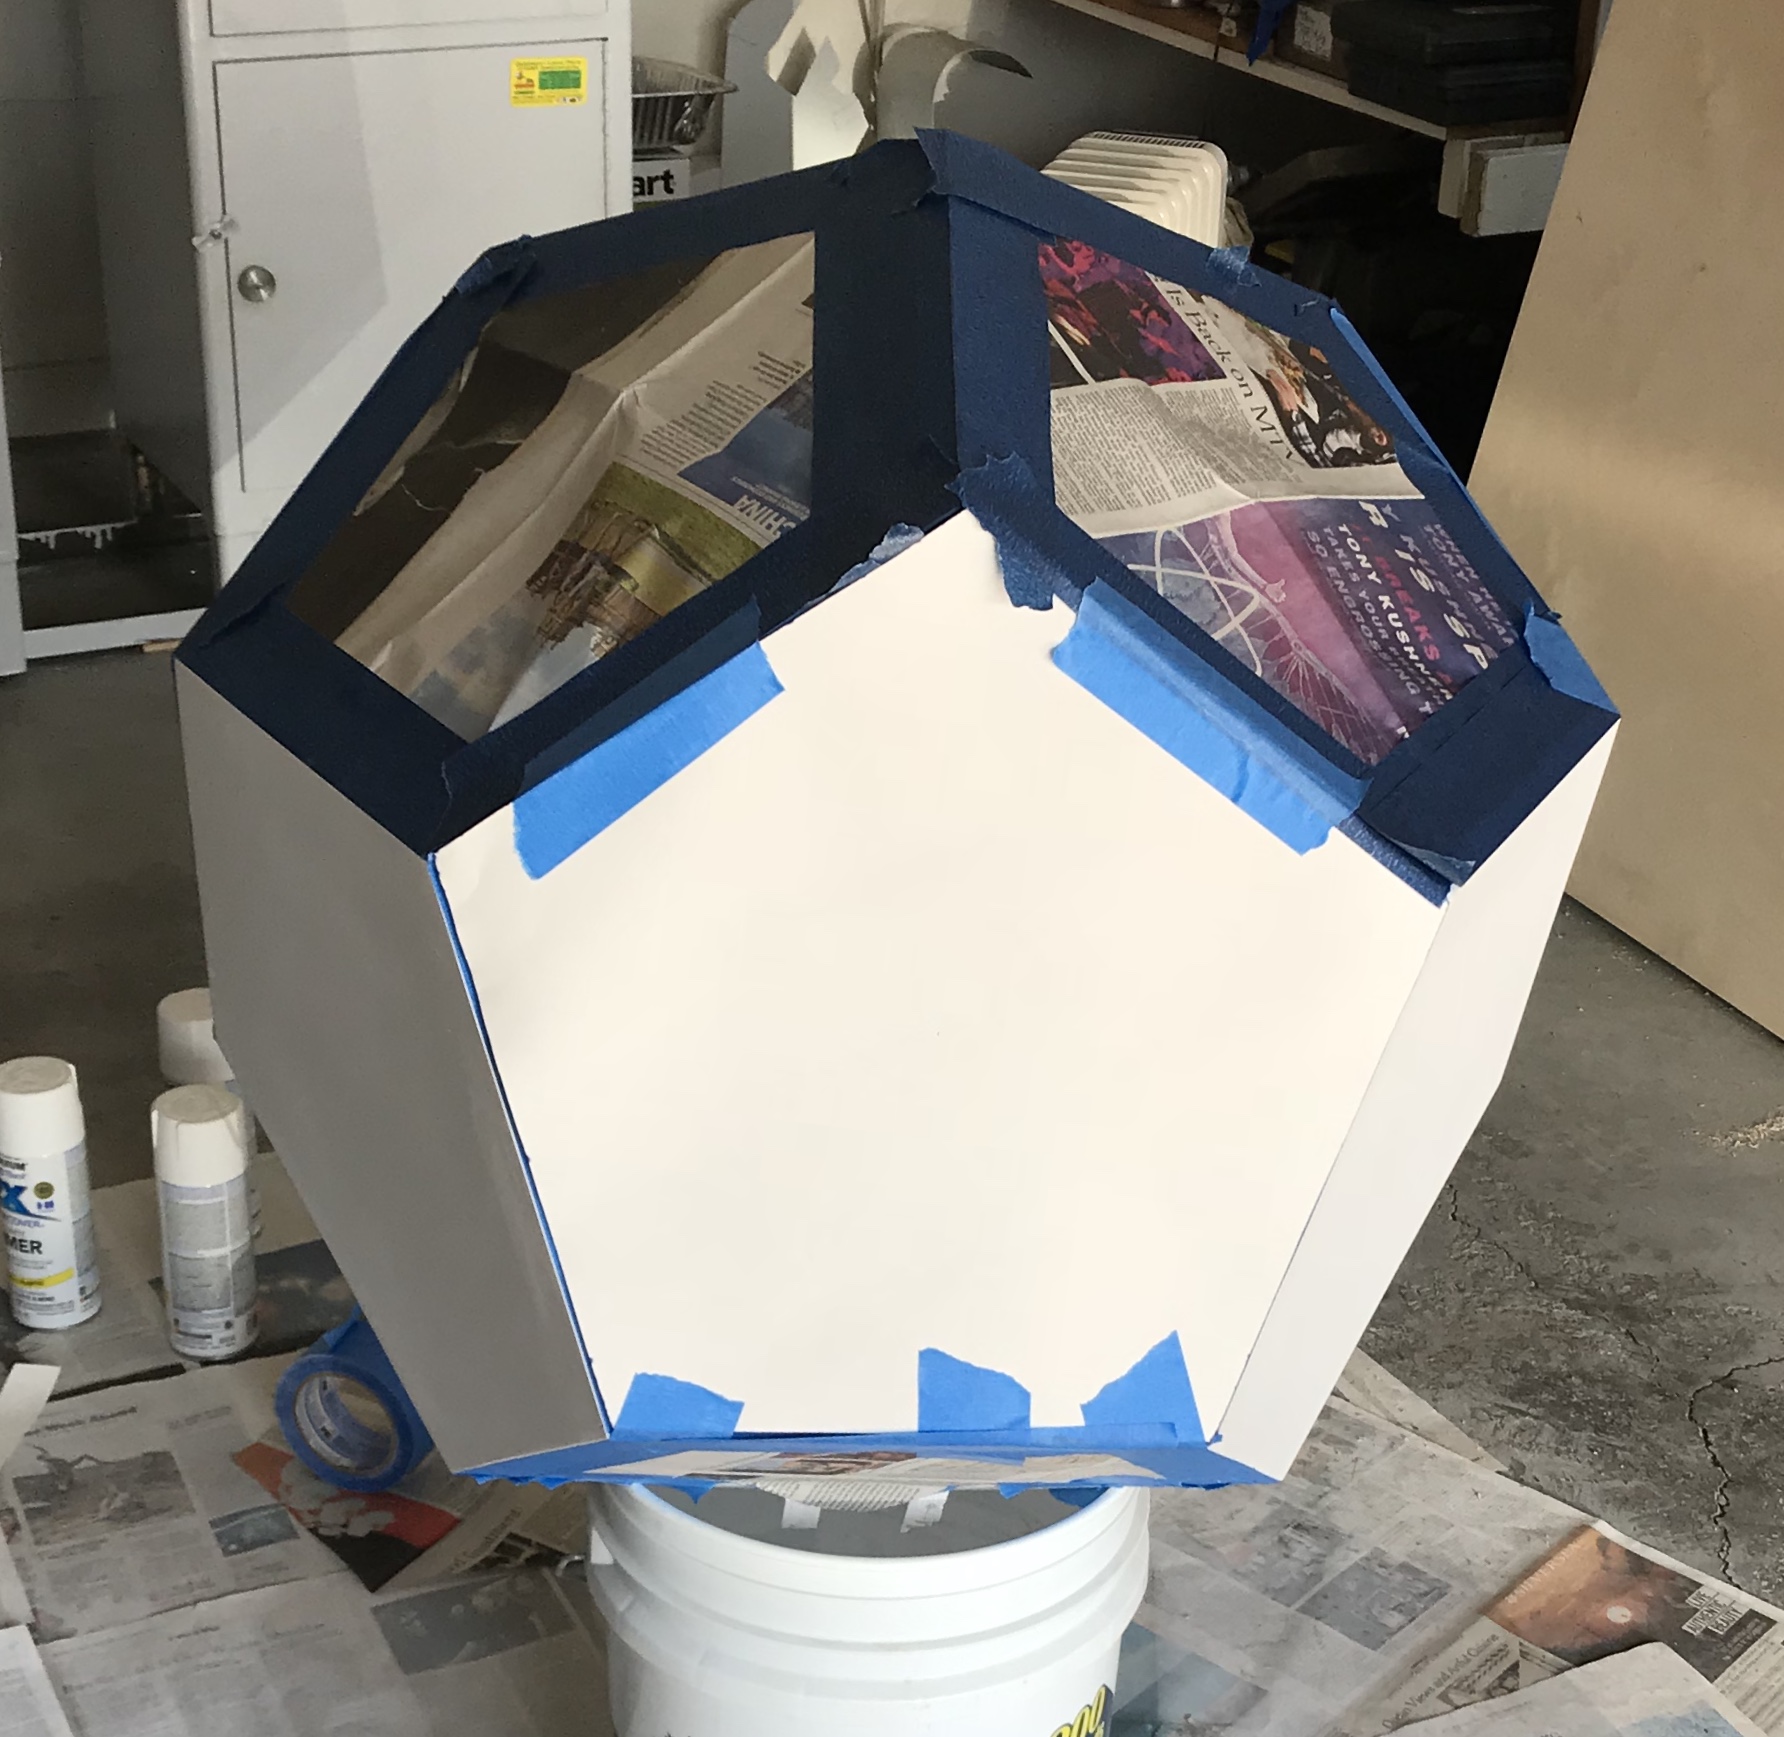
About a week later and an early April day is supposed to stay consistently over 50°. Used three cans of the Rusteoleum Painter's Touch primer to coat the dodecahedron, shelf and base. Need to purchase one more can of primer to finish door and touch-up a few spots with stuck newsprint.
I have been considering various possibilities for sealing the door from water penetration. This is especially important at the top of the door as water draining down from the top could easily enter any gap between the door and the top two pentagons. I have decided to try using some guttering aluminum sheet that I have on hand. What is required are four strips about 1" X 12" (or wider if they are to be bent double to minimize sharp edges). These would be bent along their length at 116° to cover the joins between the pentagons and mitered at the ends to fit the pentagonal door. The fifth side of the door will be covered by a "living hinge". The aluminum that overlaps with the pentagons around the door will have some sort of moisture barrier glued on. The moisture barrier will make it more difficult to close the door, so a good closing mechanism will need to be designed.
Two inch wide strips of aluminum were cut from the stock with snips and cut to 12". About 1/4 - 3/8" was left hanging over the edge of the table saw and using a square was held in place with four clamps. Using a block of wood this strip was hammered to a 90° angle. The resulting right angle was held by the wide side in the vise and gently hammered again with the use of a block of wood to less than 90°. On the table saw this was hammered flat via the use of a wooden block. This was repeated on the other long edge producing a 1" wide strip with two edges folded over.
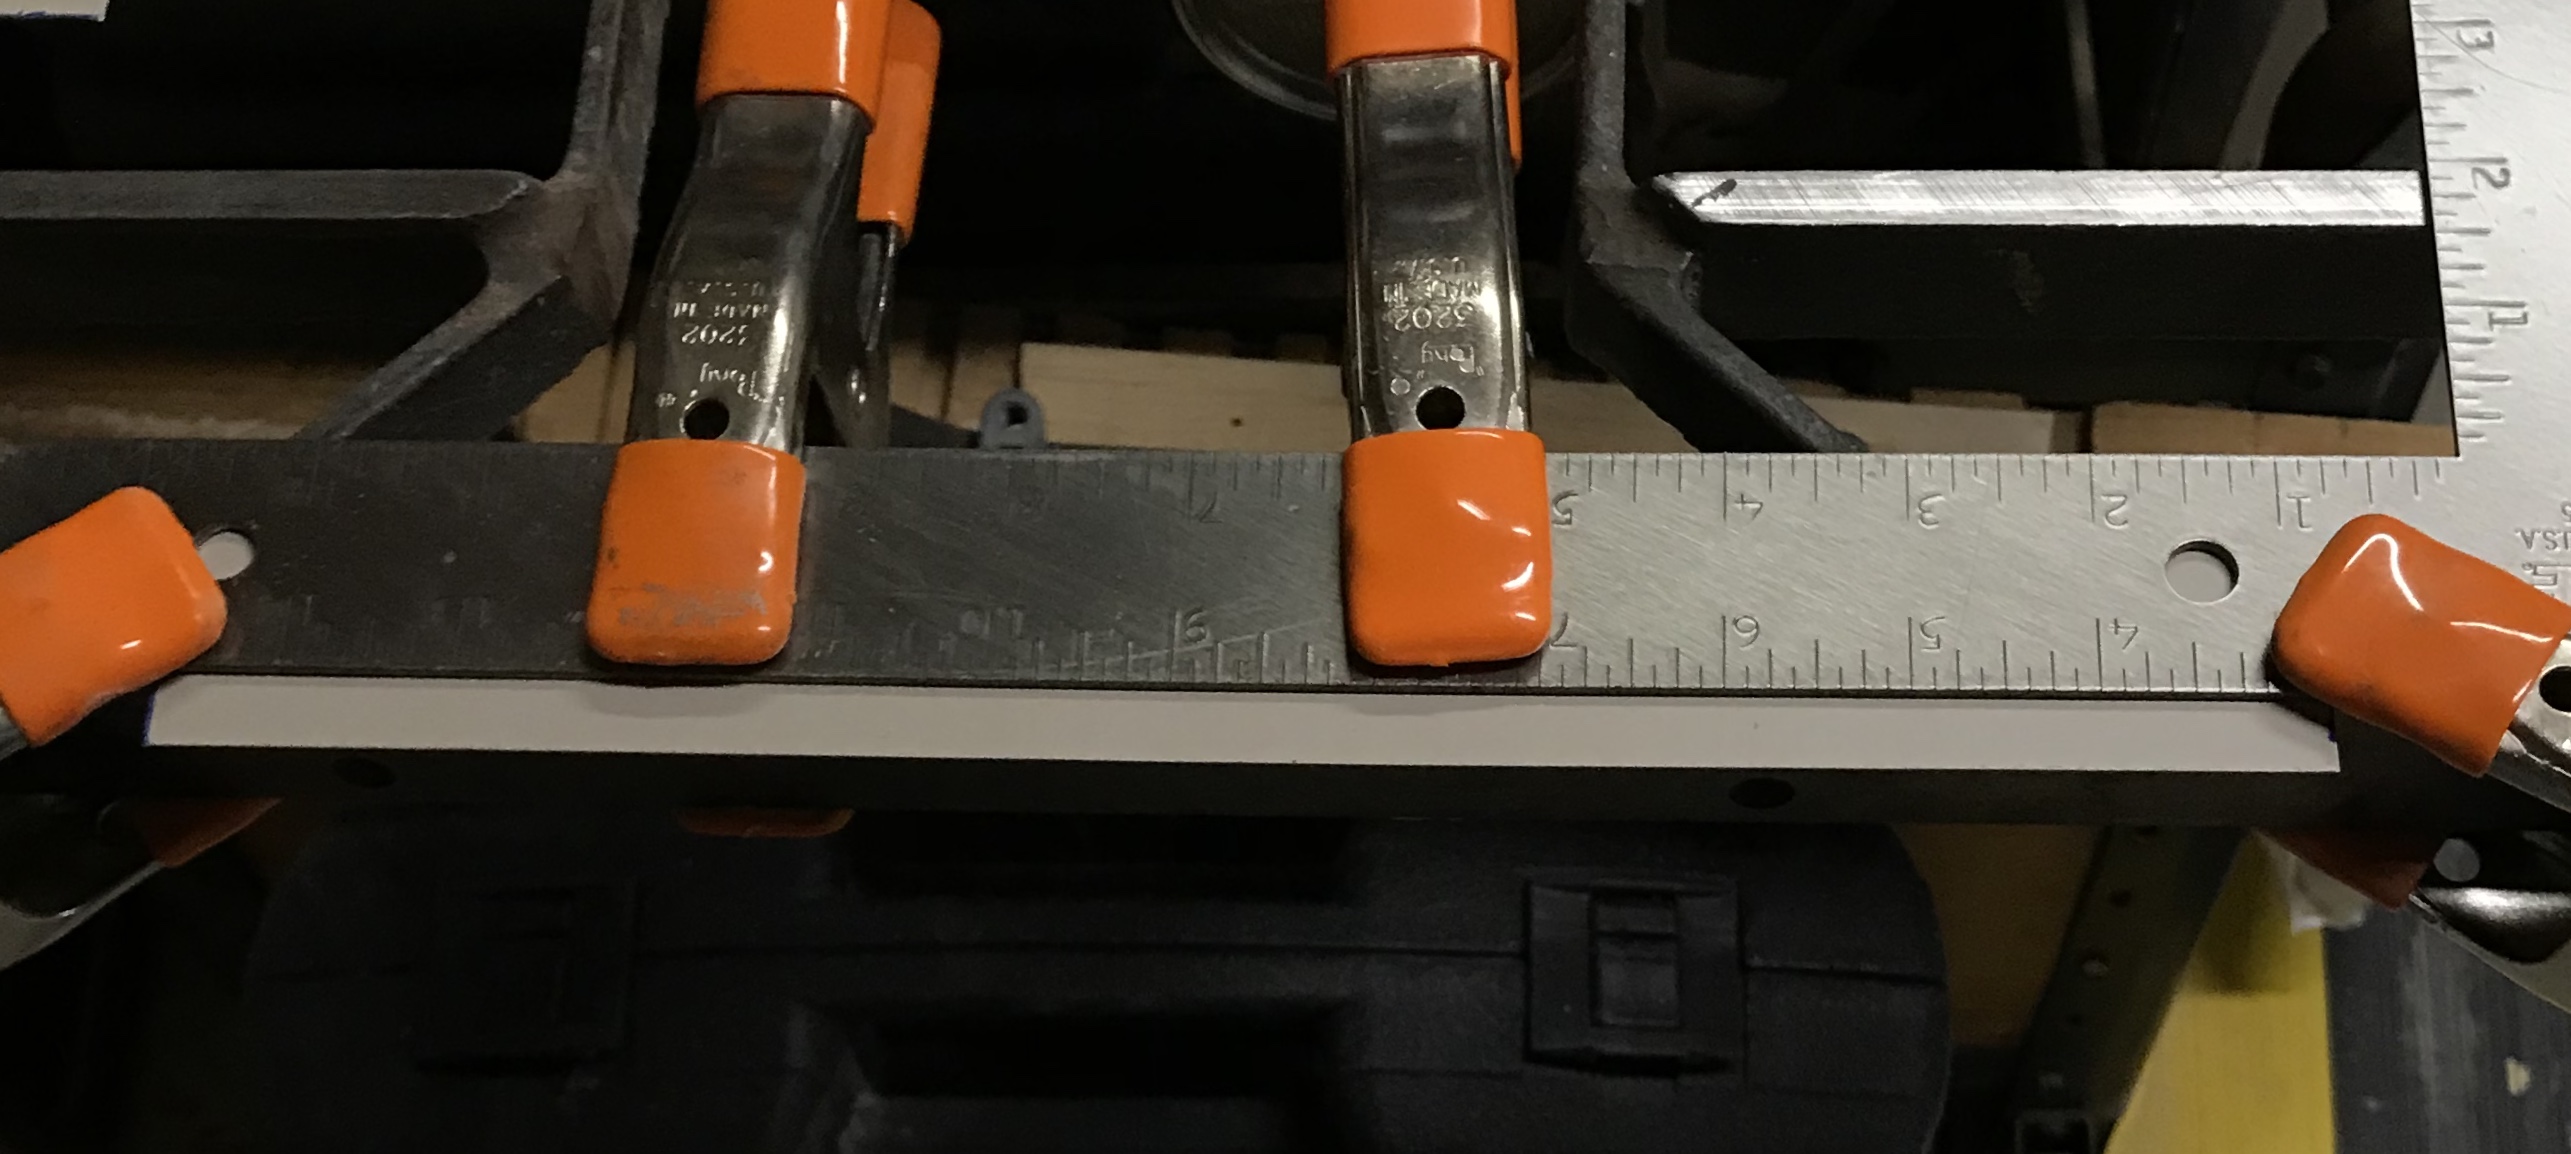
The flashing with the two folded edges was then returned to the edge of the table saw and clamped with the center line along the edge using the square as before. The flashing was bent along the centerline to approximately 116° with a hammer and a wooden block. This was repeated on the other three strips of aluminum. The final strip of flashing is shown below.
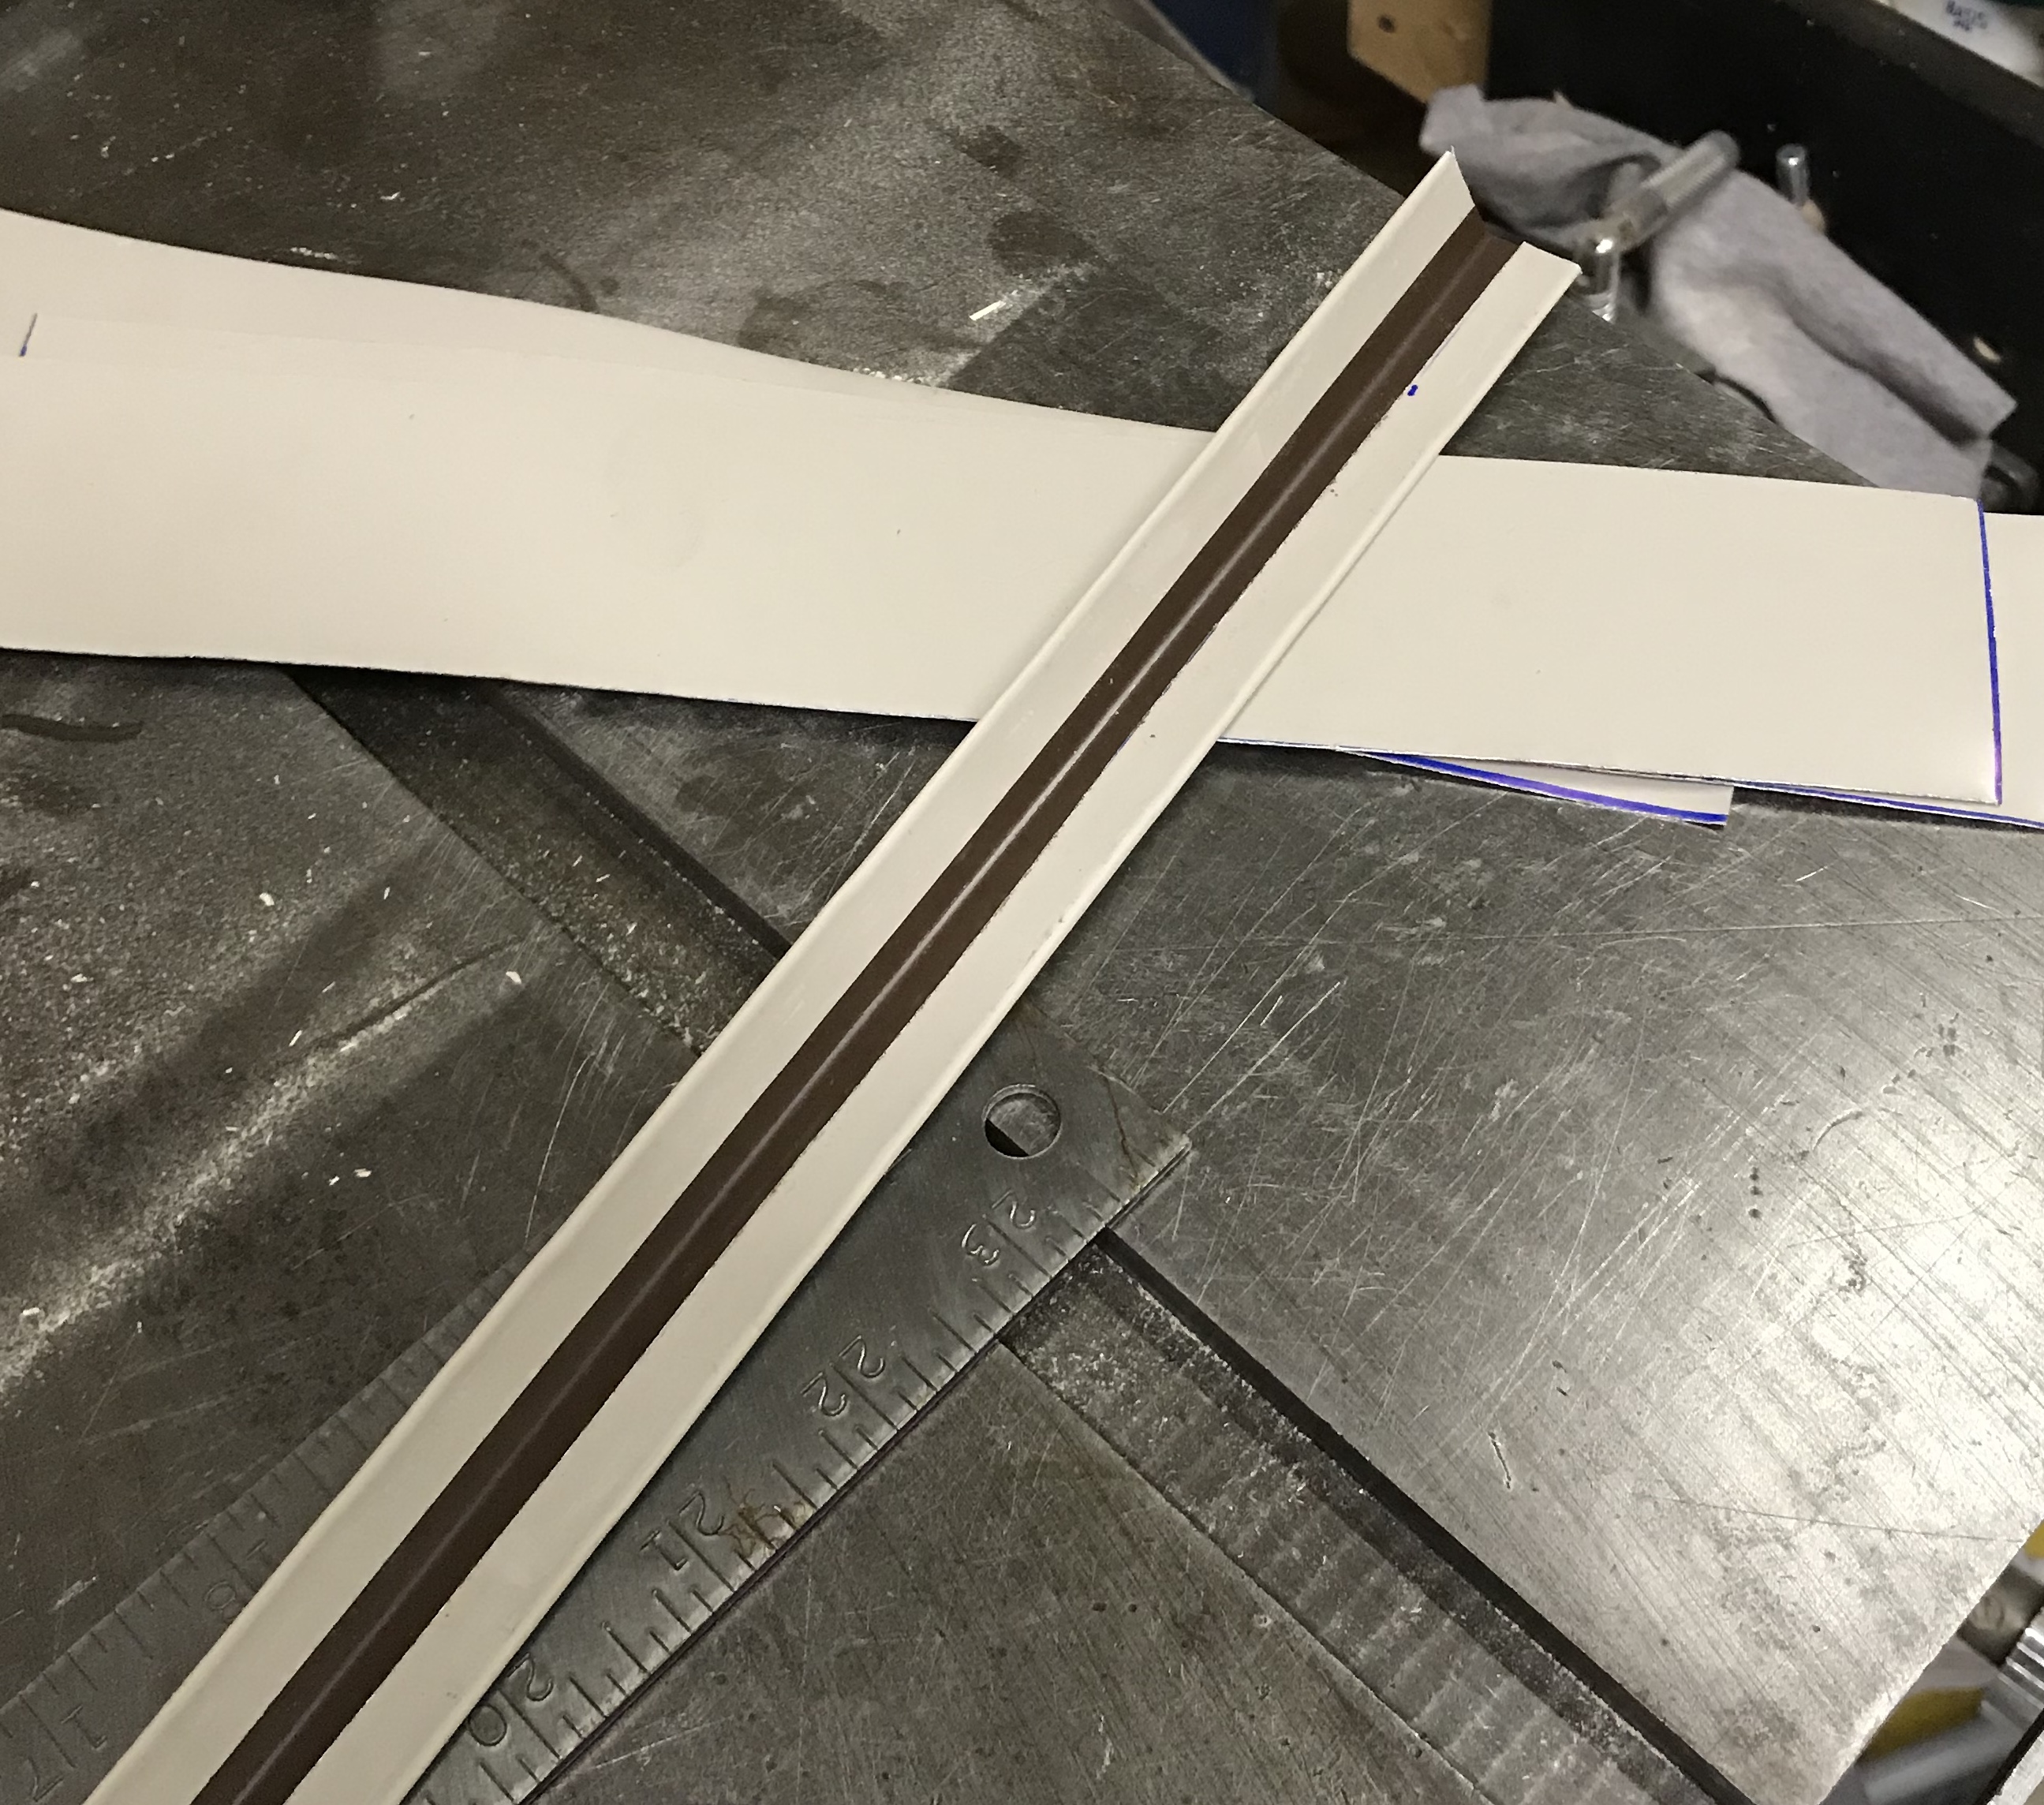
They actually look reasonably professional considering they were not done with the aid of a sheet metal brake! Now let's see if we can cut the correct miters on the ends.
The miter that is on the face of the door should be 1/2 of 108° or 54°.
The miter angle that will rest on the face of an adjacent pentagon is not so obvious and will be determined empirically. Setting a length of flashing on the dodecahedron and using a straightedge to mark the angle gave 72°. Marking this from the end of the flashing also marks the spot where the 54° angle should be cut from the bend. One end of each of the four lengths of flashing were cut at the required angles. They fit well on the dodecahedron.
The plan is to temporarily attach the flashing to the door with brass screws. It will be removed for painting, painted separately and then reattached. At that time the weather stripping will be glued to the flashing. The "living hinge" will be treated the same way.
Attempted a "continuous" length of flashing across two edges of the door. Made a 22" length of the bent flashing and cut out a wedge in the middle of one side with 54° angles forming both sides. Bent this to bring the two edges together. A test fit showed the error of my ways!! This final bend does not give the right angle for the angle across the two faces.
Warmed up enough for some painting today, April 11. Did a little sanding on spots where the grain was raised.Touched up the outside of the dodecahedron with primer as well as the base. Then painted the inside and the shelf with gloss white. The door was taped and painted with primer front and back.
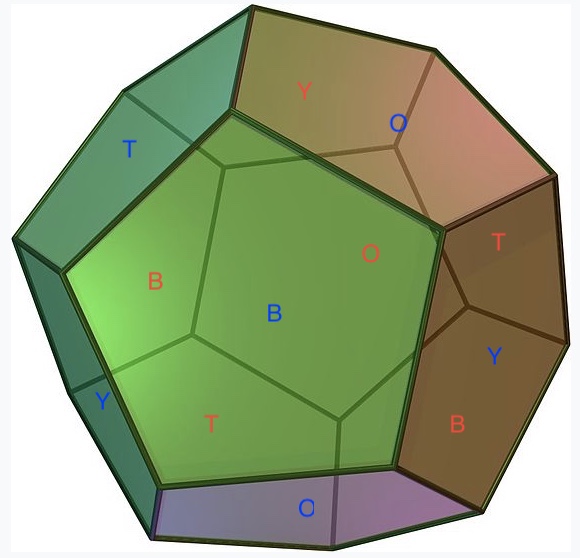
The outside color painting needs to be planned. This must include the base which needs to be a different color than the bottom three faces. The colors are basically orange (O), blue (B), yellow (Y), and tan (T). The door will be one of these colors as well. A first attempt is shown below. The labels in red are for faces in the back and the blue labels are for faces in the front. The door is blue and the face directly behind the door is orange. With the bottom faces orange, tan, and blue, the base must be yellow. There are three blue faces, three yellow faces, three tan faces, three orange faces, and the yellow base.
Taped up all but the three faces to be painted yellow. The door was also taped along the edges and a pentagonal sheet of card board was taped across the opening. The three faces were sprayed yellow as well as the base. Approximately 30 minutes later a second coat of yellow was sprayed on.
While painting the second face, brown gunk came out of the can!!! This face was sanded back to primer after drying and then repainted yellow before moving on to other colors.
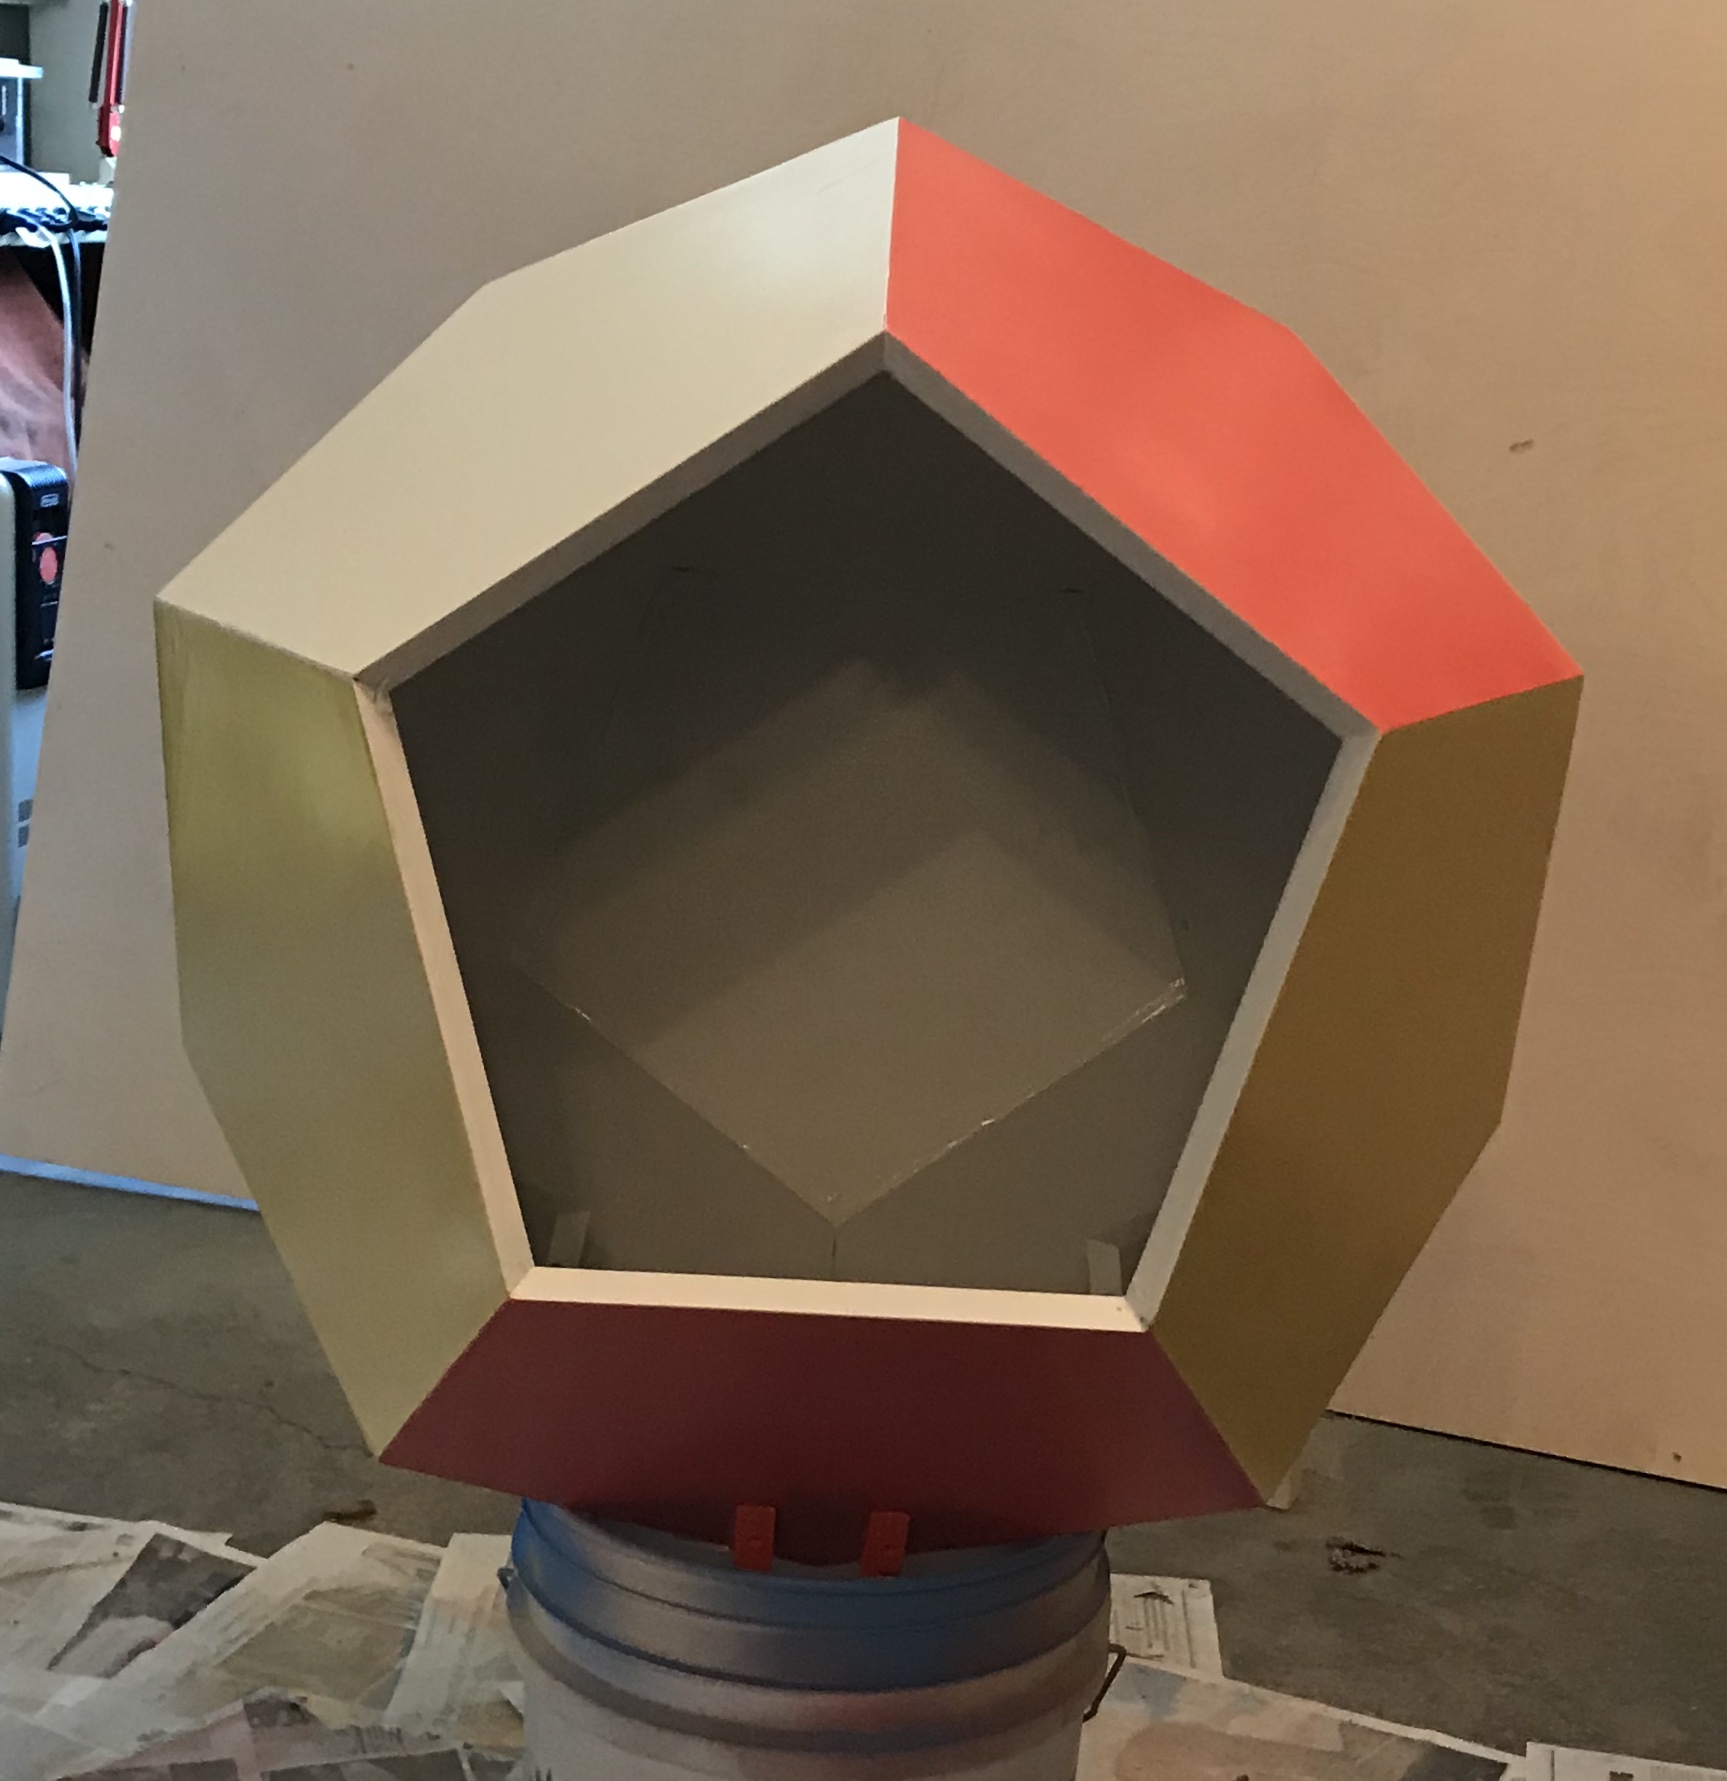
I am giving the yellow and ensuing colors 48 hours of drying time before tackling the next color. Insufficient drying time may allow taping to remove the earlier paint. Unfortunately, the painting will require an additional 9 days of warm weather, which has been scarce. Orange was next. It only took about 1 hour to cover the yellow faces, open the orange faces, and paint them. The tan faces were next. After two more days of drying the tan faces were covered and the soon to be blue faces were uncovered. The blue paint will go on tomorrow, April 27th. Blue is on!! Can't wait to take all of the tape/paper off and see all of the colors together.
A 12" living hinge was ordered this evening. It should be here by May 4th. In the meantime the flashing needs to be installed and painted. I plan to paint it blue where it overlaps the blue door and tan/yellow/orange where it overlaps the adjacent faces. Not yet sure how or if the hinge can be painted.
The tape and paper covering most of the dodecahedron were removed this morning, April 29. Looks very nice, except the tan faces are too similar to the yellow, at least in the light available in the garage. These three faces might need to be repainted a different color. The paint only came off with the tape in one small place on the bottom tan face.
After cleaning up I was finally able to move the car back into the garage.
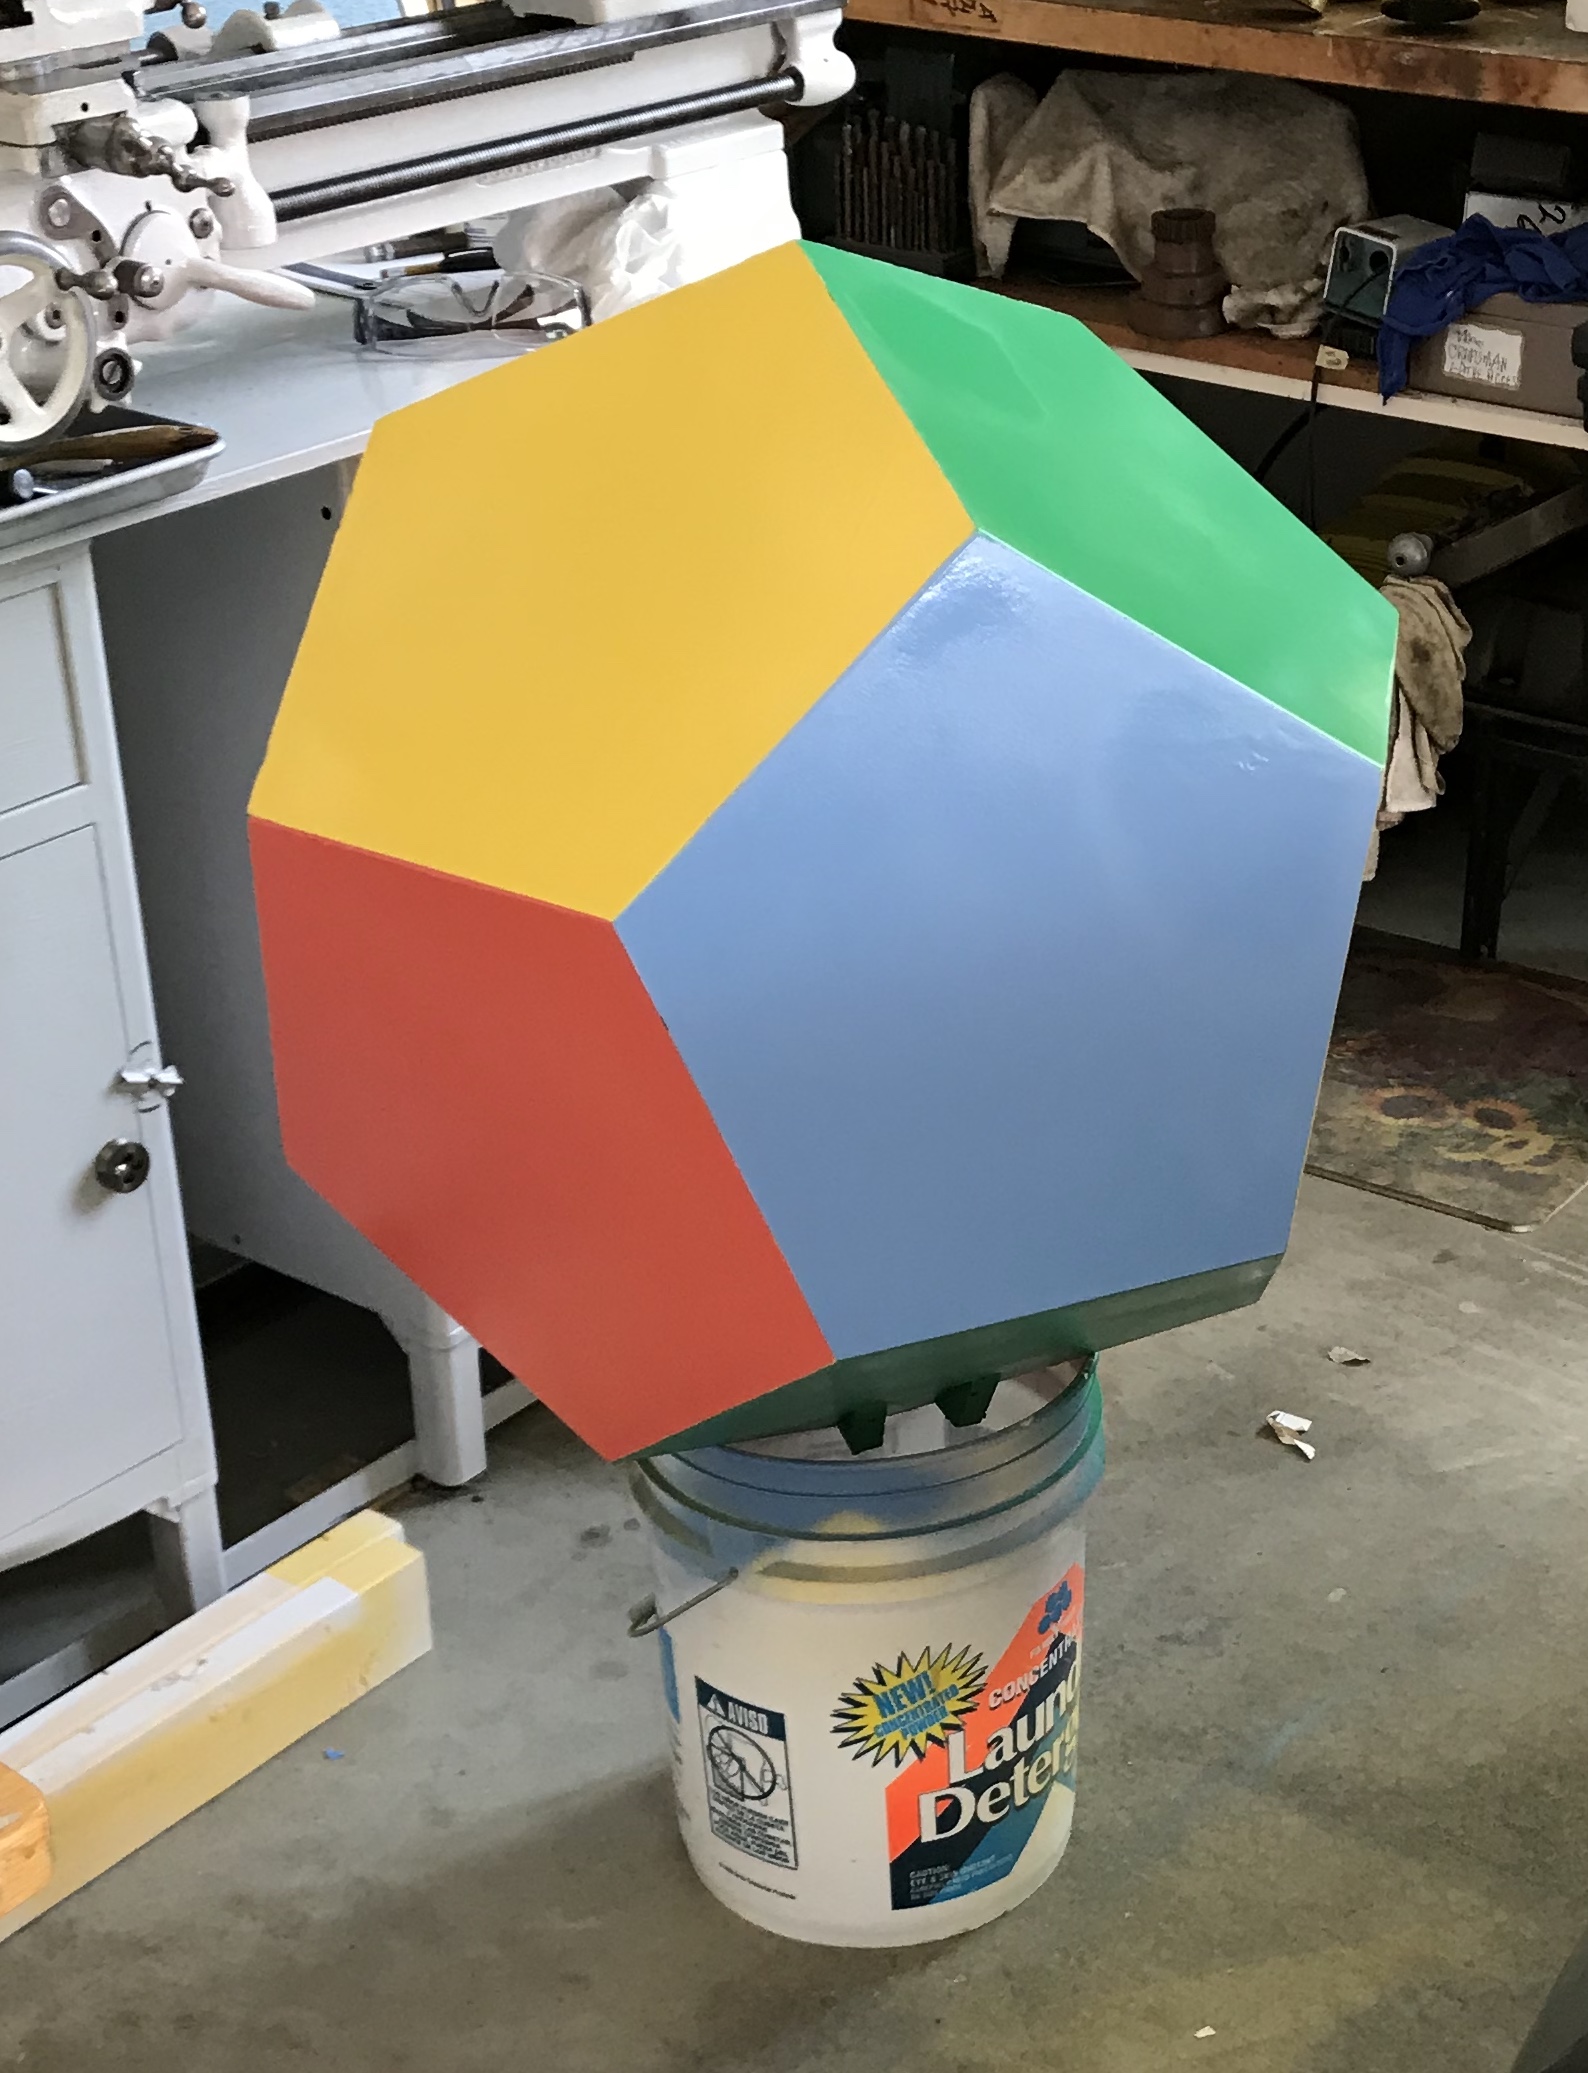
After giving it some thought the ivory had to go. It was too bland and too close in color to the yellow. A green paint was purchased and after retaping (!!) sprayed onto the three ivory faces. Three coats were applied over 1 hour. Unveiling will have to wait a further 48 hours. Yet another issue! Some of the green got on a blue face and on a yellow. The blue face was quickly repaired as I had blue paint on hand. The yellow had to be purchased.
There is no matching yellow to be found. It is not even available directly from Rustoleum. It must have been discontinued. Consequently, all three yellow faces need to be repainted with a new flavor of yellow. Started this today, May 8.
Completed the retaping and painting, waited about 36 hours and removed the wrap. The library looks great! Found a trace of yellow on a green face and easily repainted the overspray.
In case water ever gets into the library a hole was drilled in the bottom. A 3/4" Forstner bit was used. The hole was located about 1/4" from the two faces at the very bottom of the dodecahedron. After drilling it was covered with a 1 /14" X 1 1/4" square of screen from a repair kit. The screen was stapled in place after a little white primer in the hole.
After attaching the dodecahedron to the base with stainless steel screws and installing the shelf attention turned to hanging the door. The door did not seat properly, so some glue and paint was removed from two corners of the opening with a razor blade. The living hinge was marked and carefully cut on the table saw. Using a punch to mark the holes for drilling cracked the hinge at one end. The other holes were drilled for a 1/2" 6-32 wood screw, four to a side. The cracked end was glued with epoxy and gently clamped in the vise. The glue needs to dry for 48 hours prior to drilling and installing
In the meantime the flashing was selected for three sides of the door: top left, top right and right sides. They were labeled and cut to fit the door with tin snips. These three pieces of flashing were taped and the door side of each was painted blue. After two days the tape was removed and the blue side was taped. The exposed sides were painted to match the face color they would be covering.
It is getting down to the wire! We leave on March 24th for Tulsa. Michelle has been asking about the library. As of March 13 there are still a number of things to complete. The door needs to be drilled for both the hinge and the flashing so both can be installed. The door needs to be drilled for the handle and both it and the bracket need to be installed. Finally, the post needs to be purchased, cut to size, and the supports need to be drilled and temporarily attached to both post and to the dodecahedron.
Hung the door on the living hinge this morning. Four holes were drilled in the side and four in the door. Round head (1/2") brass screws were used. The biggest gaps are at the top two junctures with faces. (Of course!!) When the door was opened it sagged significantly! Back to the drawing board. Two types of hinges were purchased: a piano hinge and two regular 3" long hinges. The piano hinge is 12" long and will need to be cut to fit. This will leave two unplated ends. The pin seems to be made out of steel. Rusting could be a major problem. Consequently the two 3" hinges will be mounted. Hopefully they will cover the holes from the living hinge, otherwise repairs will need to be made.
In the meantime an 8' length of 4" X 4" cedar was purchased. Three feet were cut off leaving 5' for the post. The post is to be buried 2' deep. The door bottom is about 9" above the bottom of the dodecahedron base, so a 5' post will put the door at 3' 9". This may be too tall, but a decision on height will be made in Tulsa. The post can either be shortened or buried a little deeper to decrease the door height.
The 3' length of cedar was cut into sections with 45° angle cuts. The long side of each of these four sections was 7 1/2". These support arms were located so that their top sides were 1.5" above the top of the post. This is because the bottom point of the dodecahedron protrudes through the hole in the base by about 1". The four supports were marked (R, L, F, & B) and were also marked for the two screws holding them to the post. A line was marked across the post at the same level as the screw line to allow easy alignment. Two holes were countersunk (3/8" diameter) and then drilled through for the screws. Screws were pushed into the holes and used to mark the post for drilling. The post was drilled (9/64"). Similarly, the supports were also countersunk and drilled through for attachment to the base.
As one might expect the 45° angle cuts made with the circular saw were not very accurate. Shims will need to be purchased so the dodecahedron can be leveled, when attached to the support arms.
The hinges purchased for the door were not useful. The holes were too close to the hinge pin. This would force the screws to go through the thinnest part of the face and the door unless they were angled. A new set of all brass hinges were purchased. These have holes at an appropriate distance from the hinge pin and are a little fancier looking. All eight holes were filled with wood putty. These will need to dry overnight prior to sanding and repainting.
The handle was already looking tarnished after only a few weeks since cutting. Simichrome polish was used to buff up the handle and other parts that will be outside the door. It is supposed to contain a finish that will resist tarnish. After a few days in the garage I will determine whether these parts need a coat of Spar varnish.
Tackled the door this morning. The new hinges were aligned on the face to the left of the door about 2.5" from the top and bottom edges. The holes were marked and then drilled for the 1/2" screws that came with the hinges. The hinges were put in place as was the door. Holes were then transferred from the hinges to the door. These were drilled and the door was hung. The flashing was attached by drilling through holes close to the edges again about 2.5" from the ends. The holes were transferred to the door and the flashing was screwed to the door with round head brass screws.
The hole for the handle was drilled with a 3/8" Forstner bit. Unfortunately, there was significant tear out on the front side as the measurements were from the back (1 1/8" from the edge). This was filled with wood putty and allowed to dry overnight. The face with the living hinge holes was sanded, taped and repainted. It needed a second coat of paint after some sanding to remove a line formed by painting against tape. The door required a second layer of putty to completely fill the tear out. The puttied parts of the door were repainted "Spa Blue". In addition two places in the door frame were repainted, since they had been scraped with a razor blade to give a better fit to the door.
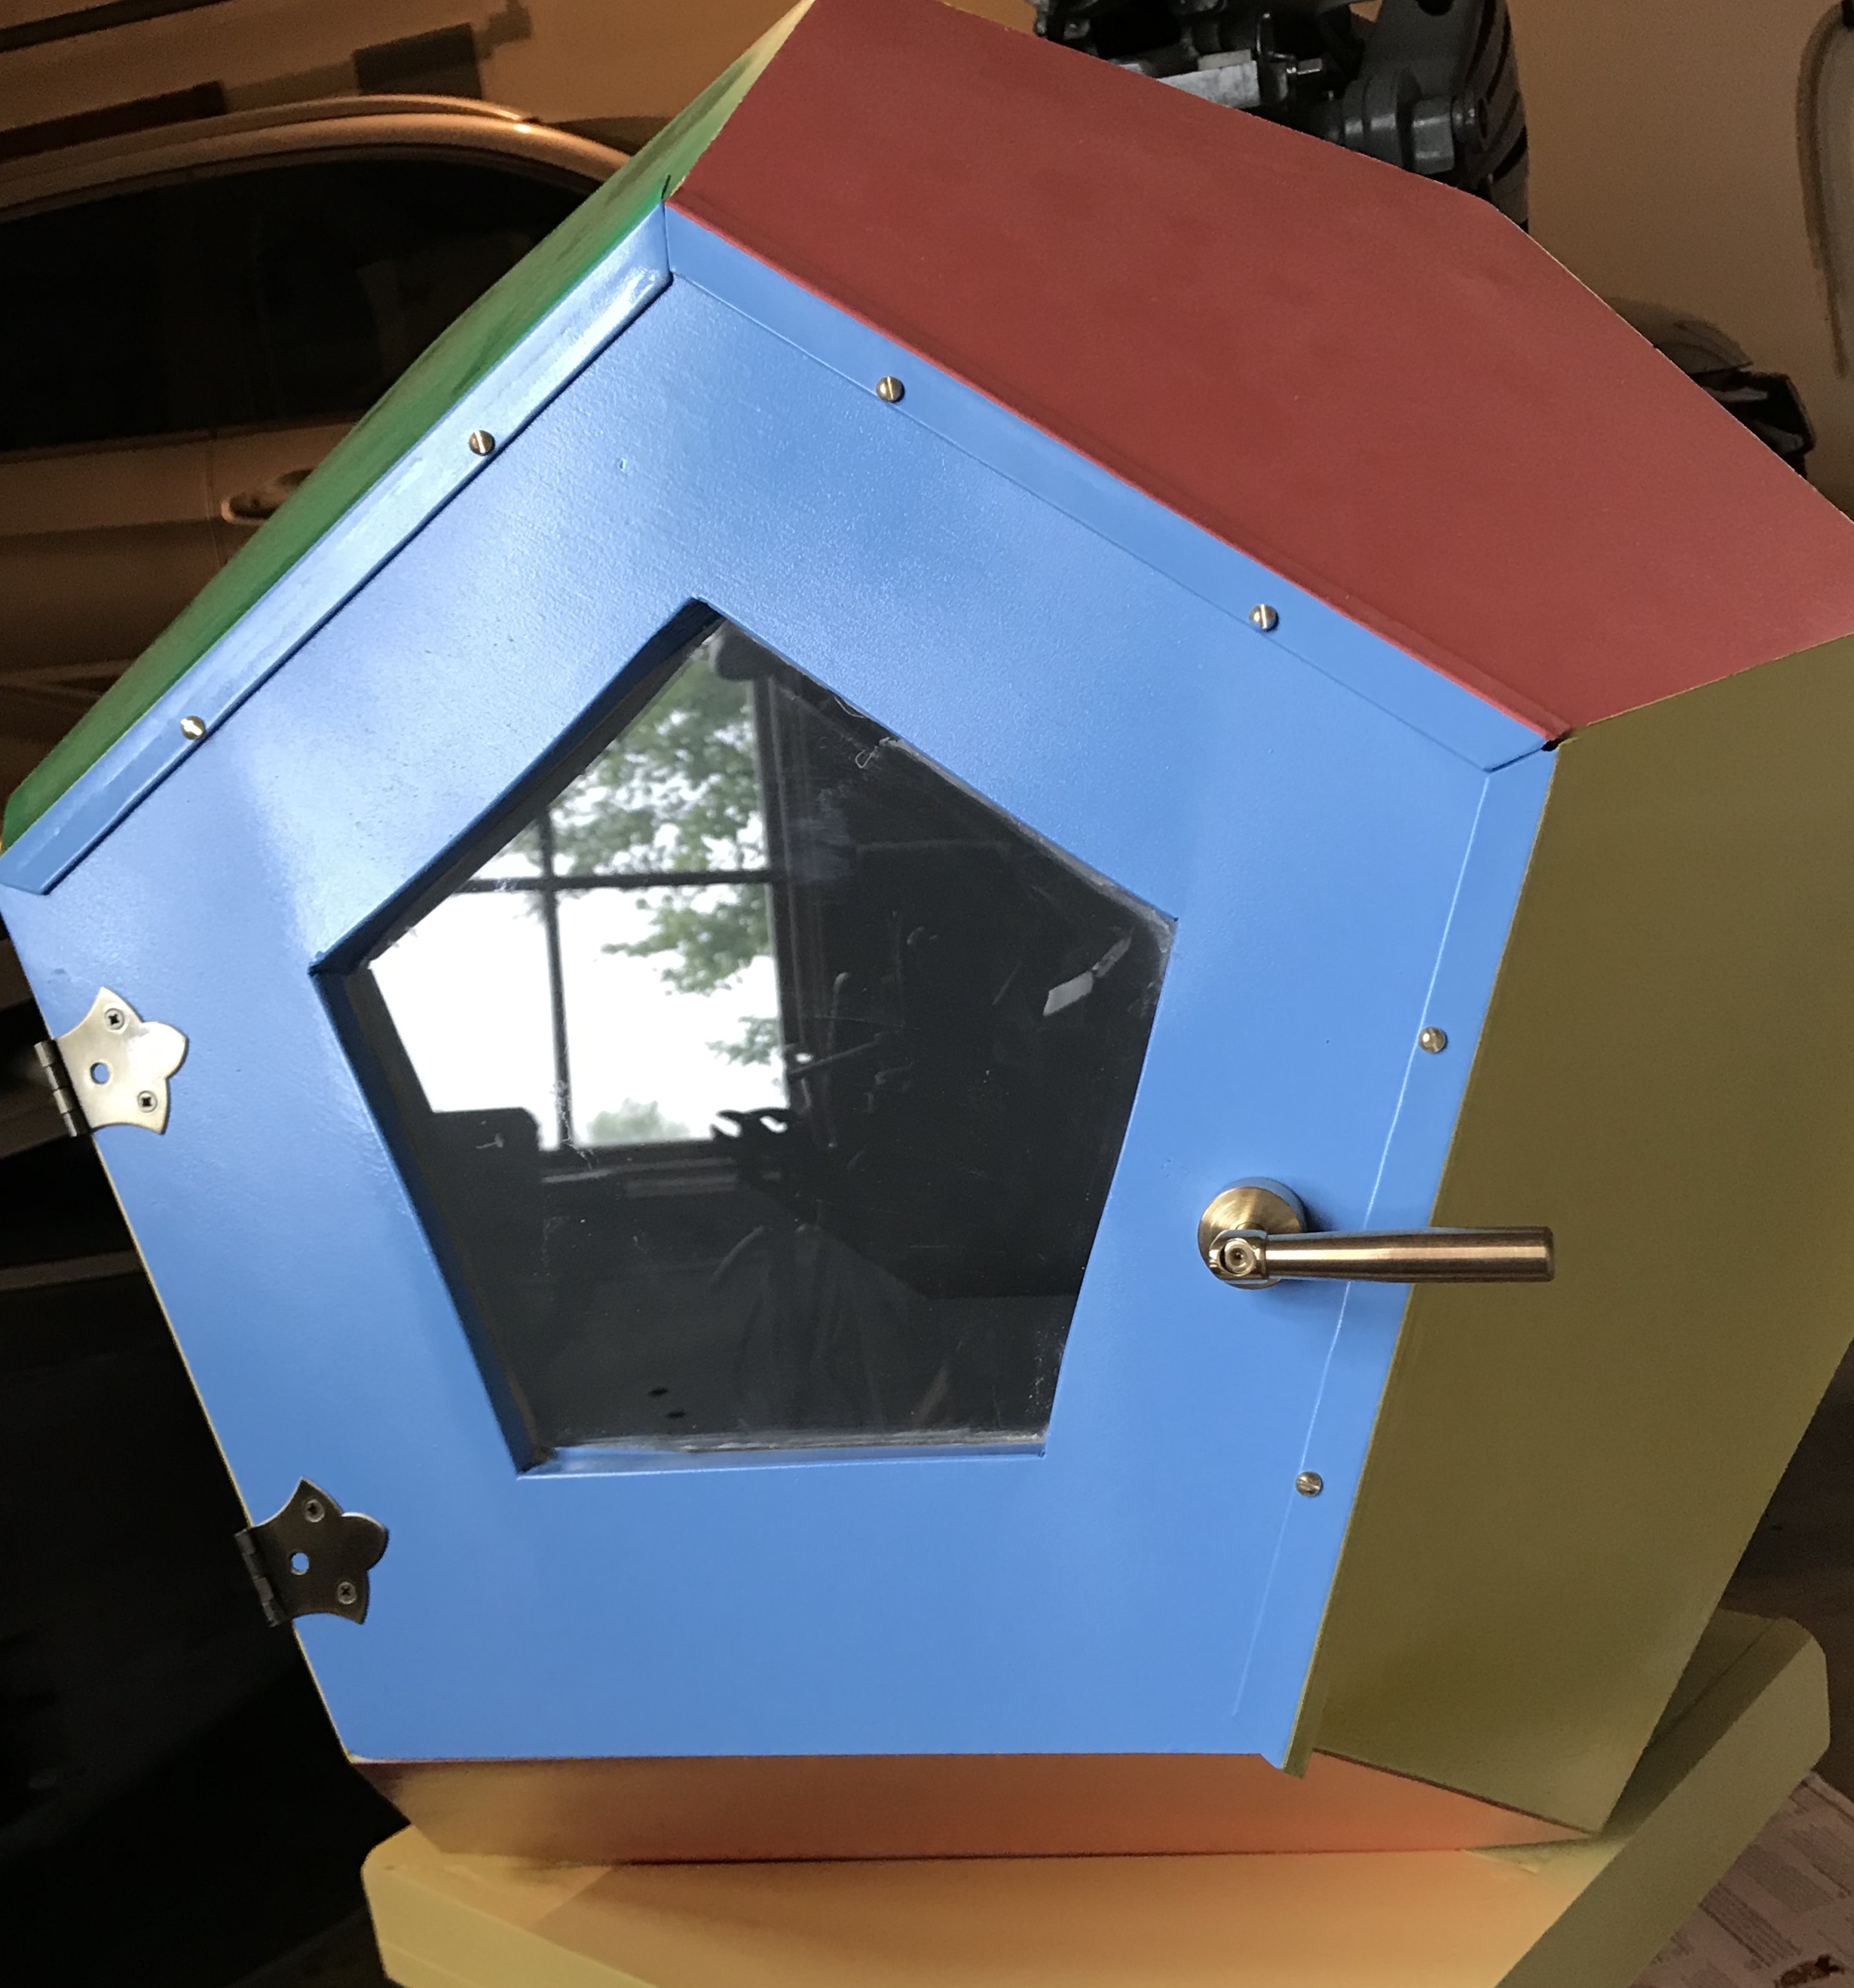
The door was mounted on the morning of May 19th only five days before we leave for Tulsa. The door handle was installed prior to mounting. The slot in the catch was filed at an angle to match the angle of the door latch. The handle latch was used to mark the inside of the right hand dodecahedron face for the catch. Using this mark the catch was attached just inside the door opening using carpet tape. The fit was checked and both the catch and the latch were adjusted slightly. Holes were then started through the catch with a drill. The catch was removed and the holes finished to depth. The catch was installed and the mechanism worked well. A length of weather stripping was temporarily placed behind one of the flashings. It does a nice job of sealing off the gap.
A dedication plaque was tackled while the door work was ongoing. A 4 1/8" X 2 5/8" piece of 1/16" brass was cut with a hacksaw, cleaned up in the mill, sanded (220 to 1500 grit), and polished (green polish on a cotton wheel) to a reasonable shine. The corners were also filed to a 45° angle. Four holes will need to be drilled for nails/screws to affix the plate to the top of the door (maybe?). (The bottom of the door will have the Little Free Library plaque.)
Cleaning up the edges of the brass in the mill was challenging. For the long edge that was cut with a hacksaw it was clamped vertically on the angle plate with machinist's clamps. The top edge was cut with a 3/8" end mill. There was tremendous chatter, so it was not cut to the line, but just until it was cleaned up all the way across. Clamping the plate on 1-2-3 blocks (two strap clamps through holes in the blocks) with minimal overhang and cutting with the side of the end mill reduced chatter substantially for the short end.
The new pulley was installed on the drill press and some effort was made to level the new pulley with the large pulley on which the vee belt was wound. The drill press is now significantly quieter. It was not a bad spindle after all!
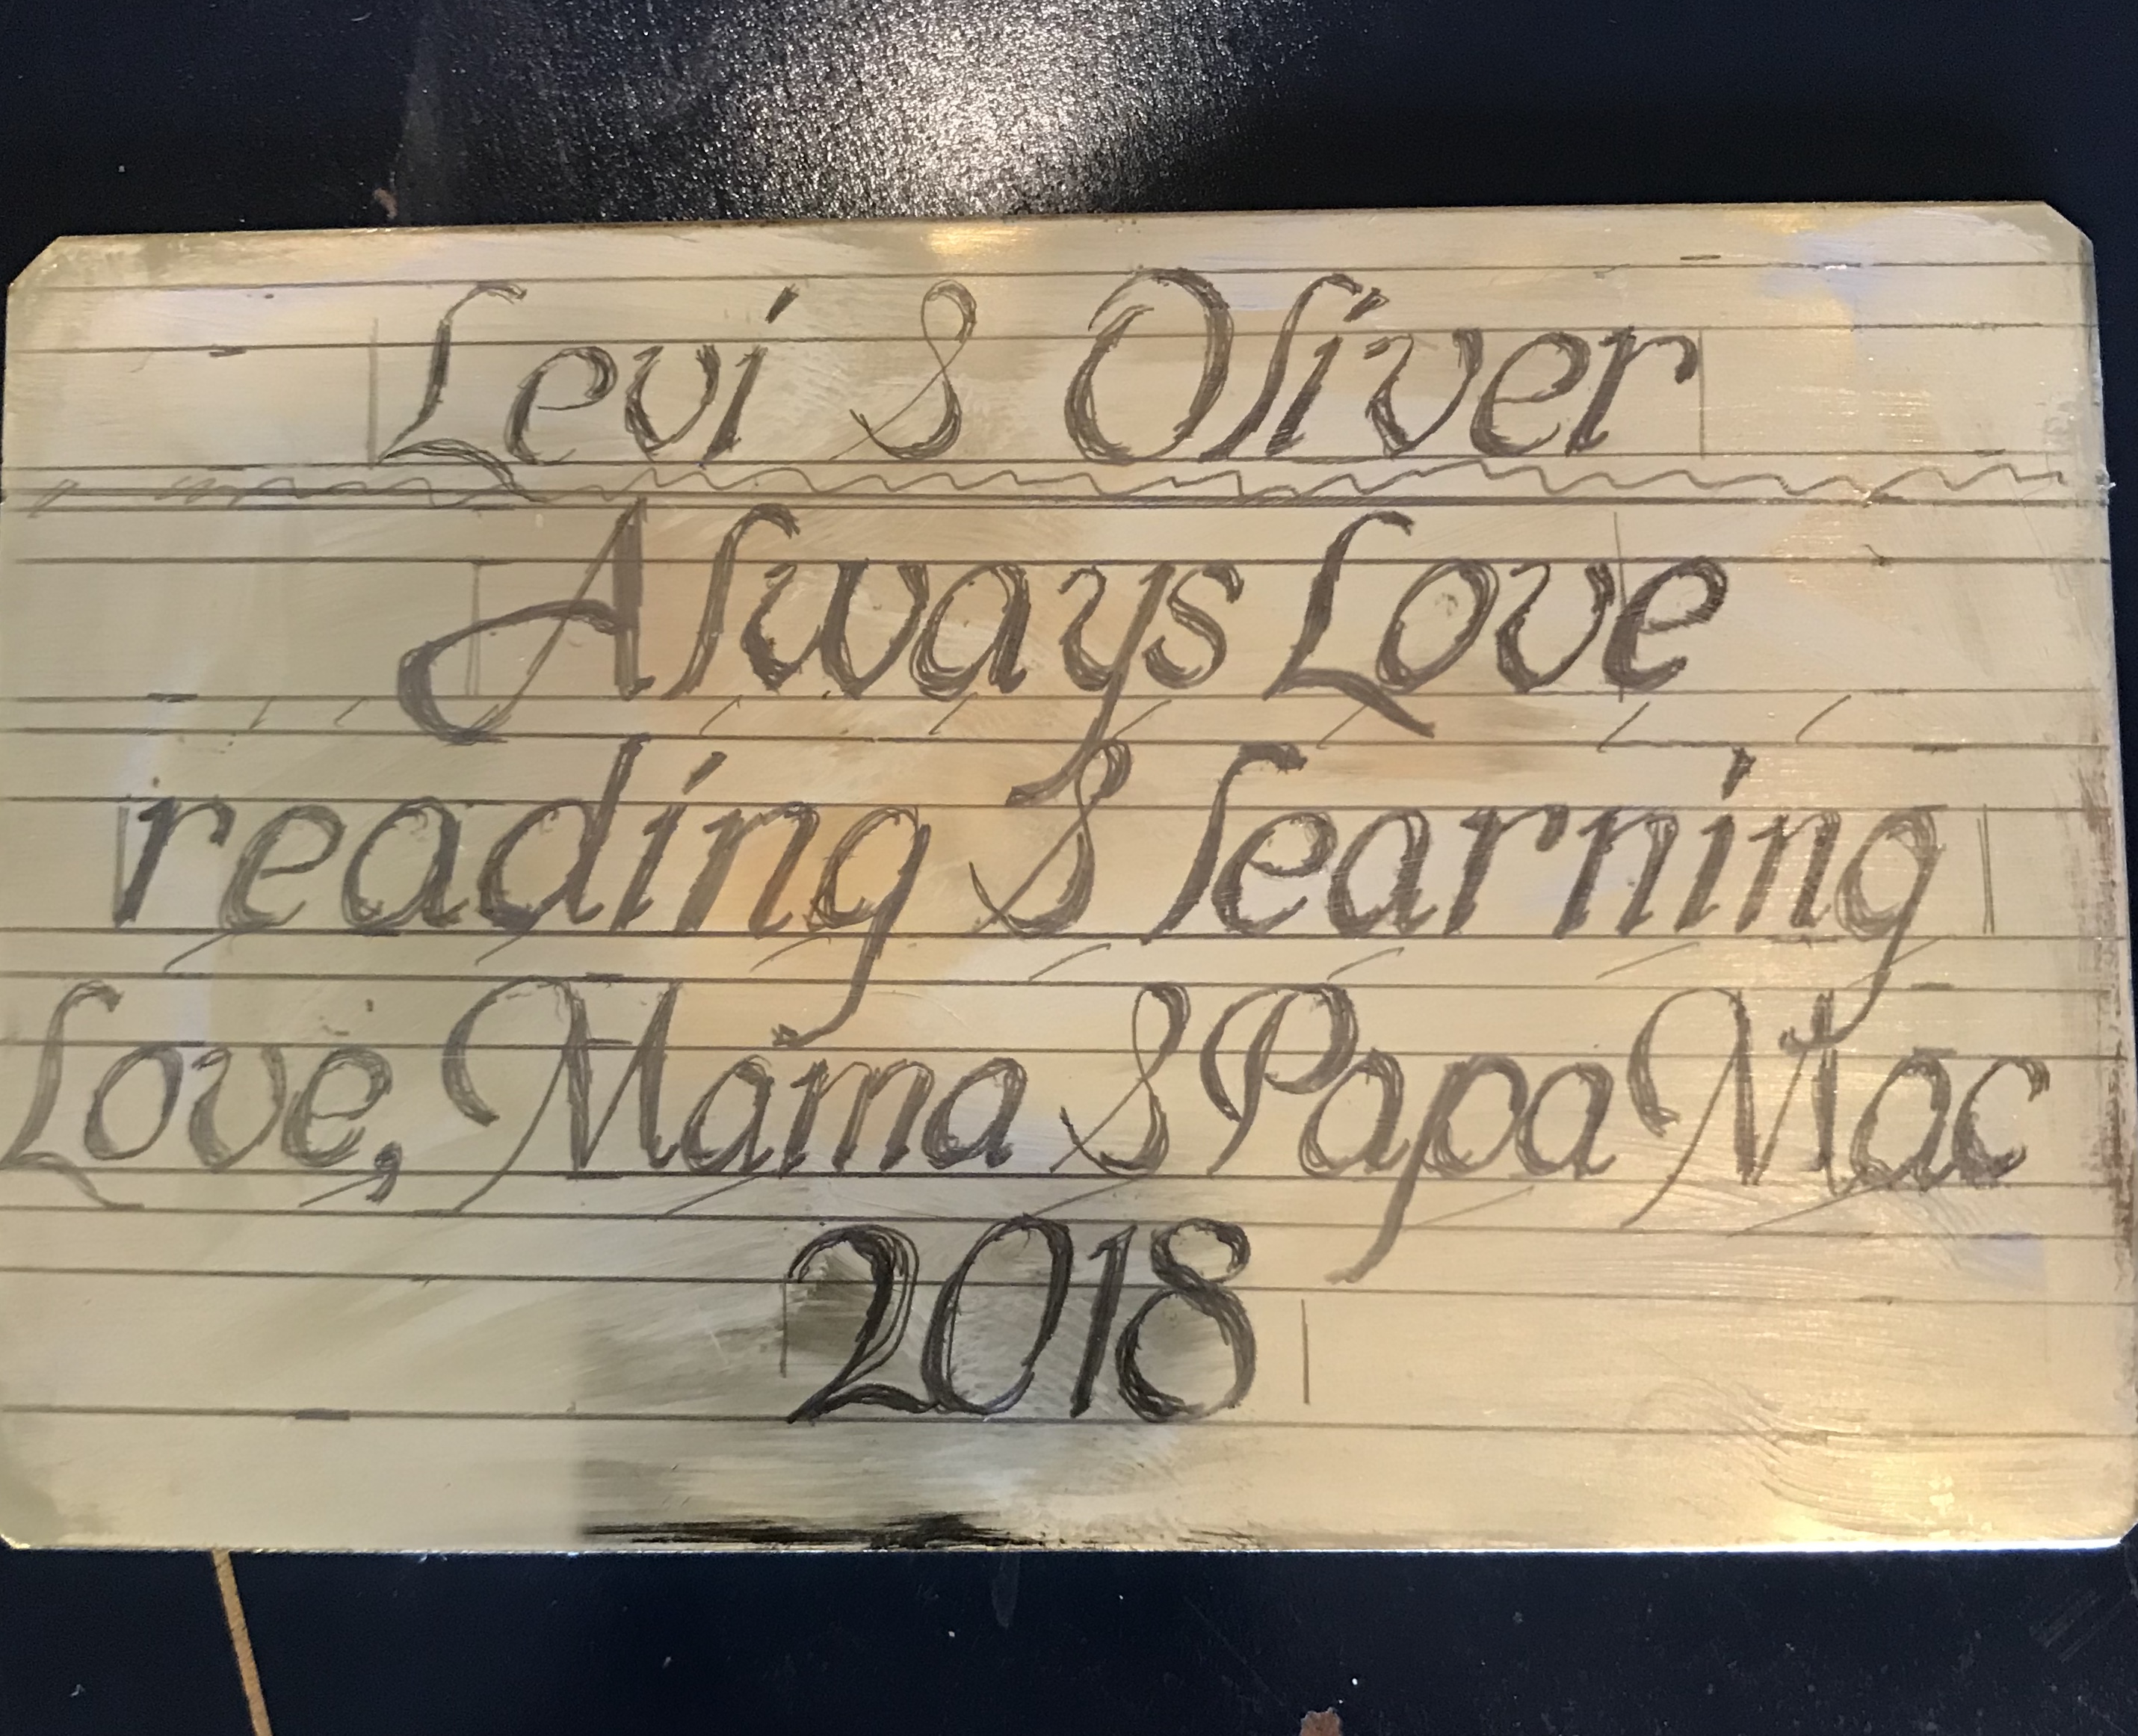
The following will be engraved on the dedication plate in Calileo font (see Reliquary for a picture of the fonts):
Levi & Oliver
Always love
reading & learning
Love, Mama & Papa Mac
2018
China white was rubbed on the plate with a little saliva. The lines for the text were marked out. About 1/8" was left for the top and bottom margins. Lines for the text were laid out 3/8" high with a gap of 3/32" between each line. The lower case text was sized at 2/3 of upper case or 1/4". After sketching out the text on paper some adjustments were made in the content. The line width was measured from the paper draft and marked on the plaque. The letters were then sketched in with pencil on the china white. This process took about 2 1/2 hours. A picture of this layout is shown below.
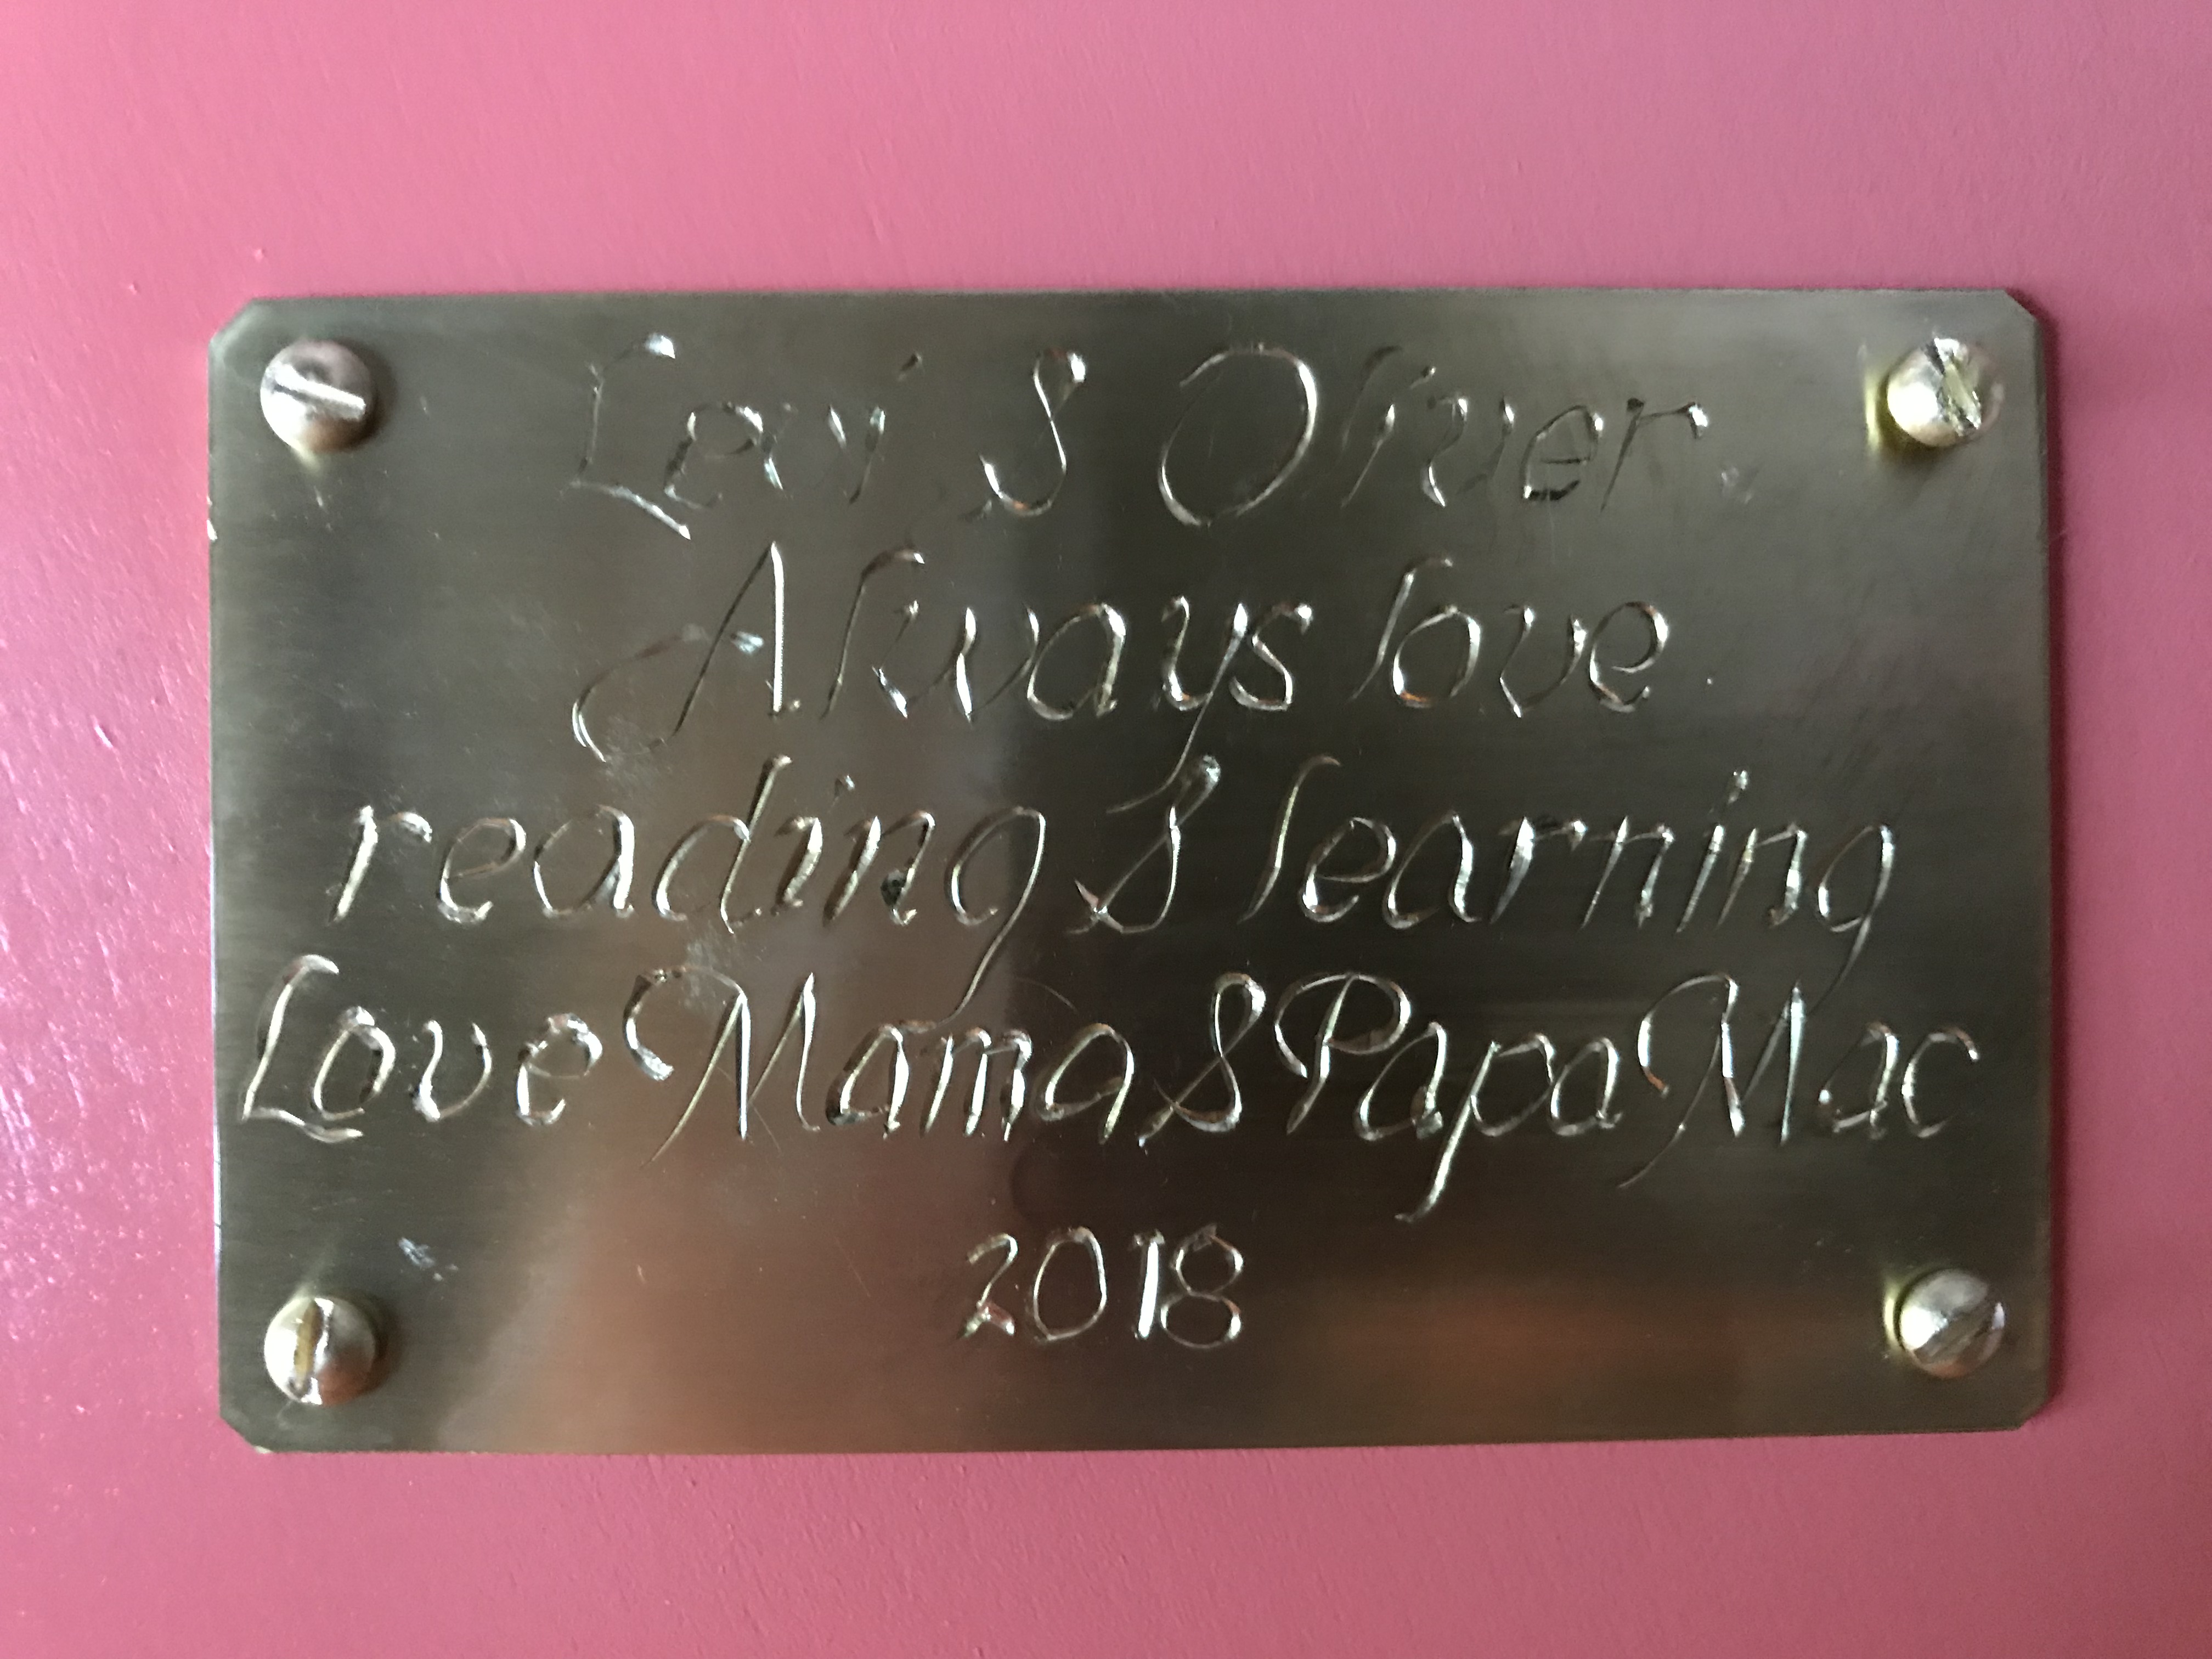
A 2 1/2" X 5" block of 3/4" plywood was found. After a bit of cleanup one side was covered with carpet tape. The brass plate was pressed onto the carpet tape. The text shown above was engraved on the brass. The only modifications from the picture above were typing the first "love" with the "l" in lower case and shrinking the "2018" to the height of lower case letters. The plaque was then sanded again with 320, 600, & 1500 grit paper. Did not polish it this time so as to not get anything in the letters. Holes (#29 drill: the screw was .135" diameter) were drilled in the corners for round head brass wood screws. The brass was cleaned up a final time and then sprayed with Rustoleum Painter's Touch clear gloss. The door handle parts were sprayed at the same time. Hopefully, this will minimize tarnishing for some time.
Well it is the Tuesday before we leave Thursday morning. Today is the day for completion. The first and simplest chore was attaching the plaque. This was put on the back or face opposite the door. Four holes were marked and drilled. The round head brass screws were used. Next was making a stop for the handle. This was fairly easy. A 1/4" brass rod was cut to about 1 3/4" and the ends were chamfered. Threads were cut on one end (1/4-28). A through hole was drilled through the plastic window and the hole into the wood was threaded for about 1/4". The stop was screwed in.
Attaching the post to the library base was quite the nightmare. First cutting the supports at 45° with a circular saw was not very successful. The best that could be done was moving two opposite supports up close to the base and leaving the other two supports about 1/4-3/8" off. All of the supports were at some angle to the base and not flat. Holes were countersunk for the 2" stainless screws and through drilled for the screws. Holes on the base were marked and then drilled for the threaded part of the screws. This required multiple attach/unattach sequences to complete all eight screws. Meanwhile keeping the post at the correct angle relative to the base with the dodecahedron wobbling on a bucket, was next to impossible. In the end it was completed and shims were inserted into the gaps. I think the base is pretty well aligned relative to the post.
The end of one of the flashings needed to be trimmed as it had been cut with the expectation of flashing along the bottom of the door, which was not needed. The weather stripping was then installed on the inside edges of the flashing. The weather stripping was installed in one continuous length to minimize water entry at the corners. The door shut reasonably well and the latch seemed to do a good job of pulling the door tight around the weather stripping. The only area of concern is the end just above the hinged side. It seems to catch upon closing. All of this work was done while the dodecahedron was laying on its side. Consequently, the door when opened would swing far enough to hit the adjacent face if not opened carefully. So a chain was installed to keep the door from opening too far. I am not sure the chain is strong enough to perform this job, so I may look for a better length of chain.
I did not yet add the "decorations" that were planned for the post supports. Five brass blade holders from a replaced ceiling fan were saved. These might look nice screwed to the outward faces of the supports. They will at least hide some of the attachment holes/screws. Attached these this morning. They could not be mounted on the supports because the angle left the tops out of alignment. Four were mounted on the post sides with #10-1 1/4" brass wood screws. All that is left is loading it in the car, driving to Tulsa, and planting it in the ground!